Beef, Dinner, Korean, Recipes

Korean Style Hamburger Patties

September 21, 2012

My recipe card says “Korean Buns.”  My mom used to make these for me and my friends when they would come over for a slumber party.  The name of this dish derives from the “Korean” ingredients my mom added to the ground beef that she spread thinly on split hot dog buns. The buns would be placed on a baking sheet and set under the broiler for a few minutes until the meat was cooked through and nicely browned.  These were the perfect slumber party snack.  My variation is to make mini patties which can be eaten with rice and Japanese pickles. Leftover patties make a satisfying bento lunch.

These patties pair perfectly with white rice.

I include water chestnuts in the patties which adds a nice crunch. They remind me of jicama adding texture to the patties without affecting the flavor of the other ingredients.

Diced water chestnuts

Form the meat into small patties and either fry or if time permits heat up the barbecue grill.

Japanese pickles (radish and cucumbers).

Korean Patties with watercress
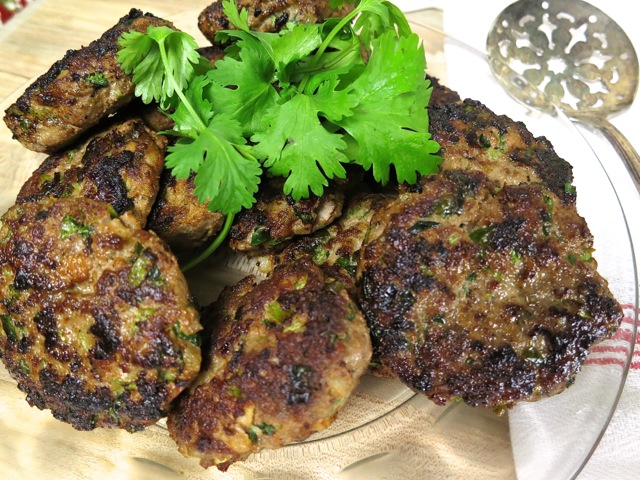
On another occasion I added a few handfuls of chopped watercress to the patties.  The watercress along with the water chestnuts add a pleasant crunch to these savory patties.

Korean Style Hamburger Patties

Ingredients

1 pound ground beef (I use lean ground sirloin)

1 tablespoon finely chopped onion

3 tablespoons finely chopped green onion

1 clove garlic, minced

1/2 cup finely chopped water chestnuts

3 1/2 tablespoons soy sauce

1 teaspoon sesame oil

1 heaping teaspoon sugar

1 whole egg

Preparation:

In a large mixing bowl add onion, green onion, garlic and water chestnuts to ground beef.  Mix gently with a fork to combine ingredients.  Add soy sauce, sesame oil, sugar and mix again.  Add whole egg and mix until all ingredients are distributed well.  Lightly form meat mixture into small patties (2 1/2 inch).

In a large non-stick fry pan heat 1 – 2 tablespoons of canola oil over medium high heat.  When the pan is hot, add half of the patties.  Fry for 3 minutes then flip patties over and fry for another 3 minutes or until nicely browned and cooked through (cooking time will depend on the size of your patties).  Repeat with the remaining patties.

They are especially delicious served with white or brown rice, Japanese pickles and Kabocha No Toroni (Kabocha squash simmered in rice wine and soy sauce).

***You may grill the patties however I prefer to pan-fry them which ensures they have a nice crust on them. And by all means, try the recipe the way my mom made it; spread meat mixture on split hot dog buns and finish under the broiler.

Potato Salad, Recipes, Salad, Side Dishes

Dilly Potato Salad with Whole Grain Mustard

September 17, 2012

Recently Bay Area Bites posted a recipe for potato salad and mentioned how this old favorite sometimes gets a bad rap because all too often it can be laden with mayonnaise. Stephanie Hua was inspired to make her own potato salad after she tasted one in New Orleans which didn’t seem too rich thanks to the generous amount of mustard used in the recipe.  In my version of her recipe I use Yukon Gold potatoes rather than red-skinned potatoes, less dill, and added chopped hard-boiled eggs to my salad.

With just a few simple ingredients you can quickly put together a really delicious potato salad in less than an hour.

Mayonnaise, Dijon, whole grain mustard.

Cut potatoes into 1 inch cubes.

Once the potatoes are cooked, mix them with some of the dressing, add diced hard-boiled eggs and more dressing.

Dilly Potato Salad with Whole Grain Mustard 

Adapted from Bay Area Bites ~ 6 servings

Ingredients

2 pounds Yukon Gold potatoes, peeled and cut into 1 inch cubes

2 eggs, hard-boiled and finely chopped

2 teaspoons white wine vinegar

3 scallions or 6 chives, finely chopped

2 + teaspoons of  finely chopped fresh dill or to taste

1/3 cup mayonnaise

1 1/2 tablespoons Dijon mustard

1 1/2 tablespoons whole grain mustard

Kosher salt and pepper to taste

Preparation

Place the eggs in a small pot and cover with water.  Bring to a boil over high heat then turn the heat down to medium.  Set your timer for 10 minutes and let the eggs simmer.  Drain the eggs and run under cold water.  Once cool enough to handle, peel and finely chop the eggs.  Set aside.

Place potatoes in a large pot of cold water and bring to a boil.  Turn the heat down to medium – medium high and cook the potatoes until they are tender when pierced with a fork, about 5 – 8 minutes. Drain the potatoes and place in a large  bowl.  Sprinkle the vinegar over the potatoes while still hot.  Sprinkle salt and pepper on the potatoes and toss gently.

Combine the mayonnaise and mustards and chop the dill and scallions or chives.  Once the potatoes are cool, add some of the dressing and all the herbs and toss with a spatula.  Add the chopped eggs, more dressing and mix gently.  If you prefer, you may add more mayonnaise and mustard to the potato salad.  Season to taste with salt and pepper.

Serve immediately or chill in the refrigerator for a few hours or overnight.

Gardening

These Peppers are Hot!

September 13, 2012


These little beauties are Hawaiian chili peppers.  Our friend Venus brought us some homemade pickled onions one day.  They were crunchy and spicy and we gobbled them up. I was determined to make a batch of these tasty pickled onions so I went searching for the peppers and finally found them at a small family run grocery store in Kahului. Many people in Hawaii grow these peppers in their gardens and they are so attractive don’t you agree?  Thanks to Venus who later brought us our own Hawaiian chili pepper plant, we now have our own supply whenever we feel like making those delicious pickled onions.

Pickled Maui onions with Hawaiian chili peppers.

We also have jalapeño peppers in the garden which we use to make jalapeño nacho rings and jalapeño/tomatillo hot sauce.

Roasted jalapeño/tomatillo hot sauce.

Chicken, Dinner, Recipes

Deviled Fried Chicken

September 11, 2012

Fried chicken.  It is irresistible.  The Epicurious web site mentions that deviled is a southern term for a dish that is highly seasoned.   With both black and cayenne pepper, this recipe is just that.  The original recipe calls for a whole chicken cut into 8 pieces with the skin removed however I prefer to use chicken tenders.

In a 1-gallon resealable plastic bag pour marinade over chicken tenders and refrigerator for 4 hours. Instead of buying a carton of buttermilk, I add 1 tablespoon of fresh lemon juice (you can also use white vinegar) to a glass measuring cup and enough milk to reach the 1 cup line. Let it stand for 10 minutes before using in the recipe then give it a quick stir.

Toss the flour mixture in a 13 x 9 x 2 inch glass dish.

Add marinated chicken to flour mixture, turn to coat. Let sit in mixture for 15 minutes, turning occasionally to re-coat chicken tenders. The original recipe calls for deep-frying but I found that it’s not necessary when using chicken tenders which are small, boneless and all about the same size. They cook quickly in less oil.

Deviled Fried Chicken

Adapted from Epicurious

Ingredients for Marinade

12 chicken tenders

1 cup buttermilk or substitute as described above

2 tablespoons Dijon mustard

1/2 teaspoon salt

1/2 teaspoon dry mustard such as Coleman’s

1/3 teaspoon cayenne pepper

1/2 teaspoon freshly ground black pepper

1 teaspoon onion powder

canola oil for frying

Flour Mixture

1 1/2 cups flour

1 1/2 teaspoons baking powder

1 teaspoon onion powder

1 1/2 teaspoons salt

1 1/2 teaspoons dry mustard

1 teaspoon garlic powder

1 teaspoon cayenne pepper

1/2 teaspoon freshly ground black pepper

Preparation

Mix buttermilk, Dijon, salt, dry mustard, cayenne pepper, freshly ground black pepper and onion powder in a two cup Pyrex measuring cup or a bowl.  Pour marinade into a 1-gallon resealable plastic bag and add chicken tenders.  Marinate in the refrigerator for 4 hours.

In a large glass baking dish (13 x 9 x 2 Pyrex works well) combine flour, baking powder, onion powder, salt, dry mustard, garlic powder, cayenne pepper and freshly ground black pepper.

With marinade still clinging to chicken pieces, place each piece into flour mixture.  Let sit for a minute then turn pieces over to coat the other side.  Let chicken stand in flour mixture for 15 minutes, turning several times to coat thickly.

Pour enough oil to reach 1/4 inch up the side of a 12 inch high-sided skillet.  Heat on medium high.  When the oil is hot, add half of the chicken tenders.  Cook the chicken tenders until nicely browned on one side, about 2 minutes.  Turn the chicken over and continue to fry another two minutes.  Repeat with the remaining chicken tenders adding extra oil to the pan if needed.

This fried chicken is best served right away.  Leftovers make a delicious sandwich topped with coleslaw in a crunchy torpedo roll.  If you have time place fried chicken on a foil lined baking pan and heat in your toaster oven for a few minutes to crisp up the coating.

Mexican, Pork, Recipes

Pork Chile Verde

September 7, 2012

Chile Verde is a dish you want to cook on the weekend when you’re puttering around the house and have a few (5) hours to spare.  It’s not that you’ll be standing over the stove the entire 5 hours.  In fact 4  of the 5 hours is allotted for simmering the green chile stew.  You will be ever so happy that you decided to make it.

Tomatillos are part of the nightshade family (tomatoes, peppers, eggplant) little green orbs tucked inside papery husks.  I lucked out and was able to find all the ingredients for this dish at one store; Foodland in Kahului.  Mahalo Foodland.

Cut the tomatillos and peppers in half and turn the broiler on.

Once the peppers cool peel off their skin.

Place roasted tomatillos in a bowl to cool slightly.


I prefer to trim off as much of the fat as I can which eliminates having to spoon it off later as the stew simmers.

Brown pork in three batches.


Pork Chile Verde

Ingredients

4 1/2 pounds pork butt trimmed well and cut into 1 1/2 inch cubes

2 teaspoons dried oregano

2 teaspoons cumin

2 teaspoons kosher salt

1 tablespoon flour

1 1/2 pounds tomatillos

2 poblano peppers

1 large Anaheim pepper

1 serano or jalapeño pepper

1 large onion (about 2 cups finely diced)

3 garlic cloves minced

2 1/2 cups chicken broth

1/2 cup chopped cilantro

4 oz. can of Ortega diced jalapeños (optional)

Preparation

Trim pork well and cut into 1 1/2 inch cubes.  Place pork in a large bowl and sprinkle on oregano, cumin and salt and mix to coat pieces of pork.  Add flour and mix again distributing seasonings and flour evenly.  Cover and refrigerate until ready to use.

Remove the papery husk from the tomatillos and rinse well.  Slice tomatillos in half and place cut side down on a large baking sheet (line pan with heavy-duty foil for easy clean up).  Wearing disposable gloves cut the peppers in half and remove their seeds.  The poblanos are a bit larger than the other peppers so cut these in quarters.  Place all the peppers cut side down on the baking sheet with the tomatillos.

Place the baking sheet on the highest rack of your oven or about 4 inches below the heating element.  Broil until the tomatillos and peppers are charred.  I find that the tomatillos are ready prior to the peppers so I remove them with tongs and place them in a bowl to cool slightly.  It will typically take about 10 minutes before the peppers are ready, watch closely removing pepper pieces as they become blistered.  Let peppers cool slightly then remove their skin.

Place tomatillos in a food processor.  Coarsely chop peppers and add to the tomatillos.  Pulse until blended but still a bit chunky. Set aside.

In a large dutch oven (I use a 5 1/2 quart Le Creuset Dutch oven) add a tablespoon of canola oil and heat on medium.  Add diced onions and garlic and sauté until tender, about 8 minutes. Remove the onions and garlic and place in a small bowl.

Add more oil to the pan and sear pork in 3 batches until browned on two sides but not cooked through.  Once you add the pork to your pan, leave it alone for about 5 minutes without turning so that it has time to form a nice crust.  If you attempt to turn the pieces over too early you will notice they will stick to the pan.  Wait a few minutes and when the pork is ready you will be able to easily turn them without resistance.  Remove browned pork to a bowl as you continue with the other batches adding additional oil as needed.

Add broth to the pan and scrape the bottom to release browned bits.  Add pork, onions and garlic, tomatillo and pepper mixture back to the pan.  Cover and simmer for about 2 hours, checking the heat occasionally.  Continue to simmer for approximately one more hour.

Remove the cover from pan and continue to simmer for another 1/2 hour.  Add cilantro and additional salt.  The chile verde is ready when the pork is fork tender.  Total simmering time is approximately 4 hours.

***If  you prefer more heat, roast additional serano or jalapeño peppers.  Sometimes I add a small can of Ortega diced jalapeños to the stew at the same time I am adding the cilantro if I want a little extra kick.

The chile verde is delicious served with rice and beans or in a soft flour tortilla.  Leftovers freeze well for a quick dinner on a busy work day.

Pasta, Recipes, Side Dishes

End of Summer Pasta Salad

September 3, 2012

I’m not sure why I chose the title “End of Summer Pasta Salad.”  Maybe it’s because the stores are selling school supplies up and down the aisles and the beaches seem to be a bit less crowded.  It’s certainly not because there’s much change in the weather here in Hawaii.  Here is our nightly weather forecast: “Expect mostly sunny days with a few passing showers in the mauka (mountain) areas, high temperatures in the mid 80s.”  Maybe I should call it Endless Summer Pasta Salad.

In the past I bought the crumbled feta you commonly find in most refrigerated grocery shelves not knowing any better until I read Cook’s Illustrated review on feta cheese.  Mt. Vikos was rated well and I was able to find it at our local health food store.  What a difference.  This feta is made from sheep and goat’s milk and is not overly salty yet very flavorful.

All kinds of ingredients can be added to a pasta salad.  Sometimes I’ll use small white beans, marinated artichoke hearts, broccoli florets or fresh corn.  Today I used conchiglie pasta (shells), grape tomatoes, olives, lite salami, feta, spinach and basil.  Other pasta shapes work well such as farfalle (bow tie), fusilli (corkscrew), rotini (spirals).  The shells are rather attractive, the olives and tomatoes are nearly the same size as the pasta and all the tasty ingredients find their way into the nooks and crannies of the pasta. Those beautiful green olives are Castelvetrano Sicilian olives that are buttery and assertive without being bitter.  They add a distinctive flavor to the pasta salad.  You can find them at the olive bar at Whole Foods, pitted or not.

After you drain your pasta, place a couple of paper towels in a large, wide bowl and pour the pasta in the bowl.  Let it sit for a couple of minutes and the paper towels will soak up the excess water.  Giving it a shake or two also helps to dry the pasta.

Toss your pasta ingredients in a large bowl with fresh herb vinaigrette.  Add the spinach just before serving the salad.

End of Summer Pasta Salad

The measurements for the pasta, tomatoes and olives can be adjusted to your liking.  If you want to prepare a smaller portion use just two cups of uncooked pasta and fewer tomatoes and olives.  The fresh basil, feta and herb vinaigrette really add that je ne sais quoi to the salad.

Ingredients

3 cups uncooked pasta

20 grape tomatoes, halved

3/4 cup olives, halved

salami cut into thin strips

feta cheese, crumbled

fresh basil, julienned

baby spinach leaves

fresh herb vinaigrette

Preparation

Cook the pasta in a large pot of boiling salted water for the suggested cooking time noted on the box.

Drain pasta, run under cool water to stop the cooking.  Place a few paper towels on the bottom of a large, wide bowl.  Pour your well-drained pasta into the bowl and let the paper towels absorb the excess water.  Set aside while you prepare the salad ingredients.

Slice the tomatoes and olives in half and cut the salami into thin strips, about 1 inch in length.  Crumble the feta cheese and julienne the basil leaves.

Remove the paper towels from the bowl and season the pasta well with salt and freshly ground pepper.  Add the tomatoes, olives, salami, feta and basil.  Give everything a quick stir, then add your vinaigrette by the tablespoonful until the salad is nicely dressed.  Just before serving, toss in the spinach leaves and give the salad one more quick stir adding more salt and pepper if necessary.

Leftover pasta salad keeps well in the refrigerator for a day or so.  The pasta will absorb most of the dressing so you might choose to add just a little more the next day.  If I’m not serving the entire salad at one time, I’ll add just enough spinach for that  portion and add more as I eat my way through the entire bowl.  Molto delizioso!

Follow

Get every new post delivered to your Inbox

Join other followers: