Appetizers, Breakfast, Dinner, Lactose Free, Pork, Recipes, Rice Dishes

Spam Musubi

August 12, 2015

It’s true.  Every now and then I eat Spam.  Phew!  Now that I got that out-of-the-way, let’s move on to my latest Spam preparation:  The beloved Spam musubi.  Found at local convenience stores, airports, and mom and pop stores, Spam musubi is a tasty snack that travels well in your bag, backpack, and even fits snugly in your pocket.  It’s an island favorite.

Spam & Musubi Presses

I have a good laugh every time I see the little man on the Spam can announcing “Glorious Spam!”

If you live near a Nijiya Japanese market, I recommend buying this nori.  It is not expensive and it’s a good nori for Spam musubi as well as maki sushi rolls.

Favorite Furikake

There’s a large variety of furikake at the markets.  Salmon, shiso, wasabi, and more.  I favor the simple combination of nori flakes with black and white roasted sesame seeds.  It’s perfect for Spam musubi.

Fried Spam

Slice the Spam into eight pieces.  Fry the Spam for a few minutes on each side until lightly browned.

Seasoned Spam

Add your soy sauce mixture and turn the Spam over and over in the sauce to coat well.  This will take just a minute.

Ready for Musubi!

Perfectly cooked Spam and seasoned Spam.

Making Spam Musubi

Making Spam musubi is quick and easy.  Cook the rice, pan fry the Spam, put it all together, press, eat.

Making Spam Musubi

I bookmarked this recipe from Serious Eats  years ago and finally got around to making it.  Not all Spam musubis are alike.  This one is a winner.

Spam Musubi

Recipe updated 7/28/23 to make 8 Spam musubi (originally 6)

Spam Musubi
 
Quick and easy snack that packs and travels well. Adapted from Kathy Chan's recipe/Serious Eats blog.
Author:
Cuisine: Hawaiian-Style
Ingredients
  • 3 cups short grain or medium grain white rice, cooked according to package directions
  • 1 can original or 25% less sodium Spam
  • 3 tablespoons brown sugar
  • 3 tablespoons less sodium soy sauce (Kikkoman recommended)
  • 4 pieces sushi nori, cut in half lengthwise to make 8 pieces
  • furikake
Preparation
  1. Slice Spam into 8 equal sized pieces (slice across the longest portion of Spam)
  2. Mix together brown sugar and soy sauce, set aside.
  3. Fry Spam on medium-high heat for a few minutes on each side, or until lightly browned. Turn heat down to medium-low, add brown sugar and soy sauce mixture and turn Spam over a few times to coat well. If the pan seems too hot, take it off the burner for a few seconds. You want the soy sauce mixture to caramelize a bit and coat the Spam nicely (watch closely so that it doesn't burn). Remove Spam to a plate to cool.
  4. Lay a piece of nori on a clean work surface. Place musubi shaper on top of the nori (in the center). Scoop enough rice into the musubi shaper to make a thin layer. Press the rice firmly with the musubi compressor. Sprinkle furikake over the rice, add a piece of Spam, more furikake, and lastly, more rice. Press firmly using the musubi compressor. You want the musubi to hold together when you eat it. To remove Spam musubi, hold the shaper and lift it up as you continue to press down on the musubi. Gently remove the compressor (if the rice sticks a bit loosen it with a butter knife). Wrap the nori around the musubi tightly.  You may need to trim a bit of the nori if it's too long.
  5. Serve right away or wrap and pack for a mid-morning or afternoon snack.

Breakfast, Eggs, Lactose Free, Recipes

Cream Cheese & Chive Scrambled Eggs

August 4, 2015

Cream Cheese & Chive Scrambled Eggs with Fried Potatoes, Bacon & ToastCream cheese adds richness to these scrambled eggs without altering the flavor of the  eggs.  Luckily for us, our neighbors Judy and John who have three chickens, deliver beautiful, fresh, eggs to our front door.

Neighbor Judy's Fresh EggsJudy writes the date on each egg so that you use them in the correct order.  Brilliant!

Neighbor Judy's Fresh Eggs

Lactose Free Cream CheeseThese days there are more and more lactose free products available, such as this delicious cream cheese.  Green Valley Organics also makes lactose free sour cream and yogurt.  All of their products are superb.

Chopped Chives

Soft Scrambled EggsKeep the heat low throughout the cooking time of your scrambled eggs.  Stir occasionally with a soft spatula.

Cream Cheese & Chives Scrambled EggsOnce the eggs have set a bit, fold in dollops of cream cheese and most of the chives to the eggs.  Keep stirring.

Cream Cheese & Chives Scrambled EggsThe eggs are almost ready to serve.  It’s your decision when to remove the eggs from the pan.  Some prefer very soft, runny, eggs, others like me prefer them to be just a bit more firm.  By the way, these scrambled eggs are delicious piled on buttered toast.

Cream Cheese & Chives Scrambled Eggs on Toast

Cream Cheese & Chive Scrambled Eggs
 
Author:
Recipe type: Breakfast
Serves: 2
Ingredients
  • 4 - 5 eggs (Mine varied in size so I used 5. If using large or extra-large eggs use 4)
  • 1 tablespoon Earth Balance Buttery Spread (or butter)
  • 2 tablespoons Green Valley Organics lactose free cream cheese (or regular cream cheese)
  • 1 tablespoon finely chopped chives
  • ¼ teaspoon salt
  • freshly ground black pepper
Preparation
  1. Place a medium-sized skillet over medium-low heat. Add 1 tablespoon Earth Balance Buttery Spread (or butter).
  2. Crack eggs into a medium bowl and whisk well. Add salt and a few grinds of pepper to the eggs. Pour eggs into skillet, stirring occasionally. Keep stirring until the eggs have set just a bit. Add dollops of cream cheese and most of the chives and fold into the eggs gently. Continue cooking until the eggs are as soft or firm as you like them. Transfer to a plate and sprinkle with reserved chives.


Dessert, Fruit, Lactose Free, Recipes

Coconut Pineapple Bread

July 25, 2015

Coconut Pineapple BreadI bought a beautiful, sweet, pineapple (that most versatile fruit) at Costco to use in a batch of mango-pineapple jam.  It was so large there was quite a bit of fruit left after making the jam.  Hmmm.  What could I make with the rest of the fruit?  Dessert immediately came to mind.  I did a quick search on-line to get some ideas and ended up with this delightful coconut pineapple bread from Maria and Josh’s blog Two Peas & Their Pod.  The coconut scattered over the top of the batter bakes up into a beautiful golden brown toasted coconut crust.

Toasted Coconut

Coconut Pineapple BreadThough this coconut pineapple bread is baked in a loaf pan I think of it more as a cake than bread.  It’s divine.

Coconut Pineapple Bread

Coconut Pineapple Bread

Adapted from Two Peas & Their Pod

Ingredients

1 1/2 cups sweetened shredded coconut

1/2 cup Earth Balance Buttery Sticks (or unsalted butter) at room temperature

1 1/2 cups all-purpose flour

1/2 teaspoon baking soda

1/4 teaspoon kosher salt (1/2 teaspoon if using unsalted butter)

1 cup granulated sugar

3 large eggs

3/4 cup sour cream (I used Green Valley lactose free sour cream)

2 cups fresh pineapple cubes (small dice)

Preparation

Preheat oven to 350°F.  Butter a 9×5-inch loaf pan and set aside.

Spread 1 cup shredded coconut on a foil lined baking sheet.  Bake until lightly toasted, tossing occasionally, about 6 minutes.  Watch closely so the coconut does not burn (edges tend to brown quickly).  Set toasted coconut aside.

In a medium bowl, whisk together the flour, baking soda, and salt.

In the bowl of a stand mixer, beat the butter and sugar on medium speed until light and fluffy.  Add eggs, one at a time, beating well after each addition.  Reduce speed to low, and alternately add flour mixture in three parts and sour cream in two, beginning and ending with the flour mixture.  Mix just until combined. If you don’t have a stand mixer you can substitute it with a hand mixer.

Using a rubber spatula, fold pineapple and toasted coconut into the batter.  Pour batter into prepared pan and smooth top.  Sprinkle with remaining 1/2 cup coconut.

Bake until a toothpick inserted in the center comes out clean, about 60 minutes (cover pan with foil after baking for 35 – 40 minutes so the coconut on top of the bread doesn’t burn).

Remove bread from oven and let cool in pan for at least 30 minutes.  Remove from pan and transfer to a wire rack to cool completely.  Slice and serve!


Dinner, Lactose Free, Recipes, Rice Dishes, Salad, Side Dishes, Tofu, Vegan, Vegetarian, Veggies

Glory Bowl Salad

July 18, 2015

Glory Bowl SaladI bumped into a friend of ours, Lisa Tamaki, with whom I have a shared interest in cooking as well as home canning.  She told me about a new salad recipe she thought I would enjoy.  The dressing has nutritional yeast in it, one of my favorite foods. Lisa’s enthusiasm about the “Glory Bowl Salad” (named for a top ski bowl in Canada) made me eager to try it out right away. Thank you, thank you!

Cucumber, Carrot, Edamame, Snap Peas, Red CabbageThe original recipe comes from Shelley Adams who once owned Whitewater Ski Resort in Canada.  This salad is one of her most requested recipes.  Rachel also posted Sami’s version of this delicious salad.  I followed her suggestion of seasoning the tofu with sesame oil and soy sauce before baking and it adds a wonderful flavor to the tofu. You can use almost any vegetables you want to in this salad.  I opted for colorful red cabbage, crunchy snap peas, cucumbers, carrots and edamame.  Don’t skip the toasted almonds.  They are super in this salad.  The dressing has a fantastic umami flavor due to the generous amount of nutritional yeast and soy sauce, so good you’ll be looking for things to pour it on once your salad is long gone.

TofuXpressI use my TofuXpress often.  It presses out the water quickly.   No more wasting paper towels!

Extra Firm Tofu

Baked TofuIt’s best to serve the baked tofu once cooled, however, you may bake it in advance and refrigerate it until ready to use.  The texture won’t be quite the same (it softens once refrigerated) but it will still taste delicious. Just bring it to room temperature before serving.

Glory Bowl Salad

Glory Bowl Salad

Adapted from Whitewater Cooks & The Conscious Dietician blog

Two generous salad bowl servings and 1 cup dressing

Ingredients

Salad Bowl:

1 cup short or medium grain brown rice

1/3 cup toasted slivered almonds (bake in toaster oven at 300° for about 5 minutes – watch so they do not burn)

1 package (14 ounce) extra firm tofu (Wildwood recommended) water pressed out

2 teaspoons sesame oil

2 tablespoons soy sauce

2 ounces sliced cucumber

1 ounce shredded carrot

1/3 cup cooked edamame

3 ounces snap peas

1 ounce shredded red cabbage

roasted black sesame seeds – optional

Dressing:

1/4 cup + 2 tablespoons nutritional yeast

3 tablespoons water

3 tablespoons soy sauce

3 tablespoons apple cider vinegar

1 clove garlic, crushed

1 1/2 tablespoons tahini paste

1/4 cup extra virgin olive oil

1/4 cup canola oil

freshly ground black pepper

Cook brown rice according to package directions.  Set aside.

Toast slivered almonds for a few minutes to crisp up.

Press out water from tofu using the TofuXpress or a clean dish towel or paper towels (weighted down).  Cut tofu into rectangles about 1/2 inch thick.  Combine sesame oil and soy sauce in a small bowl. Brush mixture over tofu slices, or toss to coat well.  Place tofu on a foil lined baking sheet and bake at 350°F for 25 minutes (I use my toaster oven).

Using an immersion blender combine nutritional yeast, water, soy sauce, apple cider vinegar, garlic, tahini paste, extra virgin olive oil, and canola oil.  Or whisk by hand until all of the ingredients are well incorporated. Season to taste with freshly ground black pepper.

Assemble your salad by placing the rice on the bottom of your bowl, adding the vegetables and tofu over the rice. Drizzle a generous amount of the dressing over the salad.  Sprinkle toasted almonds and roasted sesame seeds over the top and serve with extra dressing.


Dessert, Lactose Free, Recipes

Chewy Fudgy Homemade Brownies

July 10, 2015

Chewy Fudgy Homemade BrowniesI’m still on the “Brownie Quest,” searching for the perfect brownie.  These may be that perfect brownie. Besides the eight ounces of melted chocolate, there’s a cup of chocolate chips stirred into the batter.  As the brownies bake, the little chocolate nuggets melt perfectly and become pure decadence in every bite.

Melted Chocolaty BrowniesThe recipe comes from Sally’s blog.  I love the idea of a somewhat chewy brownie.  The baking time is a bit forgiving, due to all the chocolate in the recipe.  If you take the pan out of the oven just as soon as the brownies are set, you’ll have softer brownies (above) but leave them in for a few more minutes, they’ll become a bit chewier (below).  Either way, they are so delicious.

Chewy Fudgy Homemade BrowniesBrownie Batter

Chewy Fudgy Homemade Brownies

Chewy Fudgy Homemade Brownies

Adapted from Sally’s Baking Addiction

Makes 16 – 20 brownies

Ingredients

1/2 cup Earth Balance Buttery Sticks (or salted butter)

8 ounces (228g) coarsely chopped bittersweet or semi-sweet chocolate

3/4 cup (150g) granulated sugar

1/4 cup (50g) packed light brown sugar

3 large eggs

1 teaspoon vanilla extract

1/2 cup + 2 tablespoons (80g) all-purpose flour (measure accurately)

2 tablespoons (11g) unsweetened cocoa powder

1/4 teaspoon salt

1 cup (180g) semi-sweet chocolate chips

Preparation

Melt the Buttery Stick and chopped chocolate in a medium saucepan on medium-low heat, stirring constantly, about 3 minutes.  Remove from the heat, pour into a large mixing bowl and allow to cool slightly for 10 minutes.

Adjust the oven rack to the lower third position and preheat oven to 350°F.  Line the bottom and sides of a 9×9 inch square baking pan with aluminum foil, leaving an overhang on all sides. Butter the foil.

Whisk the granulated and brown sugars into the cooled chocolate/butter mixture.  Add the eggs, one at a time, whisking until smooth after each addition.  Whisk in the vanilla.  Gently fold in the flour, cocoa powder, and salt.  Fold in the chocolate chips.

Pour batter into the prepared pan and bake for 35 – 40 minutes or until the brownies begin to pull away from the edges of the pan.  A toothpick inserted in the center should come out with a few moist crumbs when the brownies are done.  As oven temperatures vary, check for doneness at the 35 minute mark.  If the brownies need more time, continue to bake and check every few minutes.

Allow the brownies to cool completely in the pan set on a wire rack.  Once cooled, lift the foil out of the pan using the overhang on the sides and cut into squares using a sharp knife. (Wipe the knife clean after each cut). Brownies freeze beautifully.
Eggs, Lactose Free, Potato Salad, Recipes, Salad, Side Dishes

Potato Salad with 7-Minute Eggs & Mustard Vinaigrette

July 2, 2015

Potato Salad with 7-Minute Eggs & Mustard VinaigretteThere must be a million different potato salads out there in recipe land.  This one, with perfectly boiled eggs caught my attention immediately. It is truly a meal in itself.
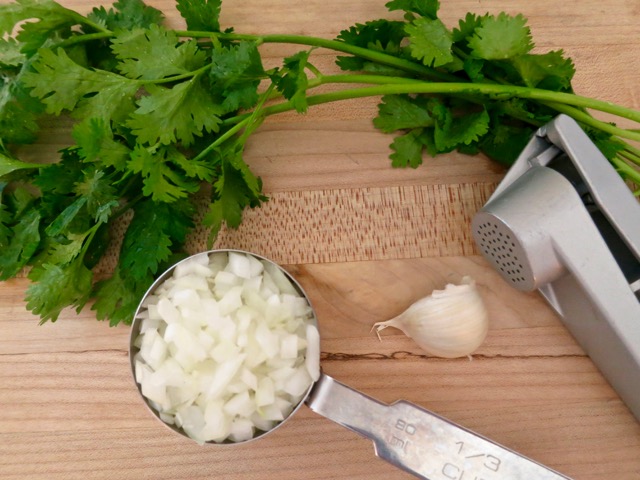
Upland CressOur local Whole Foods market carries this delicious Upland Cress.  You snip off just the amount you want to use and store the remainder in the crisper section of your refrigerator.  Because it is sold with its roots still attached, it stays nice and fresh for up to a week.  The tender leaves are delicious in any type of salad.  I especially love tossing them into vinegar based potato salads just before I serve them.

Whole Grain MustardMy sister Mie gave us this crock of whole grain mustard from France.  Lately I’ve been using spoonfuls in this potato salad.

Potato Salad with 7-Minute Eggs & Mustard Vinaigrette

Potato Salad with 7-Minute Eggs & Mustard Vinaigrette

Adapted from Bon Appetit magazine

4 generous servings

1 1/2 pounds baby gold potatoes, scrubbed

2 large eggs

3 tablespoons apple cider vinegar

2 tablespoons whole grain mustard

1 teaspoon honey

1/3 cup olive oil

kosher salt & freshly ground black pepper

1/4 cup flat leaf parsley, chopped

handful of Upland Cress (optional)

1 1/2 tablespoon chopped dill pickles

1 tablespoon chopped fresh chives

Preparation

Place potatoes in a large pot and cover with water.  Bring to a boil, then simmer until tender, about 15 – 20 minutes. The cooking time will depend on the size of your potatoes.  Transfer cooked potatoes to a plate to cool.

Place eggs in a small pot, cover with water and bring to a boil over high heat.  As soon as the water boils, turn the heat down to medium and simmer the eggs for 7 minutes (set the timer).  Drain cooked eggs and cool in a bowl of ice water. Peel eggs and set aside.

Whisk vinegar, mustard, and honey in a small bowl.  Whisking constantly, gradually add oil and whisk until emulsified.  Season with salt and pepper.

Halve potatoes and place in a large bowl.  Season with kosher salt and pepper.  Add parsley and a generous amount of dressing. Toss to coat potatoes well.  Add Upland Cress if using, and lightly toss again. Transfer potato salad to a platter.  Halve reserved eggs and tuck in between the potatoes.  Season eggs with kosher salt and freshly ground black pepper. Drizzle salad with some of the reserved vinaigrette.  Top with pickles and chives.

*If you are not serving the salad right away, hold back on adding the Upland Cress, eggs, pickles, and chives until just before you serve the salad.  You will have extra dressing.  I use it over salad greens or bean salads.


Follow

Get every new post delivered to your Inbox

Join other followers: