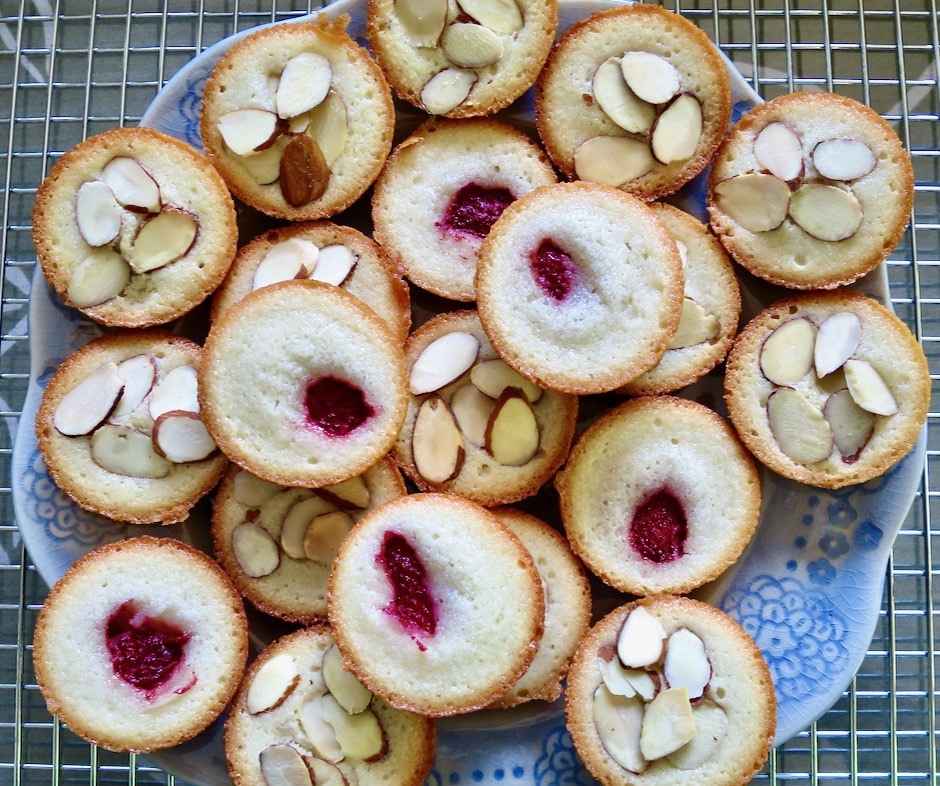
Dessert, Lactose Free, Recipes

Carrot Cake Cupcakes

February 8, 2020

Carrot Cake Cupcakes

Carrot cake could be the ultimate dessert.  It is moist with a well balanced sweetness, and of course a delectable cream cheese frosting.  Carrot cupcakes on the other hand, are dessert perfection.  Everyone gets their own mini cake with lots of cream cheese frosting.  They are an irresistible treat.

Grated Carrots

The grater above is a “family heirloom” once belonging to my mom.  It’s looking a bit rustic these days, but it still turns out perfectly grated carrots.  If you have a box grater use the finer holes for this recipe.

Carrot Cake Cupcakes Batter

I added golden raisins and shredded coconut to the batter but left out nuts.  Instead, I used toasted pecans to decorate the frosting on some of the cupcakes.  Note that when using Green Valley lactose free cream cheese, it is not as firm as normal block cream cheese.  Therefore, open the tub of cream cheese and drain it in a sieve if you notice any liquid in the tub.  If there is too much liquid, your frosting will turn out runny and you will need to start over.  Adding more confectioners sugar will not solve the problem (I have been there!).

Carrot Cake Cupcakes (with liners)

Carrot Cake Cupcakes

I made these with and without cupcake liners.  It seems the cupcake liners I bought were a bit small for the pan I have so I now make these without them.  Instead, I coat each cavity well with floured cooking spray.  However, you may choose to use cupcake liners as they make for easy clean up and a pretty presentation.

Carrot Cake Cupcakes

Carrot Cake Cupcakes
 
Author:
Serves: 12
Ingredients
  • Cupcakes:
  • 2 large eggs
  • ¼ cup canola oil
  • ¼ cup Miyoko's vegan butter or Buttery Sticks, melted and cooled (or increase canola oil to ½ cup and omit vegan butter)
  • ¾ cup granulated sugar
  • ¼ cup packed dark or light brown sugar
  • 1 teaspoon vanilla extract
  • 1 teaspoon ground cinnamon
  • ⅛ teaspoon ground nutmeg
  • Pinch of ground allspice (optional)
  • ¼ teaspoon kosher salt
  • 1⅛ cups + 1 tablespoon all-purpose flour
  • 1 teaspoon baking powder
  • ½ teaspoon baking soda
  • 1½ cups small hole grated carrots (not packed)
  • ½ cup golden raisins (soaked in hot water for 10 minutes, drained)
  • ⅓ cup sweetened coconut flakes
  • ¼ cup chopped and toasted pecans (to top frosting)
  • Cream Cheese Frosting:
  • 8 ounces cold Green Valley lactose free cream cheese
  • 1 cup powdered sugar (more if needed)
  • ½ teaspoon vanilla extract
  • 1 tablespoon cornstarch
Preparation
  1. Preheat oven to 350 degrees. Spray a 12-count muffin pan well with cooking spray (floured cooking spray works best) or coat with softened butter. You may also use cupcake liners.
  2. Whisk the eggs, canola oil and melted vegan butter, granulated sugar, brown sugar, vanilla extract, cinnamon, nutmeg, allspice (if using), and salt together in a large bowl.
  3. Add the flour, baking powder and baking soda. Stir until just combined.
  4. Fold in carrots, golden raisins, and coconut.
  5. Divide the batter evenly in the prepared muffin tin.
  6. Bake for 20 minutes, or until a toothpick inserted in the center comes out clean. Cool cupcakes in the pan for 20 minutes, then remove to a wire rack to cool completely.
  7. Meanwhile, prepare the frosting. If using Green Valley lactose free cream cheese, remove it to a medium bowl. If there is visible liquid in the bowl, drain cream cheese in a sieve for 15 minutes (in the refrigerator). This is an important step to ensure a good frosting consistancy or you risk having runny frosting that won't be spreadable. Whisk cream cheese, confectioner's sugar and vanilla extract in a medium bowl. Place cornstarch in a small plastic or metal strainer or sieve and sprinkle over the cream cheese mixture. Whisk again until ingredients are well combined. Place frosting in the refrigerator until ready to use (helps to firm it up).
  8. I don't have a piping kit so I used a Ziploc gallon freezer bag instead. Place bag in a 2-cup measuring cup with one of the corners centered in the middle of the cup. Fold top edges of the bag over the cup. Transfer frosting to the bag. Twist the bag to ensure the frosting is at the bottom. Snip off a tiny corner of the bag (start small, you can always cut off more). Pipe frosting on the cupcakes and smooth with a small angled icing spatula or short butter knife. Sprinkle chopped pecans over the top.
  9. The cupcakes can be frozen for a few weeks in a single layer in an airtight plastic container.


Breakfast, Dinner, Eggs, Lactose Free, Recipes, Side Dishes

Potato Chip Tortilla Espanola

January 26, 2020

Potato Chip Tortilla Espanola

Who would have thought that using potato chips in a Spanish tortilla would produce a perfect version of this traditional dish?  Thanks to Food52 for posting this terrific recipe from Ferran Adria.  Adria was the genius Chef at the acclaimed El Bulli restaurant in Spain. I find it amusing that a 3-star Michelin Chef who was at the forefront of  the molecular gastronomy movement would come up with such a simple recipe.  But then molecular gastronomy is all about experimentation.

Fresh Eggs, Piquillo Peppers, Serrano Ham, Lay's Chips

According to Senior Editor at Food52 Kristen Miglore, she prefers thin potato chips such as Lay’s rather than kettle-style chips.  Out of curiosity, I tried both Lay’s and those scrumptious thick, kettle-style Maui potato chips that I love dearly.  But Lay’s was the clear winner for me as well.  The tortilla made with the thinner chips was toothsome yet tender.  By comparison, the tortilla made with the kettle-style chips was noticeably more dense and a bit dry, likely due to the egg mixture not softening the thicker chips as well as the thinner ones.  I suppose you could leave the chips in the egg mixture longer, but this is supposed to be a quick recipe that takes less than 20 minutes from start to finish.

Fresh Thyme, Serrano Ham, Piquillo Peppers

The original recipe from Food52 recommends either serrano ham or prosciutto.  I went with the serrano ham and it was a winner. Our local Whole Foods market will slice the ham according to your request.  They also stock jarred piquillo peppers that are just gorgeous.  You may substitute pimentos if you are unable to find these.  They add beautiful specks of color and are mild in flavor.

Potato Chip Tortilla Espanola

I bought a broiler-safe ceramic pan just for this recipe. It was relatively inexpensive which made it easier to click the Buy Now button on Amazon.  Can one ever have too many pans in the kitchen?

Potato Chip Tortilla Espanola

The potato chips soak up the egg mixture and become a glorious tortilla with bits of ham, peppers and thyme. The fresh thyme compliments the other ingredients and should not be left out.  I like to serve it with sliced tomatoes, avocado and a slice or two of good bread.

Potato Chip Tortilla Espanola

Potato Chip Tortilla Espanola
 
Adapted from Food52
Author:
Serves: 4
Ingredients
  • 4 ounces (about 2¼ cups) potato chips such as Lay's
  • 2 ounces thinly sliced serrano ham (or thinly sliced prosciutto, bacon, ham)
  • 3 tablespoons finely chopped jarred piquillo peppers (or pimentos)
  • 1 tablespoon fresh thyme leaves, coarsely chopped
  • 8 large eggs, lightly beaten
  • pinch of kosher salt
  • a good amount of freshly ground black pepper
  • 1½ tablespoons olive oil
Preparation
  1. Special equipment: Broiler safe 10-inch skillet
  2. Position the rack in the upper third of the oven (about 6 inches from the heat source).
  3. Heat the broiler to high.
  4. Combine the potato chips, serrano ham, piquillo peppers, thyme, eggs, and salt and pepper in a large bowl and let sit to allow chips to soften in the eggs, about 6 minutes, stirring occasionally.
  5. Heat the oil in a 10-inch broiler-safe skillet over medium heat. Add the egg mixture and cook without stirring, until the bottom begins to brown, about 3 minutes. Transfer pan to the broiler, and broil until the top is set but still slightly jiggly on top, about 2 minutes. Transfer tortilla to a plate and cut into wedges. Serve warm or at room temperature.


Dinner, Lactose Free, Recipes, Tofu, Vegan, Vegetarian

Lemongrass Tofu

January 9, 2020

Lemongrass Tofu

Our lemongrass plant is now growing beautifully after we transplanted it to a sunnier corner of the garden.  Now that it is flourishing, I pondered over what to make next with our fresh lemongrass.  This grass-like herb has stalks that when cut, have mild and citrusy notes that add a delightful flavor to any dish you use it in.  Tofu immediately came to mind.

Lemongrass

Finely Chopped Lemongrass

Use only the tender white portion of the lemongrass stalks.  I usually peel away a few of the outer layers as they can be quite fibrous.  The fragrance of cut lemongrass is exquisite.

Super Firm Tofu

I find that super firm tofu works best as the cooked pieces hold their shape very nicely.  Also you save time not having to press the water out because of its firmness.

Sliced Tofu

Lemongrass Marinade

The few ingredients called for in the marinade make this an easy and quick meal you can prepare on the fly.  Leftovers make for a tasty lunch to take to work.

Tofu in Lemongrass Marinade

Lemongrass Tofu

The glorious  color of the fried tofu comes from a smidgen of turmeric.  A little goes a long way with this ground spice.

Lemongrass Tofu with Inari Sushi & Spinach

Lemongrass Tofu Spring Rolls

Lemongrass tofu is the perfect protein for a vegetarian spring roll.  Stuff the roll with crispy cucumbers, carrots, rice noodles and lots of mint.

Lemongrass Tofu with Spaghetti Squash & Salad

Lemongrass Tofu
 
Adapted from Epicurious.com
Author:
Serves: 8
Ingredients
  • 3-4 lemongrass stalks, outer layers peeled, bottom white part thinly sliced and finely chopped (about ¼ cup)
  • 2 tablespoons soy sauce (Kikkoman recommended)
  • 1 tablespoon less sodium soy sauce (Kikkoman recommended)
  • 1½ teaspoons sambal oelek (Huy Fong recommended)
  • ¾ teaspoon ground turmeric
  • 1 tablespoon granulated sugar
  • 16 ounce package super firm tofu (Wildwood recommended) sliced into ¾-inch slabs
Preparation
  1. Combine the lemongrass, soy sauce, sambal oelek, turmeric and sugar in a small bowl. Pour mixture into a low-sided glass dish that will fit the tofu slabs in one layer. Add tofu and let marinate for 5 minutes, then turn pieces over to marinate another 5 minutes.
  2. Heat 2 tablespoons canola oil in a 12-inch skillet (deep sided preferred, tofu can splatter as it cooks) over medium heat. Add tofu slabs and cook until nicely browned, about 4 minutes. Turn the heat down to medium-low if it seems too hot. Flip tofu pieces over and cook until second side is nicely browned.
  3. Serve with your favorite side dishes, sliced over cold noodles, or stuffed into spring rolls.


Cookies, Dessert, Lactose Free, Recipes

Red Velvet Crinkle Cookies

December 23, 2019
These gorgeous cookies are perfect for the holidays. The red and white contrast are simply out of this world! Besides being very festive, they are surprisingly easy to make, not to mention delicious.. I adapted this recipe from Eric Kim’s recipe at Food52.
I had two bottles of red food coloring in my cupboard for a long time. I thought I would never use it. After making these cookies a few times, I was off to the market to purchase another bottle. The color of the batter looks very strange at first. But rest assured, once you add the flour and cocoa powder, things improve dramatically.
Scoop balls of dough and freeze for about 10 minutes to firm up. Roll in confectioners sugar (lots of it) covering all areas to ensure you get that dramatic red and white look.
The cookies have the perfect texture. They are a bit chewy on the outside and tender and soft in the center. If you want to make these in advance of a holiday, you may freeze them in a plastic container separating layers of cookies with parchment paper.

Red Velvet Crinkle Cookies

  • 4 tablespoons (1/2 stick or 57 grams) Buttery Sticks at room temperature (or regular butter)
  • 2 tablespoons extra virgin olive oil
  • 1 tablespoon canola oil
  • 1 cup + 2 tablespoons (225 grams) granulated sugar
  • 3/4 teaspoon kosher salt (1 teaspoon if using unsalted butter)
  • 1 large egg
  • 1 tablespoon rice vinegar (substitute white or apple cider vinegar)
  • 1 tablespoon red food coloring
  • 1 teaspoon vanilla
  • 1 3/4 cups (219 grams) all purpose flour
  • 1/4 cup (21 grams) unsweetened cocoa powder
  • 1/2 teaspoon baking soda
  • 1/2 cup confectioners sugar

Preheat oven to 350 degrees. Line 2 baking sheets with parchment paper.

Cream Buttery Sticks, olive oil, canola oil, sugar, salt and egg with a hand mixer until fluffy and pale yellow, about 1 minute. Add the vinegar, red food coloring, and vanilla and mix until well combined.

In a separate bowl, whisk flour, cocoa powder and baking soda together. Add to the butter and sugar mixture stirring gently until just incorporated.

Using a medium cookie scoop (I use Oxo #40, 1 1/2 tablespoons) portion out 20 balls of dough on a plate. Freeze for 8-10 minutes. Remove from the freezer and roll each piece of dough into a round ball. Coat thoroughly with confectioners sugar. Place on a parchment lined baking sheets leaving enough space as cookies will spread as they bake. I use a cookie sheet and a half sheet that fit on one rack so that I can bake all the cookies at one time. You may choose to use 2 cookie sheets and bake one at a time. Bake for about 13-14 minutes. Let cookies rest on the pan for a few minutes before transferring to a rack to cool completely.

Recipes

Gingerbread Cookies

December 8, 2019
Hawaiian Style Gingerbread Cookies

The holiday season is here again and that means everyone is baking all kinds of delectable treats to share with family, friends and co-workers. It’s an annual tradition for me to make these gingerbread cookies. I set a weekend date in early December to make these so I don’t feel rushed later in the month. Once all of the cookies are baked and cooled, I pull up a stool to the counter and start decorating each cookie. Once I’m done decorating, the cookies are stored in sealed bags in the freezer until I am ready to pass them out. They are so much fun to make!

Happy Holidays!
Appetizers, Beans, Dinner, Lactose Free, Recipes, Side Dishes, Vegan, Vegetarian

Creamy Fresh Herb Hummus

November 24, 2019

Creamy Fresh Herb Hummus

Homemade hummus is the best.  It is so easy to prepare and the end product is certainly worth the 30 minutes you spend making it. All the ingredients except for the herbs and pistachios go into the food processor.  Blitz away until the mixture is as smooth as you want it to be.  We enjoy eating hummus with homemade pita chips and falafel.  Hummus keeps well in the refrigerator and makes a great snack for home or work.

Chickpeas with Skins Removed

This time around I decided to remove the skins from the chickpeas. It took me about 9 minutes to pinch off the skins from a can of beans.  I didn’t mind the extra step since I enjoy spending time in the kitchen.  Of course this is optional, but I found the hummus to be magnificently smooth.  I came upon a curious recipe from the Minimalist Baker blog.  The undrained chickpeas and garlic cloves are heated in the microwave for a few minutes making the chickpeas very smooth and creamy when blended together with the other ingredients.  The garlic mellows a bit which makes for a well-balanced hummus.

Chickpeas & Garlic

When you microwave the chickpeas use a large bowl since the chickpea liquid tends to expand. I cover the bowl with plastic wrap leaving a small vent for air to escape.  Once the chickpeas come out of the microwave I drain them, saving just a few tablespoons of the liquid for later.  Then everything goes into the food processor until smooth and creamy.  Place the warm hummus in a container and refrigerate until cool.  Transfer the cooled hummus to a serving plate, add your favorite fresh herbs, pistachios, and a swirl of olive oil.  Dust with cayenne pepper and serve with pita chips.

It’s really a chore to stir tahini in the container or jar that it comes in.  The bottom of the container usually has solid pieces of tahini that are hard to get at.  These days I just pour the entire container into a bowl and whisk away until the tahini is mixed to perfection.  The thought of having to clean another bowl might discourage you but you will save a lot of frustration. It only takes a minute to wash the bowl!

Creamy Fresh Herb Hummus

Creamy Fresh Herb Hummus
 
Author:
Serves: 6
Ingredients
  • 1 can (15 ounce) chickpeas, drained with liquid reserved, skins removed (optional)
  • 3 medium garlic cloves, peeled
  • ¼ cup + 1 tablespoon well stirred tahini
  • 2½ - 3 tablespoons fresh lemon juice
  • ¾ teaspoon kosher salt
  • 2-3 tablespoons cold water
  • 1-2 tablespoons reserved chickpea liquid
  • ¼ teaspoon ground cumin
  • ⅛ teaspoon cayenne (optional) + more for serving
  • 2 tablespoons extra virgin olive oil + more for serving
  • handful of fresh herbs
  • pistachios, salted and shelled
Preparation
  1. Drain and reserve the liquid from the chickpeas. Pinch off the skins from the chickpeas
  2. Transfer chickpeas, reserved liquid and 3 garlic cloves to a large bowl. Cover with plastic wrap leaving a small vent for the air to escape. Microwave for 3½ - 4 minutes.
  3. Drain chickpeas, reserving 2 tablespoons of liquid. Transfer chickpeas to a food processor along with the garlic cloves, tahini, lemon juice, salt, 2 tablespoons cold water, 1 tablespoon chickpea liquid, cumin, cayenne and olive oil. Process until mixture is smooth, scraping down the sides as needed. If the hummus is too thick, add water or chickpea liquid until it is the texture you prefer. Keep in mind the hummus will thicken a bit once refrigerated. Transfer mixture to a container and refrigerate until chilled.
  4. When ready to serve, spoon hummus onto a serving plate. Place fresh herbs in the center and top with pistachios. Drizzle olive oil over hummus and sprinkle a bit of cayenne over the top. Serve with pita chips.


Follow

Get every new post delivered to your Inbox

Join other followers: