This is a quick (10 minutes max) cucumber dish that is perfect to serve alongside teriyaki meat sticks, lemon grass tofu, and Korean hamburger patties. It’s a very refreshing salad that everyone will enjoy.
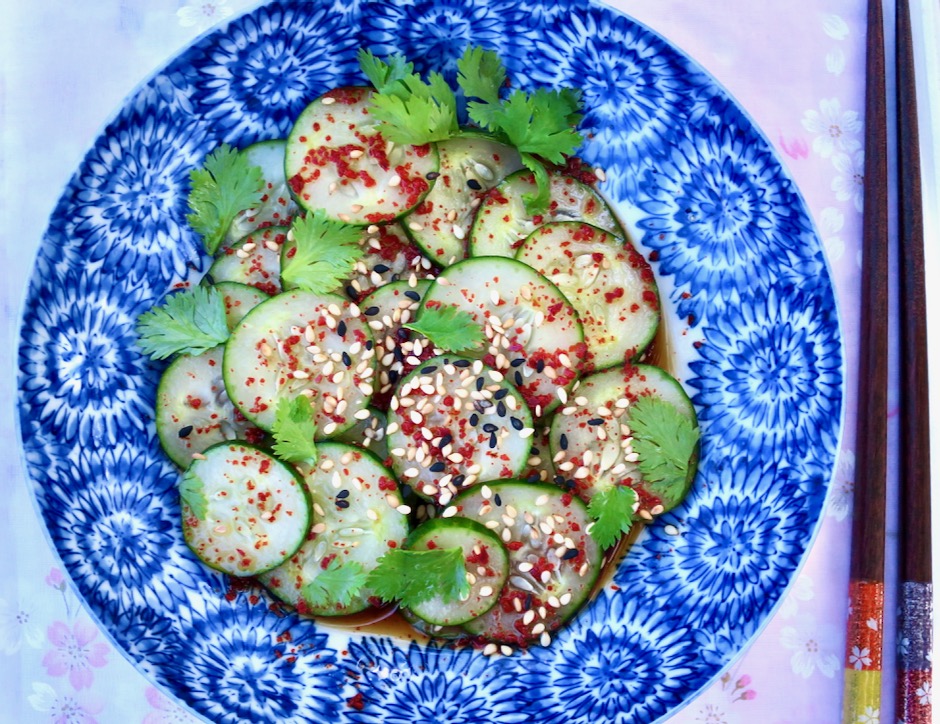
Japanese cucumbers are the best choice for this salad. They are super crispy with tender skins and have very few seeds. I always have a big jar of gochugaru (Korean chili flakes) on hand. The chili flakes add a subtle heat and beautiful pop of color to salads like this one.
We have some beautiful cilantro growing in the garden so I added a few tender leaves to the salad. If you’re not a fan of cilantro, use thinly sliced green onions or chives. If you are not planning to eat the salad right away, store cucumbers and dressing separately until ready to serve.
With just three ingredients, onions, butter and miso (+ water), you might wonder how this dish from Yotam Ottolenghi, can turn out so gorgeous and flavorful. Of course these three ingredients are among the most delectable in the world of cuisine. Serve the onions alongside grilled steak or chicken, or simply over a bowl of steaming rice.
The recipe calls for very small onions, or very large shallots. Both can be difficult to find. The best option I found was to use Maui onions which tend to be on the small side. I threw in a couple of red cipollini (Italian for small onions) that I had bought at Whole Foods.
The onions are sliced lengthwise with ends trimmed ever so slightly in order to keep the onion halves intact while baking.
My version of the recipe is vegan as I switched out the butter for Miyoko’s vegan butter. It works great in this dish and all baking recipes if you are looking for a lactose free substitute for regular unsalted butter.
Light miso paste is whisked together with the melted vegan butter and warm water. This simple mixture eventually turns into a luscious sauce that coats the onions and gives them a rich, savory flavor.
The first time I made this dish, I was surprised at how much liquid there was. It crossed my mind that this might not work out! But eventually, the pale liquid reduces to a thick, flavorful sauce.
Beautifully glazed onions ready to serve alongside your favorite dinner entree.
Special equipment needed: Heavy baking dish safe for 500 degree oven
Preheat oven to 500 degrees
Halve the onions lengthwise, discarding the papery skin as well as the layer beneath it if it's tough or dry. Trim the tops and a bit off the bottom (not too much, you want to ensure the onion halves stay held together at the base). Place onions halves, cut-side down slightly spaced apart, in a 9x13-inch baking dish or one that fits your onion halves.
In a medium bowl, whisk together the melted butter and miso paste. Whisk in the warm water. Pour mixture over the onions. Cover the pan tightly with heavy duty aluminum foil. Bake for 35 minutes. Remove foil and turn the onions over so they are cut-side up. Baste onions very well, then return to the oven, uncovered for another 40-45 minutes, basting every 10 minutes, until the onions are very soft and deeply browned on the tops. The sauce should be reduced to a gravy consistency.
Transfer onions to a platter, pouring the sauce over and around them before serving. Any leftovers can be refrigerated for up to 2 days. Reheat before serving.
Summer is long gone yet surprisingly our mango trees continue to provide us with fruit. Is it global warming that has confused our magic mango trees? Who knows how long this will continue, but for now, we are thrilled to have mangos all year long. Which brings me to this wonderful mango cake. The original recipe from Ina Garten features fresh peaches. I just switched them out with mangos and what a delightful version it turned out to be.
Our Pirie mangos are very sweet and the perfect choice for this cake: like peaches they hold up well in baking. I also prefer them when making Maui mango bread loaves.
I made the cake lactose free since this is the best option for me, but feel free to use regular dairy products if you try the recipe.
Lots of cinnamon sugar makes for a tasty topping.
The cake batter and mangos are layered, ending with mangos, pecans, and cinnamon sugar on the top.
The cake is moist from the two layers of mangos and the top has a light crunch to it from the pecans and cinnamon sugar. Fresh mango cake in January is such a treat.
1 stick (4 ounces, 113g) Miyoko's unsalted butter (or regular unsalted butter), at room temperature
1½ cups sugar, divided (7 ounces, 198g = 1 cup and 3½ ounces, 99g = ½ cup)
2 large or extra large eggs (2.2 ounces, 63g each) (Ina calls for extra large eggs. If you don't have them handy, use large eggs. I find that some brands such as Eggland's Best large eggs are heavier than others so I use these instead of extra large).
1 cup (8 ounces, 227g) Green Valley lactose free sour cream (or regular sour cream) at room temperature
1 teaspoon vanilla extract
2 cups (8½ ounces, 240g) all-purpose flour
1 teaspoon baking soda
1 teaspoon baking powder
½ teaspoon kosher salt
1 teaspoon ground cinnamon
2½ pounds ripe but firm mangos, peeled, pitted and sliced
½ cup (2 ounces, 57g) chopped pecans
Preparation
Preheat oven to 350 degrees. Grease a 9-inch square baking pan.
In the bowl of a stand mixer fitted with the paddle attachment (or large bowl and hand mixer), beat butter and 1 cup of sugar for 3 minutes on medium-high speed, until light and fluffy. With the mixer on low, add the eggs one at a time, then the sour cream and vanilla. Mix until the batter is smooth. In a separate bowl, sift together the flour, baking soda, baking powder, and salt. With the mixture on low, slowly add the dry ingredients to the batter and mix until just combined. In a small bowl, combine the remaining ½ cup sugar and cinnamon.
Spread half of the batter evenly in the pan. Use an offset spatula if you have one. Top with half of the mango slices, then sprinkle with two-thirds (about 5 tablespoons) of the sugar mixture. Spread the remaining batter on top, arrange the rest of the mangos on the batter and sprinkle with the remaining sugar mixture and the pecans.
Bake the cake for about 55 minutes (check at 50 minutes), or until a toothpick inserted in the center comes out clean. Serve warm or at room temperature. Any leftover cake can be frozen for a few months.
When I was growing up meatloaf was a mainstay of my mom’s repertoire. She was an excellent cook who made tasty, old fashioned recipes such as beef stew, creamed tuna, pan-fried pork chops and the best brownies and lemon meringue pie ever. Here we are nearing the end of 2020, and meatloaf is just as popular as it was when I was a kid.
This Italian version of meatloaf is an excellent way to put a new twist on an old classic. The sweet Italian sausage creates an intensely flavorful meatloaf. A can of crushed tomatoes along with a few other ingredients turns into a luscious, rich sauce that certainly requires garlic bread to round out the meal.
The sauce is so simple to make. Crushed tomatoes, tomato sauce, garlic, dried oregano, salt and red pepper flakes are all you need.
The first time I made this recipe I was shocked at how much sauce there was prior to baking the meatloaf. I was almost certain that the entire dish might be a flop because of the amount of sauce called for. I was pleasantly surprised to see that it had reduced to a thick, rich and delicious sauce, in fact just the perfect amount for the meatloaf.
We have eaten the meatloaf with many different sides such as buttered pasta, mashed potatoes, and in a sandwich. It is a very versatile main dish that freezes and reheats well. You can switch out the cheddar and mozzarella cheese with pepper jack cheese, or use mozzarella with a sprinkling of parmesan cheese.
¼ teaspoon red pepper flakes (more if you want a spicy sauce)
1 teaspoon dried oregano
¼ teaspoon fine sea salt
Meatloaf:
35 squares saltines
¾ cup whole milk
2 large eggs
1 pound ground sirloin or other lean ground beef
1 pound sweet Italian sausage, casings removed
2 ounces Parmesan cheese, grated (1 cup)
½ teaspoon garlic powder
1 teaspoon dried oregano
½ teaspoon fine sea salt
½ teaspoon freshly ground black pepper
¼ teaspoon red pepper flakes
2 ounces sharp white cheddar cheese, shredded (1/2 cup)
2 ounces mozzarella cheese, shredded (1/2 cup)
3 tablespoons fresh basil (julienned or chopped just before serving)
Preparation
Special equipment: Broiler safe 13 by 9-inch baking dish
Adjust oven rack to middle position and heat to 400 degrees.
Sauce: Heat oil in large saucepan over medium-low heat. Add garlic and cook until softened but not browned, about 1-2 minutes. Stir in tomatoes, tomato sauce, pepper flakes, oregano and salt. Increase heat to medium and bring to a simmer, stirring occasionally, for about 5 minutes. Remove from the heat, cover to keep warm.
Meatloaf: Spray broiler-safe 13 by 9-inch baking dish with vegetable oil spray. Place saltines in a large zipper lock bag, seal bag, and using a rolling pin crush crackers to fine crumbs. In a large bowl, whisk saltines with milk and eggs. Let sit until the saltines are softened, about 5 minutes. Whisk saltine mixture until a smooth paste forms. Mix in beef, sausage, Parmesan, garlic powder, oregano, salt, pepper and pepper flakes with your hands (I use disposable gloves) until thoroughly combined.Transfer beef mixture to prepared dish. Using wet hands (or disposable gloves) shape into a 9 by 5-inch rectangle. The top should be flat and the meatloaf should be 1½-inches thick. Pour sauce over the meatloaf. Cover the dish with aluminum foil and place on rimmed baking sheet. Bake until the meatloaf registers 160 degrees, about 1 hour 5 minutes to 1¼ hours.
Remove sheet pan from oven, uncover dish, and sprinkle cheese evenly over the top of the meatloaf. Heat broiler. Broil meatloaf until cheese is melted, about 2 minutes. Let rest for 15 minutes.
To serve, transfer the meatloaf using 2 spatulas to a cutting board to make 1-inch thick slices. Or, slice directly in the baking dish. Spoon off any excess oil from the tomato sauce. Scatter julienned or chopped basil over the top and into the sauce just before serving.
These fried chicken tenders have become one of my favorite dishes. They are super crispy, flavorful and tender. You could make this with chicken breasts cut into thin strips, but I find that chicken tenders are the best option because they turn out juicy and ever so tender.
I found that using Kikkoman panko is the ticket for making an extra crispy coating. In past recipes, I used Shirakiku panko, but Kikkoman has a better texture for fried chicken. So I’m now stocked up with a few boxes in my pantry. I also freeze trimmed chicken tenders so I have them ready when I have a craving for this dish.
This recipe is adapted from one I found on the Food Network site. It calls for lemon pepper which I didn’t have on hand but found it at my local market.
We made a quick honey mustard sauce for the fried chicken tenders. It is the perfect accompaniment for the chicken that has a hint of cayenne in the seasoning.
If you have leftovers as we often do, a chicken sandwich with some crunchy iceberg lettuce, mustard and mayonnaise makes for a satisfying meal. Or reheat in a toaster oven uncovered until just warm, and serve with your favorite sides.
Whisk together the honey mustard ingredients. Chill in refrigerator until ready to use.
Place whisked eggs in a wide shallow bowl. Place flour in another wide shallow bowl. Pour panko into a pie plate and season with the garlic powder, lemon pepper, cayenne, salt and pepper. Mix well so all ingredients are evenly combined.
Heat about 1½-inches of canola oil in a small Dutch oven or other wide deep fryer pot over medium heat. If you have a deep fry thermometer, heat to 350 degrees.
Lightly salt (kosher salt recommended) and pepper both sides of the chicken tenders. Dip each tender into the flour making sure to coat evenly. Dip into egg (let excess egg drip back into the bowl), and dredge in the seasoned panko. With dry hands, pat the panko gently onto each side of the chicken tenders. Transfer to a sheet of foil or plate and continue with the rest of the tenders. Fry tenders in batches for 1½ - 2 minutes, turning halfway through cooking time, or until they reach 160 degrees. Drain on paper towels. Serve with honey mustard sauce.
A few years ago I tried my hand at making bagels. I experimented with several different recipes but none stood out enough to make again. They were often beautiful bagels and we ate them all but I found some to be generally too chewy. So I put bagel making aside until a few months ago when I took up the challenge again. Good bagels are in a class of their own but they are hard to come by in the Islands. Since there is nothing better than homemade bread which we make with considerable success, why not homemade bagels?
Making the dough is actually quite simple. Bagel dough is very stiff so a heavy duty stand mixer is a must for this recipe. After shaping the bagels, they go into the refrigerator to proof overnight then are boiled and baked the following day.
After testing different methods for boiling the bagels I found that the longer you boil them, the chewier they become once they have finished baking. Many recipes call for boiling bagels for a minute on each side. My preference is to boil bagels for 10-15 seconds per side. They puff up nicely and you’ll end up with bagels that have a perfectly soft yet chewy texture.
My “almost everything bagels” are generously coated on both sides with rehydrated dried minced onion, poppy seeds, sesame seeds and flaky Maldon salt. Rehydrating the onions in hot water for a half hour keeps the onions from burning when the bagels are baking.
Be generous with your toppings because inevitably, a few of the seeds will fall off when you slice the bagels.
Bagels are superb served with smoked salmon, ham and cheese, avocado, pimento cheese or just butter. According to bagel purists, toasting a bagel is verboten and that bagels should be eaten warm as they come out of the oven. They are best eaten the day they are made. So in my case, I freeze most of the bagels since there’s no way I can eat a dozen in a day. When I am ready to have one, I take it out of the freezer to defrost, slice, and toast my bagel. Then it’s ready for whatever toppings I want to add. Sometimes just a few pats of butter does the trick.
1½ teaspoons instant yeast (recommend SAF Red Instant Yeast, proofing is not necessary)
1 tablespoon granulated sugar
2 teaspoons fine sea salt
2 teaspoons diastatic malt powder (available from Amazon)
1½ cups (12 ounces) water
1 tablespoon barley malt syrup (available from Amazon or local health food stores)
1 tablespoon baking soda
egg white wash whisked until frothy
toppings of your choice
Preparation
Special equipment: Heavy duty stand mixer, kitchen scale, parchment paper, 2 large sheet pans, diastatic malt powder, barley malt syrup, wide flat slotted spoon, kitchen timer, small pastry brush (silicone works great)
Note: I use a half sheet pan and a quarter sheet pan to bake all 12 bagels at the same time on the center rack. If you use 2 large sheet pans, boil and bake 6 bagels at a time. Then continue with the second batch after the first 6 bagels have baked. It is a good idea to leave space between the bagels and not crowd them so they bake up nice and brown on all sides.
Whisk flour, yeast, sugar, salt, and barley malt powder in the bowl of a stand mixer. Pour in water. With mixer on low speed (#2 on my KitchenAid), mix until dough starts to come together, about 4-5 minutes. Use a spatula to scrape down the sides to ensure all of the flour gets mixed in well. Bagel dough is very stiff, however, if the dough seems too dry, add a teaspoon of water.
Increase the speed (#3 on my KitchenAid) and set a timer for 5 minutes and knead dough until it is cohesive and smooth. Remove dough and weigh it. Then divide it into 12 equal portions for small bagels, 10 for larger bagels. As you work, cover the dough pieces with plastic wrap or a clean kitchen towel to prevent drying. Working with 1 piece at a time, shape the dough into a smooth ball. Pinch the dough together on the bottom of the ball. Again, cover with plastic wrap to prevent drying and continue with the rest of the dough. Let the dough balls rest for 5 minutes, covered.
To shape the dough, place dough round on the counter, push your index finger into the center of each dough round so that it goes all the way through. Twirl the dough between your two index fingers to create a hole about 1½-inches wide. Place shaped bagels on a baking sheet lined with parchment paper that has been lightly oiled. Cover with plastic wrap and refrigerate overnight.
Preheat oven to 500 degrees with rack in center.
Have ready: A thick layer of paper towels on the counter to place the boiled bagels on and a large piece of parchment paper for transferring bagels once dry (they will stick on paper towels if left too long). Have a second sheet pan lined with parchment paper ready and all of your toppings (if using) plus egg wash. Remove bagels from the refrigerator.
Fill a large wide pot or Dutch oven with at least 6-inches of water. Bring water to a boil. Add barley malt syrup and baking soda. Give it a quick stir, skim off most of the foam. Working with 2-3 bagels at a time, gently place bagels in boiling water and set timer for 20 seconds. After 10 seconds have passed, gently flip bagels over for another 10 seconds. Immediately transfer bagels to paper towels using a wide, flat slotted spoon. Then transfer to parchment paper. Continue with the rest of the bagels.
If you are adding toppings to your bagels, brush bottom side of bagel first with egg wash. Sprinkle toppings over the dough, flip bagel and repeat the process. Transfer to the parchment lined baking sheet. Continue with the rest of the bagels. You may choose to leave some of the bagels plain or simply coat with sesame seeds or other toppings of your choice. Place bagels in oven and reduce heat to 450 degrees. Bake bagels (rotate pan halfway through) for about 14 minutes or until bagels are nicely browned. Let bagels cool a bit before slicing.