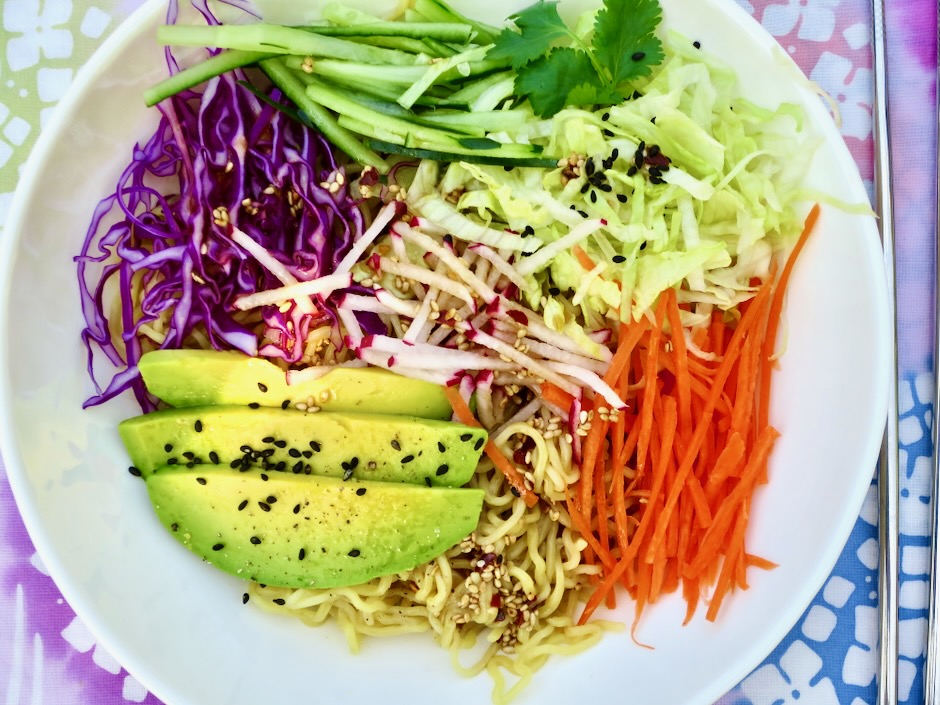
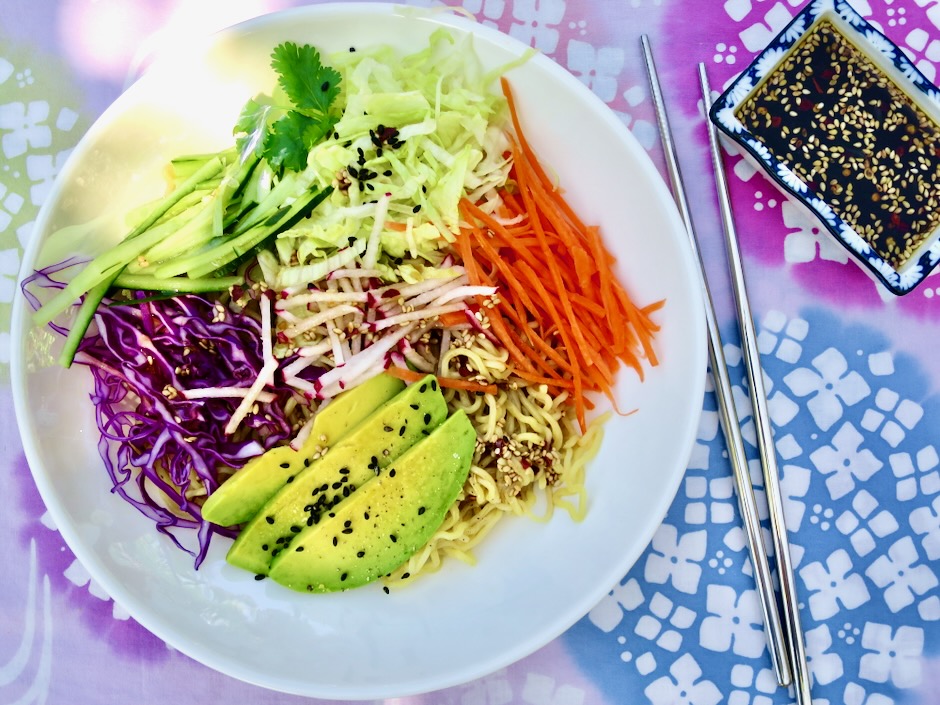
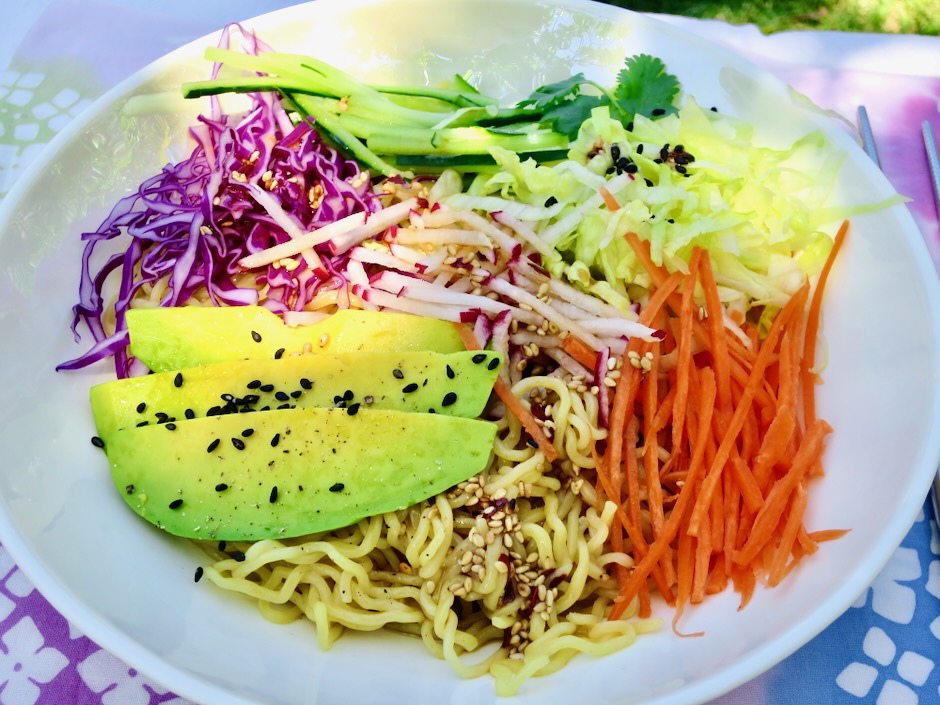
I can’t think of a more refreshing and satisfying combination than crisp vegetables served over ramen, drizzled with a tangy dressing. Although we usually think of ramen served in a steaming hot broth, it can also be used in cold or room temperature dishes like this one. The colorful vegetables are served on a bed of toothsome noodles that make for a delightful lunch.
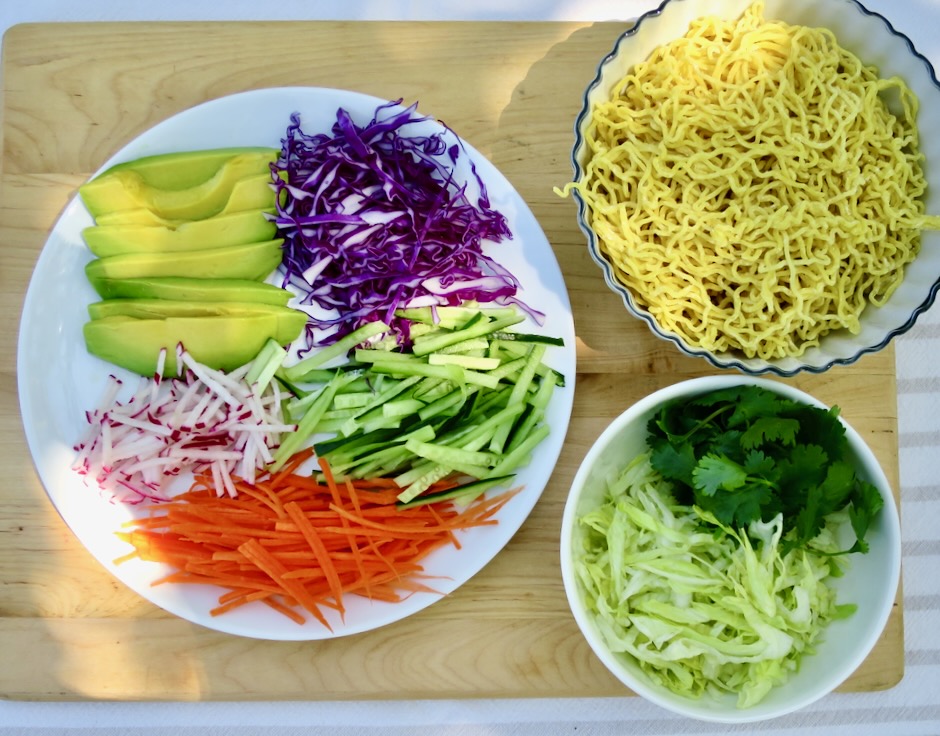
All the vegetables for this dish as well as the dressing can be prepared the night before you plan to serve it (except for the avocado). If you can’t find fresh ramen you may use dried noodles. I used fresh Sun Noodle ramen this time, however, Hakubaku brand dried ramen is a good choice if fresh is not available. If you prefer a wavy noodle, you might choose Ichiban dried ramen. Just be careful not to overcook the noodles so they retain their chewy texture. The noodles are best cooked just before serving.
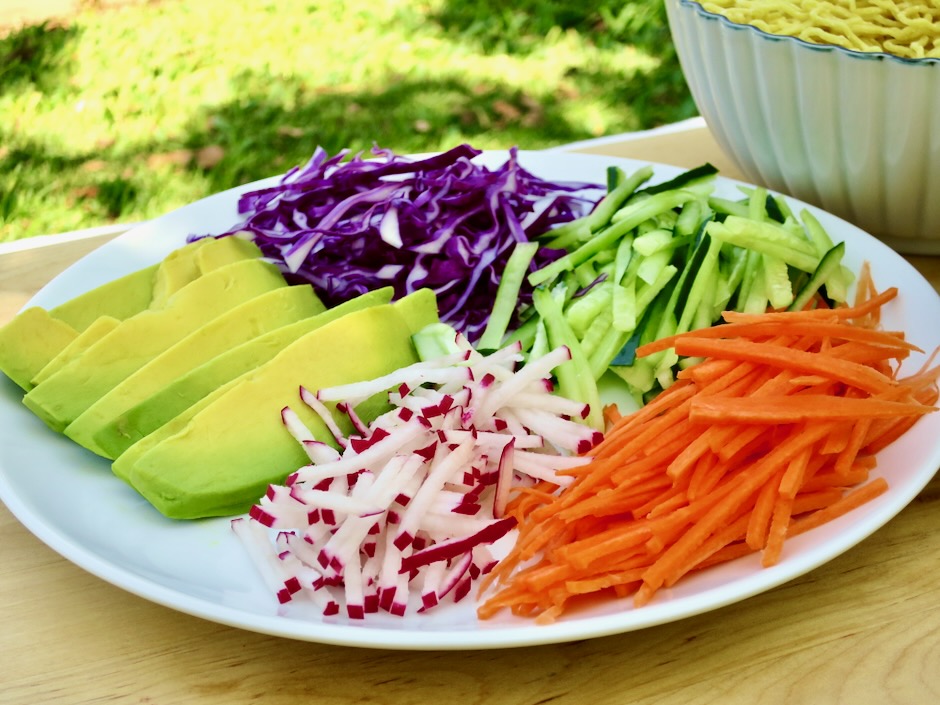
There are lots of options for the salad toppings. I used cabbage, cucumbers, carrots, radishes, and avocado. Other good choices would be watercress, summer squash, green onions. Make your dish colorful.
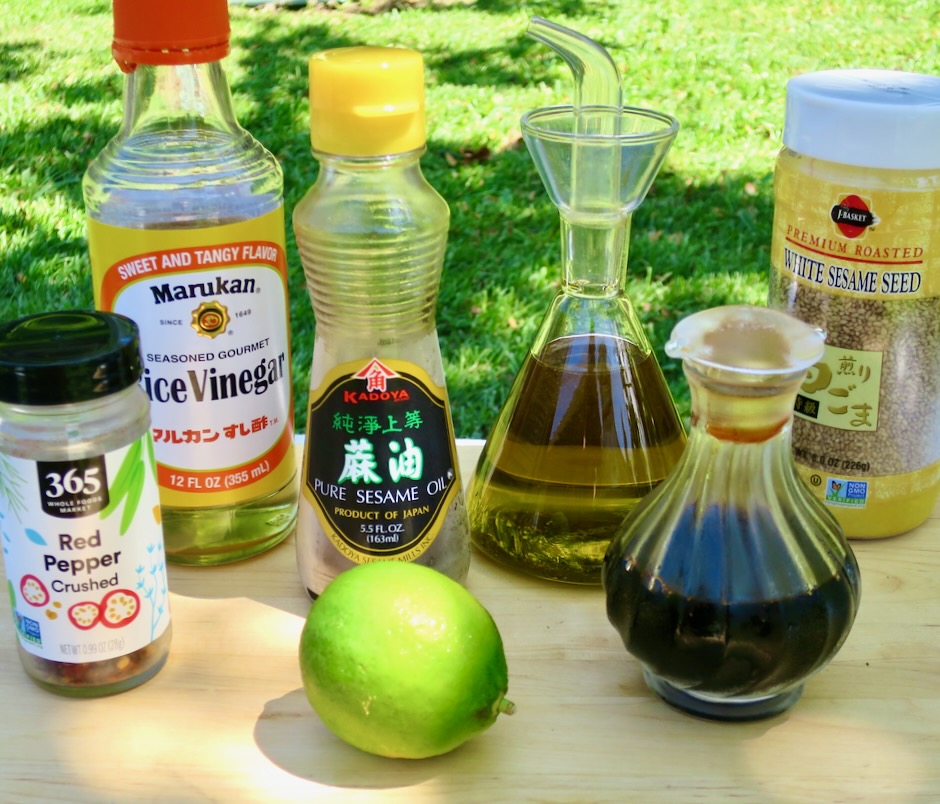
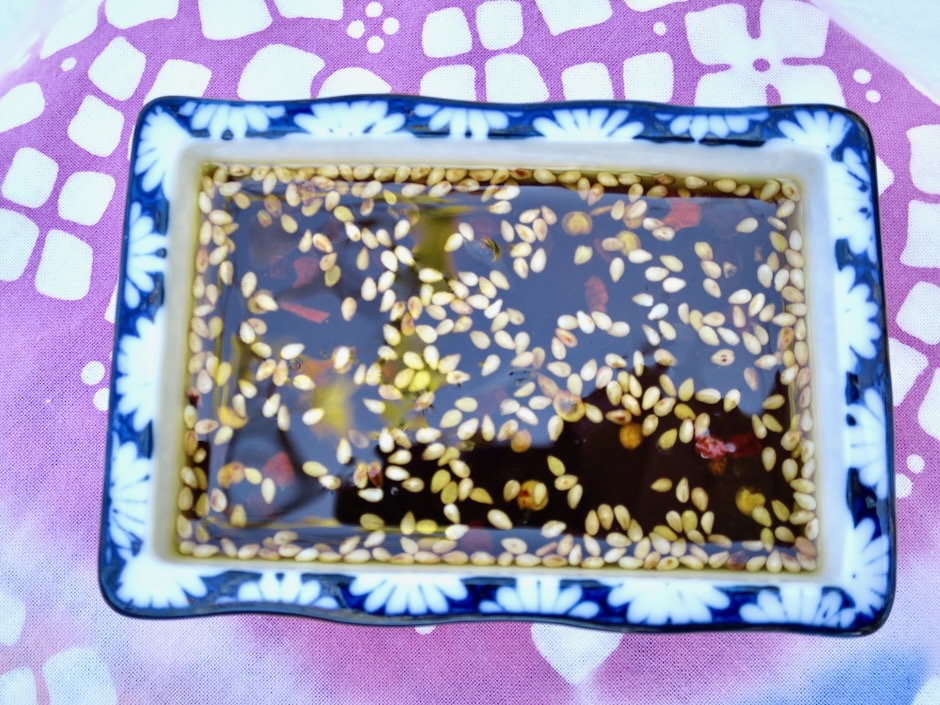
The dressing for this salad uses ingredients that are not difficult to find at your local market. The fresh lime juice makes this dressing pop!
This is a one bowl meal that really hits the spot especially this time of the year when temperatures are soaring.
A refreshing ramen salad perfect for a summer meal
Ingredients
1/4 cup seasoned rice vinegar
2 tablespoons extra virgin olive oil
1 1/2 tablespoons fresh lime juice
2 tablespoons low sodium soy sauce
1 tablespoon roasted sesame seeds
1/2 teaspoon red pepper flakes
1 teaspoon roasted sesame oil
10 ounces fresh or 6 ounces dried ramen noodles
2-3 cups shredded or julienned vegetables (radishes, iceberg lettuce, red cabbage, cucumber, summer squash, carrots, scallions, avocado
Directions
Combine seasoned rice vinegar through sesame oil in a jar. Shake and set aside.
Cook noodles according to package directions until just al dente. Immediately drain the noodles in a colander and rinse under cold water to stop the cooking. Transfer to a medium bowl, toss with half of the dressing.
Divide the noodles between bowls. Arrange vegetables over the ramen and serve with remaining dressing.
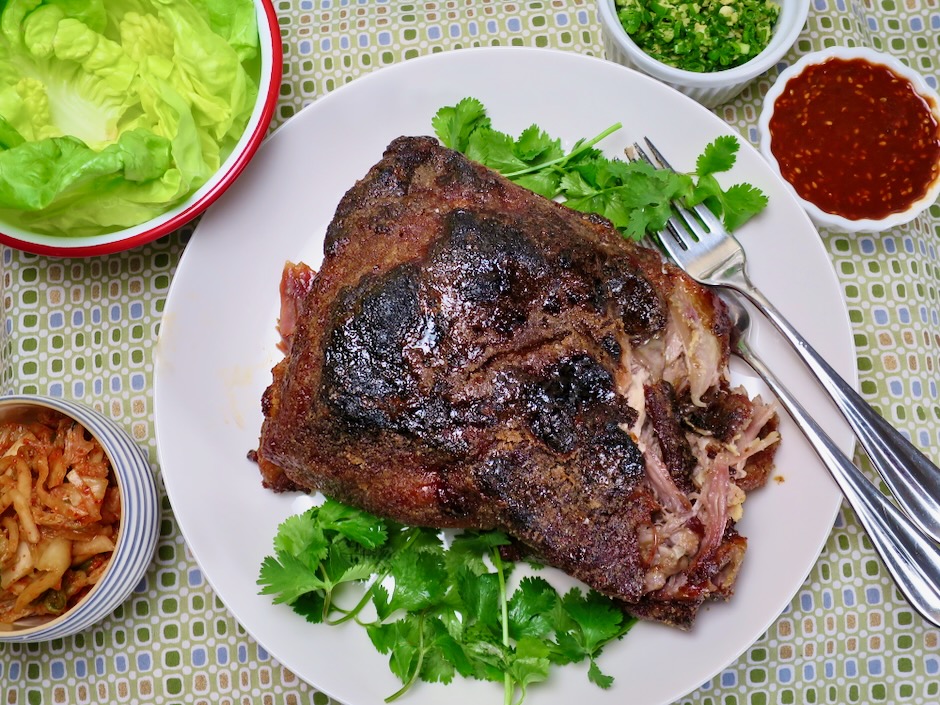
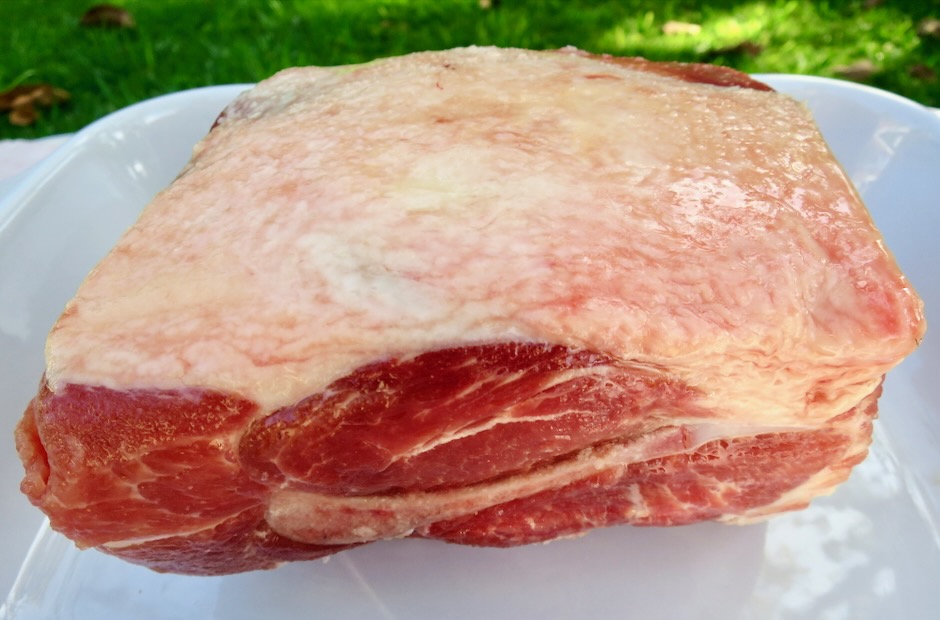
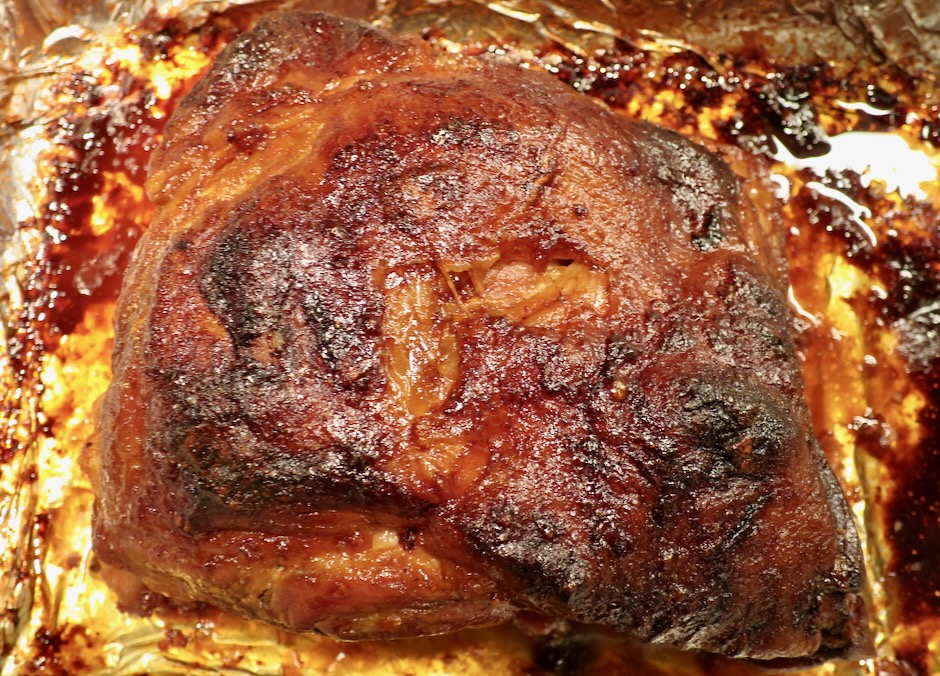
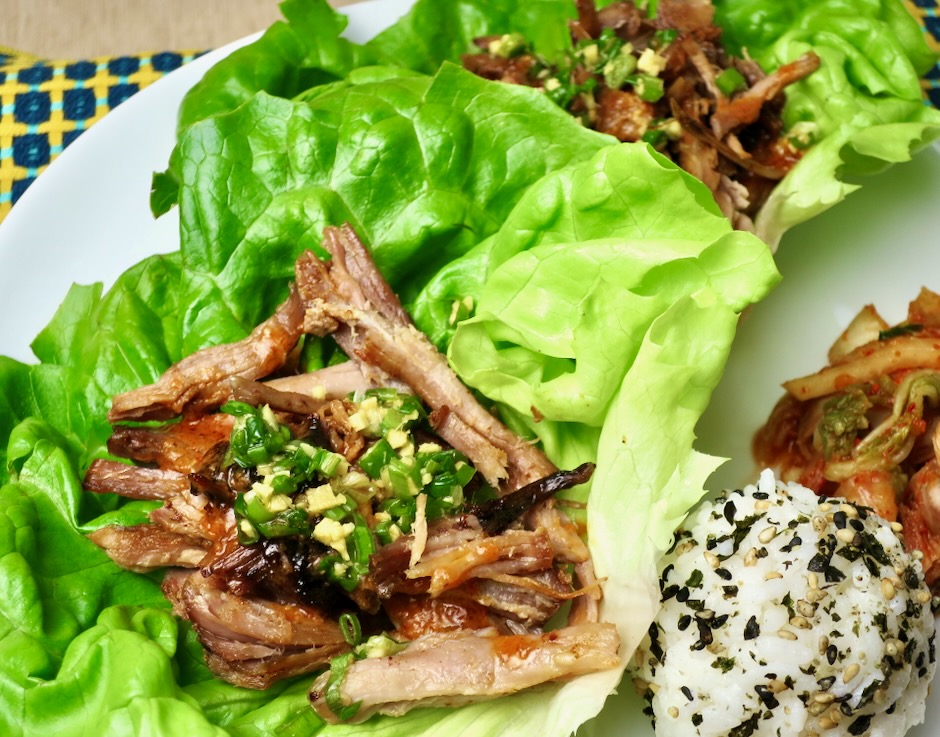
Bo Ssam is the ultimate dinner party centerpiece. It is a popular Korean pork dish that once cooked, is shredded and wrapped in vegetables (ssam) in this case, butter lettuce leaves. The slow roasted pork butt (shoulder) comes out of the oven with a crisp exterior and meltingly tender, shreddable interior. When brought to the table, all eyes will be focused on the Bo Ssam as it is absolutely stunning. Mahalo to David Chang for sharing his recipe on the NYT Cooking site which inspired me to make this dish (numerous times).
The pork and sauces are wrapped in a crisp lettuce leaf then folded before consuming. Steamed white rice or onigiri and kimchi are the perfect sides to go along with this dish.
For this recipe you’ll want to have a nice layer of fat on one side of the pork. If you purchase one that has an extra thick layer of fat, trim some of it off. The pork cooks fat side up and becomes the most delicious, crispy, salty and sweet crust you will ever encounter.
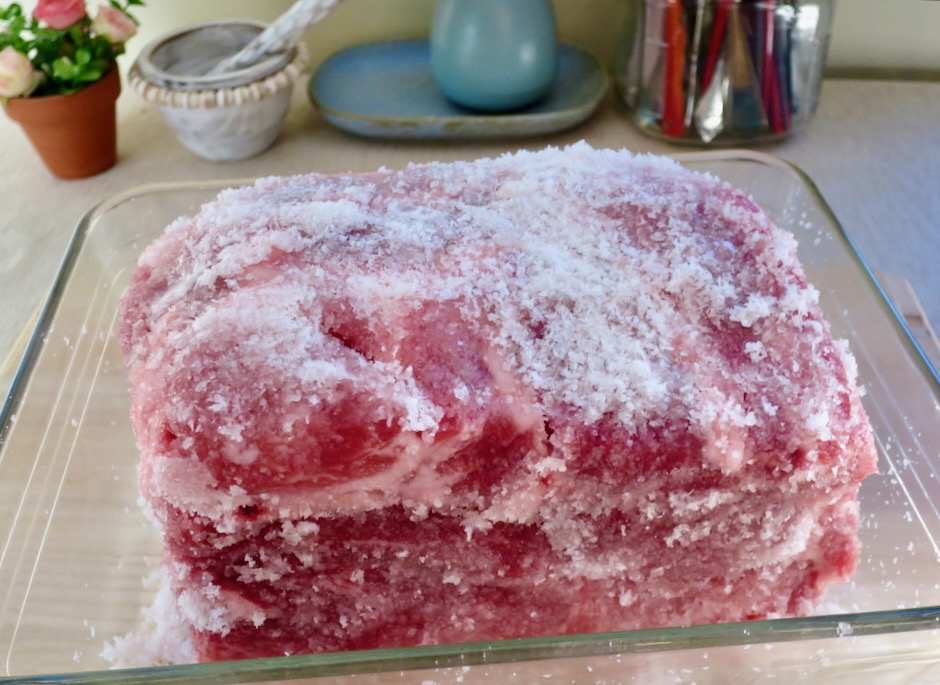
The pork is cured in a mixture of kosher salt and white sugar. This will create a very moist and flavorful Bo Ssam. Plan a bit in advance as the pork needs to be cured overnight (minimum 6 hours).
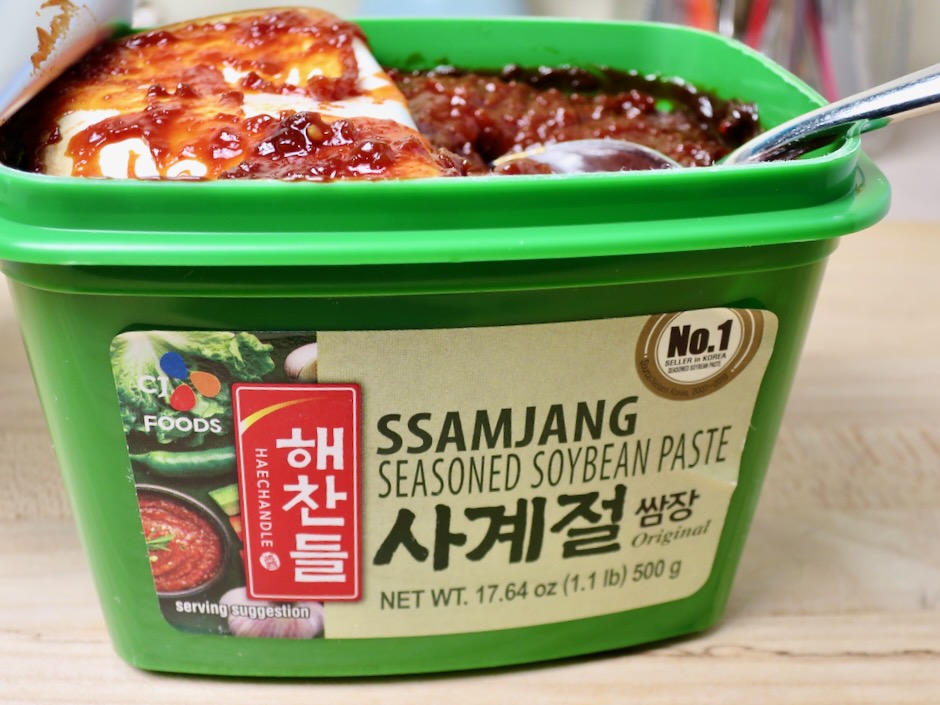
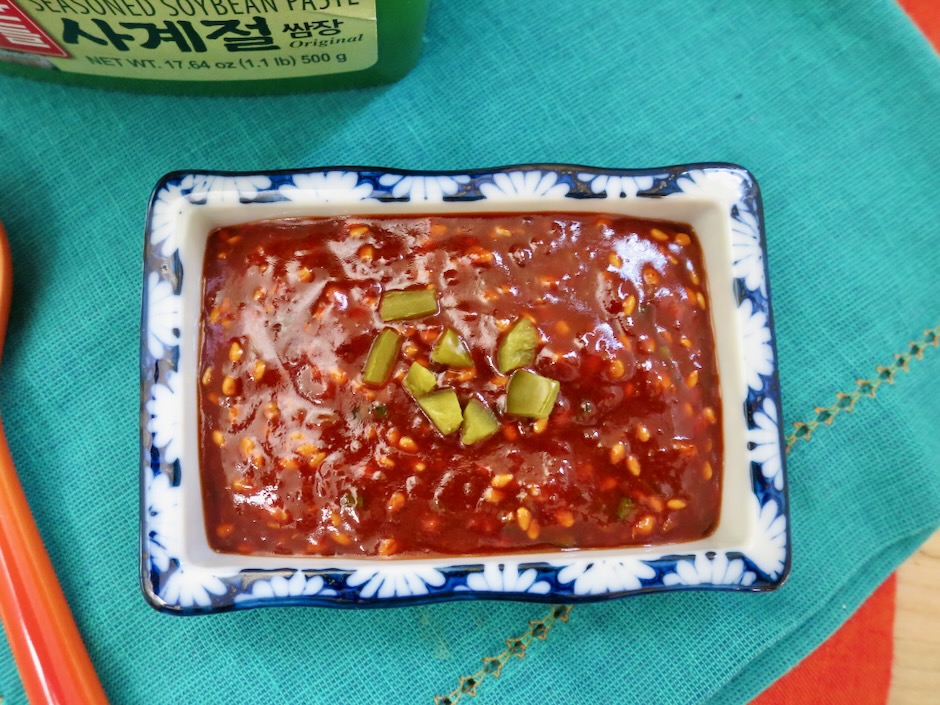
Ssamjang is a Korean soybean paste and is the basis for the Ssam sauce. I once tried replacing it with miso paste since I did not have ssamjang on hand. It was fine but after making the sauce with ssamjang I understood how important this ingredient is in order to create an authentic sauce for the Bo Ssam. All Korean markets as well as Amazon carry ssamjang.
While the pork is roasting and filling your home with the most incredible aroma, prepare your sauces for the table.
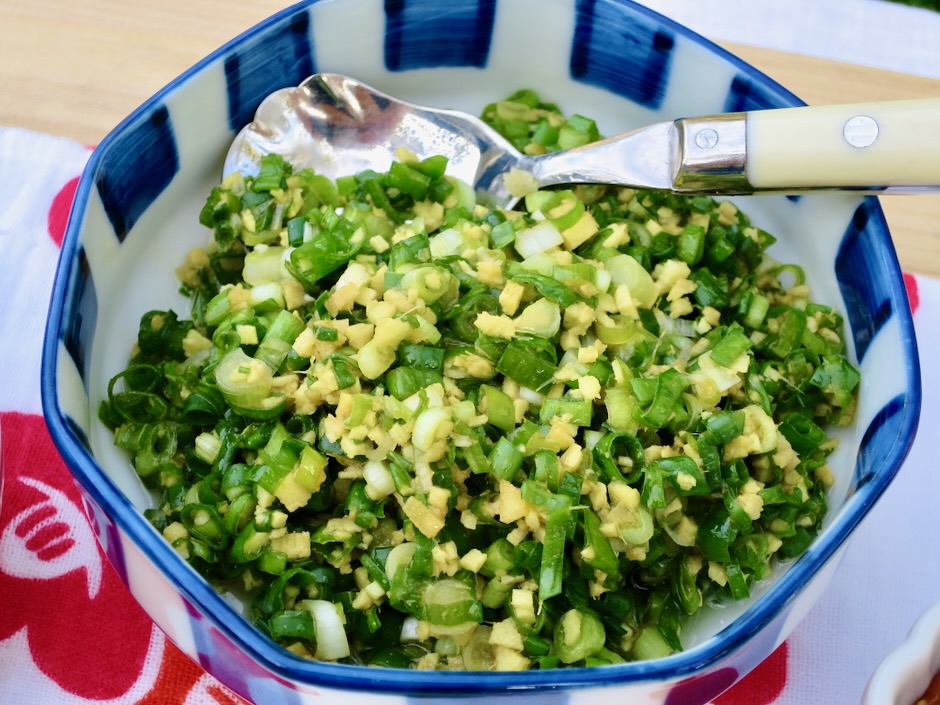
The scallion ginger sauce is so refreshing. It is the perfect accompaniment to the rich, flavorful pork. Make a double batch for leftovers.
Look at this gorgeous pork roast. Can’t wait to eat!
I found these little bao buns at Island Grocery here on Maui. Many Asian markets carry them either stored in the freezer or fresh on the display counter. They are optional for this meal but make for a tasty addition to lettuce. However, butter lettuce is essential so purchase the freshest available. Crisp them up in an ice water bath if you feel they need a quick refresh.
Pork Butt: 4-5 pound bone in pork butt (pork shoulder)
⅓ cup kosher salt (I used Diamond Crystal)
⅓ cup white sugar
3 tablespoons light brown sugar
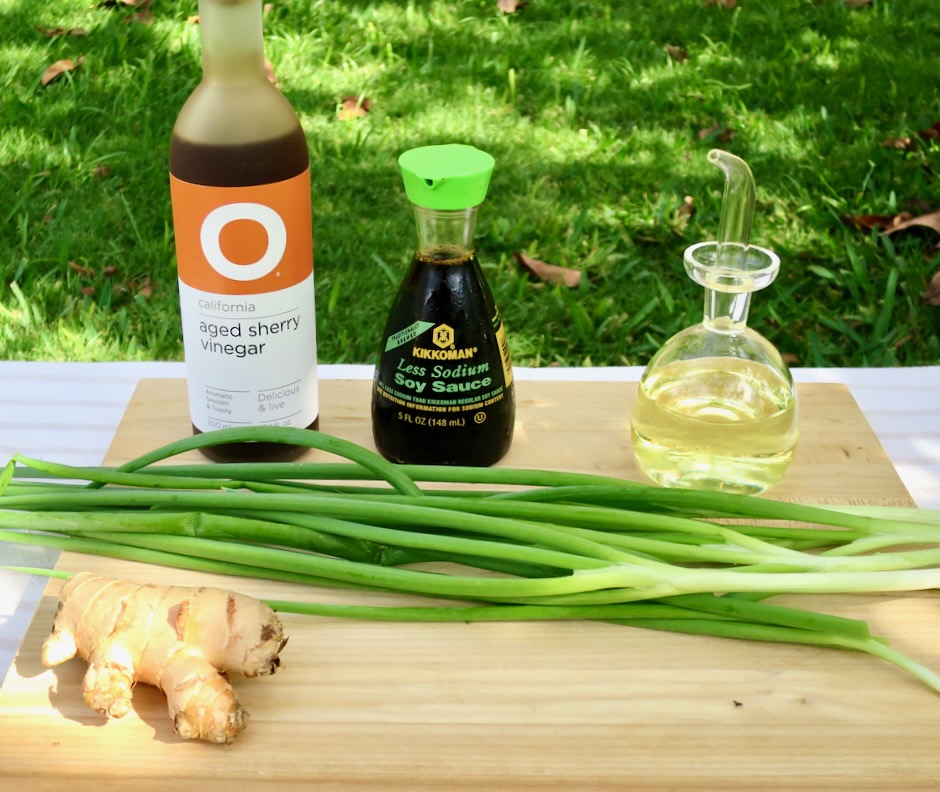
Ginger-Scallion Sauce: 1¼ cups thinly sliced scallions, both green and white parts
¼ cup very finely minced fresh ginger
2 tablespoons neutral oil
¾ teaspoon soy sauce
1 scant teaspoon sherry vinegar
¼ teaspoon kosher salt
Ssam Sauce: 4 tablespoons ssamjang paste
2 tablespoons gochujang
1 tablespoon honey
1 tablespoon sesame oil
2 teaspoons sherry vinegar
2 scallions, thinly slcied
1 small garlic clove, finely minced
2 teaspoons roasted sesame seeds
Accompaniments: steamed short or medium grain white rice
butter lettuce, leaves separated, washed and dried
steamed bao buns (optional)
kimchi
Preparation
Special ingredients: Ssamjang paste, sherry vinegar
Place the pork in a large, shallow glass baking dish. Mix the salt and white sugar together in a small bowl. Rub the mixture all over the pork. Cover with plastic wrap and place in the refrigerator for at least 6 hours, or overnight. I put my pork in the refrigerator the evening before I served it, for a total of about 14 hours.
When you are ready to cook the pork, heat oven to 300 degrees. Remove the pork from the refrigerator and brush off any excess sugar and salt mixture with paper towels. Discard juices collected in the pan. Place pork skin side up in a roasting pan (heavy duty foil lined pan makes for easy clean up). Cook for 6 - 6½ hours, basting hourly with pan juices. The cooking time will depend on the size of your pork. The meat should easily pull apart with the tines of a fork when done. At this point, you may remove the meat from the oven and allow to rest for up to an hour.
Meanwhile, make the ginger-scallion and ssam sauces. Combine sliced scallions, minced ginger, oil, soy sauce, sherry vinegar, and salt in a medium bowl. Cover and refrigerate until ready to serve. For ssam sauce, whisk together the ssamjang and gochujang paste, honey, sesame oil, and sherry vinegar. Stir in the scallions, garlic and sesame seeds. Cover and refrigerate until ready to serve.
Just prior to serving, set oven rack to middle position and preheat to 500 degrees. Rub the brown sugar all over the cooked pork. Place in the oven for about 6-8 minutes, or until a dark caramel crust has developed (watch for burning). Transfer to a large platter. To serve, shred some of the pork and place on the side of the platter. Allow everyone to make their own lettuce (and bao buns if using) wraps with pork and sauces. Serve steamed white rice and kimchi on the side.
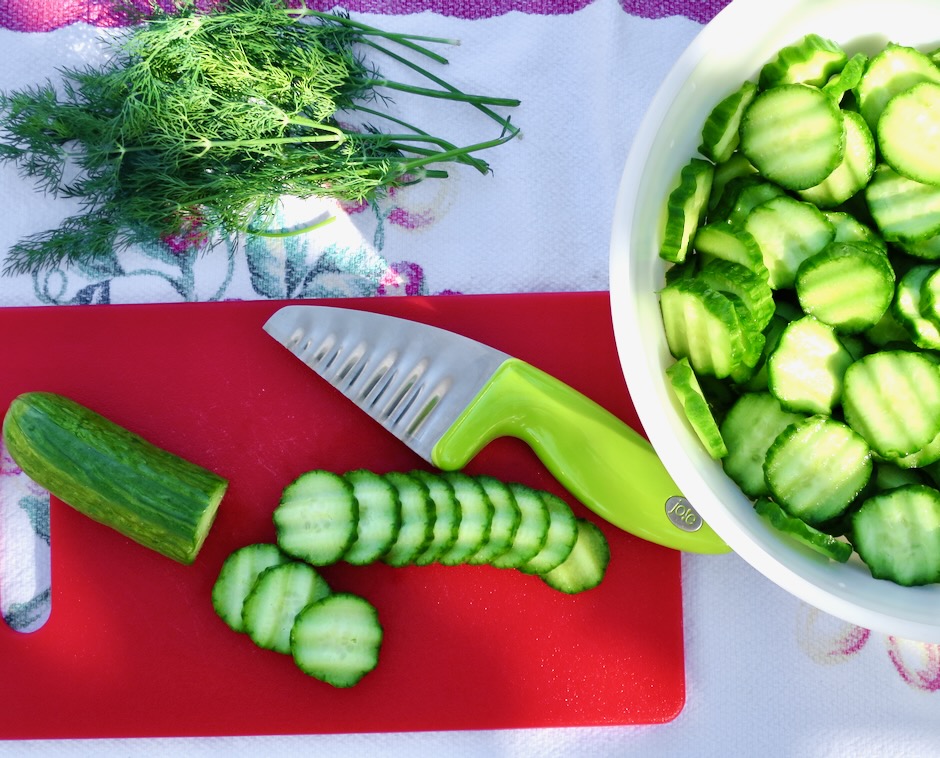
Crispy, tangy and refreshing quick dill pickle chips are so easy to make and perfect for your summer picnics. We love pickles and always have an assortment in our refrigerator to serve with sandwiches or for a quick snack. These dill chips are ready in just a few hours.
Kirby cucumbers are typically used for pickles but are rarely found here on Maui. Our locally grown Keiki Cukes are the perfect substitution. They are small and crispy with very few seeds. We have successfully used these for canning whole dill pickles as well as spears. They are sold at all of our local markets as well as Costco.
This crinkle cutter gives the cucumber slices scalloped edges which is sort of fun but of course is optional.
The brine for the pickles couldn’t be easier. The ingredients go into a pot until the mixture simmers, then poured over the sliced cucumbers. That’s it!
Use a large bowl or mason jars to brine the cucumber slices. This recipe makes enough pickles for three pint jars. Surprise your neighbor with a jar of these crunchy pickles.
The dill pickle chips are best eaten once they have been chilled thoroughly. Pile them on hotdogs, sandwiches, burgers or chop finely and mix into potato salads.
Place cucumber slices in a large bowl or pack in mason jars.
Heat water, vinegar salt, sugar, red pepper flakes, garlic, black peppercorns, mustard seeds, and dill in a large pot over high heat until salt has dissolved and the mixture is simmering. Immediately pour brine over the cucumbers, making sure they are submerged in the brine. Let cool for 30 minutes. Cover the bowl or jars, and refrigerate until thoroughly chilled. Store for up to a month.
Tender and juicy grilled chicken breasts marinated in mayonnaise combined with bold flavorings is a dream come true. It can be a tricky grilling lean chicken breasts as they have a tendency to overcook or cook unevenly. Mayonnaise is the solution to this problem. It is a perfect coating which will keep chicken very moist and tender when grilled. And it’s such an easy meal to put together on short notice. An added benefit is that the breasts become virtually non-stick when on the hot grill. Leftovers make the best sandwiches. And depending on what ingredients you choose to add to the mayonnaise, thinly sliced chicken is the perfect foil for warm tortillas served with your favorite salsa.
Choose whatever flavors you enjoy. I combined mayonnaise with smoked paprika and also mixed some up with homemade pesto. You could use fresh herbs, barbecue sauce, minced chipotle in adobo (for a spicy version), or any other bold ingredients. I reserved some of my pesto to serve over the grilled chicken.
Kenji Alt-Lopez has a recipe on NYT Cooking that includes chimichurri. You can put this together in 15 minutes if you have the ingredients ready to go.
Chimichurri sauce is very versatile. Use it with this recipe, or drizzled over a grilled steak, roasted veggies, pasta salad or as a sandwich dressing. For an appetizer, grill good sourdough bread and slather the sauce over the bread before serving.
4 boneless, skinless chicken breasts, pounded lightly for even pieces
4 tablespoons mayonnaise
flavorings of your choice: pesto, barbecue sauce, fresh herbs, chimichurri (best to use seasonings that do not have too much liquid as this will create a runny coating)
salt and pepper
chimichurri sauce: 1 cup packed Italian parsley leaves
¼ cup packed cilantro leaves (optional)
2 teaspoons finely chopped fresh oregano
1 teaspoon dried oregano
2 tablespoons chopped red or white onion
2 medium garlic cloves, minced
1 teaspoon red pepper flakes
½ teaspoon kosher salt
3 tablespoons red wine vinegar
6 tablespoons extra virgin olive oil
Preparation
Combine your favorite seasoning with the mayonnaise. Salt and pepper both sides of the chicken. Coat both the top and bottom of each breast with the seasoned mixture. Place chicken in a dish, cover with plastic wrap and refrigerate until you are ready to grill the chicken (a few hours is sufficient). If you are using more than one seasoning, divide mayonnaise into separate bowls then add desired seasonings to each bowl (1 tablespoon mayonnaise + seasoning per breast).
Meanwhile, combine all chimichurri ingredients in a small bowl. You may use some of the chimichurri with mayonnaise to coat the chicken breasts.
Grill over medium high heat until chicken reads 160 degrees on an instant read thermometer. Serve chimichurri sauce (if using) with grilled chicken. Cooked chicken breasts can be frozen (vacuum sealed preferably) and used for sandwiches or as a taco filling.
This tuna macaroni salad is delicious and quick to make with ingredients you already have in your pantry. It makes the perfect side dish for sandwiches, grilled chicken, tofu, pork or any of your favorite grilled foods. Include it as part of your bento lunch along with a spam musubi or katsu sando.
I love crispy bits of celery in my salads though you can leave it out if it’s not your thing. That goes for the onion as well. When using them raw, I go for sweet onions that have a more subtle flavor than their yellow or red counterparts.
You may use sweet relish right out of the jar or chop bread and butter pickles for a chunkier, crisper texture.
Serve the salad after it has chilled for at least 3 hours. Everyone will enjoy this summertime side dish.
¼ cup chopped bread and butter pickle chips or sweet relish
1 tablespoon Dijon mustard
¼ teaspoon onion powder
¼ teaspoon freshly ground black pepper
½ cup chopped celery
2 tablespoons sweet onion, finely chopped
paprika for garnish
Preparation
Bring a large pot of well-salted water to a boil and cook the macaroni according to package instructions. For this salad you don't want the pasta to be al dente, but fully cooked. Drain, rinse with cold water until the pasta is cool. Pour pasta onto a clean kitchen towel or a few stacks of paper towels to dry thoroughly.
Meanwhile, mix the mayonnaise with the chopped pickles or sweet relish, Dijon mustard, onion powder, and pepper. In a large mixing bowl, combine the cooked macaroni with the tuna, egg, celery and onion. Fold in the mayonnaise dressing until macaroni is evenly coated.
Taste and add kosher salt and more mayonnaise as needed. Cover and refrigerate for a least 3 hours until well chilled. Sprinkle with paprika before serving.
Notes: Salad can be made 1 day in advance (keeps well for 3 days). Double the recipe to feed a larger crowd.
The Caesar salad is iconic and one of the best salads ever created. A simple combination of crispy greens, a creamy dressing with a hint of anchovies, and crunchy croutons make it the perfect salad. In this version, kale replaces the romaine and toasted panko replaces the croutons. If you are fond of kale, you will love this salad. If you are on the fence about kale, you will still love this salad.
The dressing does not include an egg but you won’t miss it. With the flavorful anchovies, Parmesan, garlic and other ingredients, it makes a very tasty dressing that is perfect for the nooks and crannies of the curly kale leaves.
Having crunchy breadcrumbs with every bite of the salad is an additional plus.
Kale is a hardy green that keeps well. If you are serving the salad for fewer than four people, store the remaining freshly torn kale in an airtight bag in your refrigerator until you are ready to make another salad. The dressing will keep for several days, as will the panko bread crumbs.
4 cups packed curly kale (1 large bunch with ribs and stems removed, leaves torn into 1-inch pieces)
2 tablespoons plus ¼ cup extra virgin olive oil
2 oil-packed anchovy fillets
¼ cup fresh lemon juice (3 tablespoons if you prefer a less tangy dressing)
3 tablespoons mayonnaise
1 teaspoon Dijon mustard
1 teaspoon Worcestershire sauce
2 medium garlic cloves, finely grated (Microplane works great)
½ ounce Parmesan, finely grated (about ½ cup) plus more for serving
Preparation
Melt Buttery Sticks or butter in medium skillet over medium-low heat. Add panko, ⅛ teaspoon salt (1/4 teaspoon if using unsalted butter), and a few grinds of pepper. Cook panko, stirring often, until golden brown, about 4 minutes. Transfer to a small bowl and stir in half of the lemon zest.
Place torn kale into a very large bowl and drizzle 2 tablespoons olive oil over the greens. Massage kale with your hands until dark green and very soft, about 4 minutes.
Using the flat side of a chef's knife, smash the anchovy fillets on a cutting board to a fine paste. Transfer the paste to a medium bowl. Whisk in lemon juice, mayonnaise, mustard, Worcestershire sauce, garlic,1/2 ounce grated Parmesan, and ¼ teaspoon kosher salt. Gradually stream in remaining ¼ cup olive oil, whisking constantly until dressing is smooth and creamy.
Add half of the dressing to bowl with kale and toss evening to coat. Taste and add more dressing by the tablespoon until salad is well dressed. Taste and season with more salt and pepper if needed.
Mound salad onto a platter or divide among plates. Drizzle any remaining dressing over the top with more Parmesan, reserved panko, and lemon zest. Serve immediately.