Browsing Category

Vegetarian

Dinner, Lactose Free, Potato Salad, Recipes, Side Dishes, Summertime Meal, Vegetarian

Tri-color Fingerling Potato Salad with Red Onions

July 7, 2023

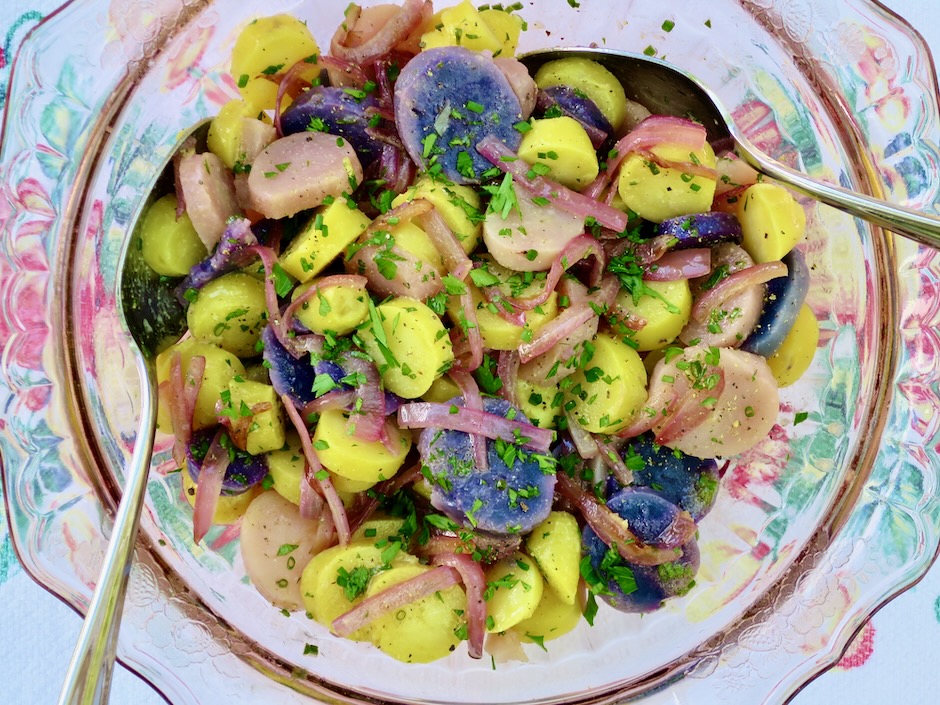
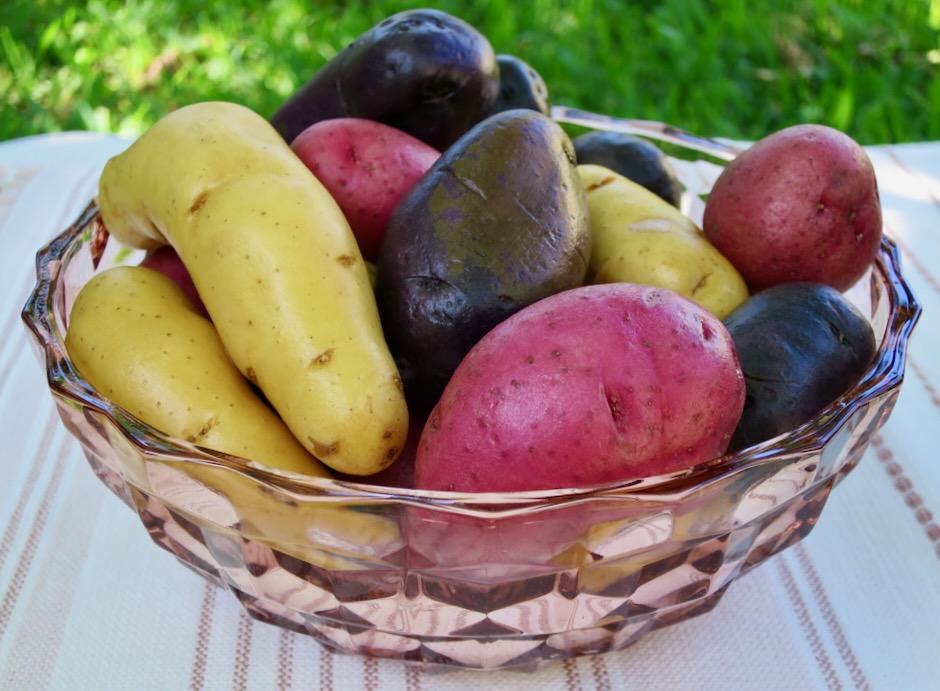
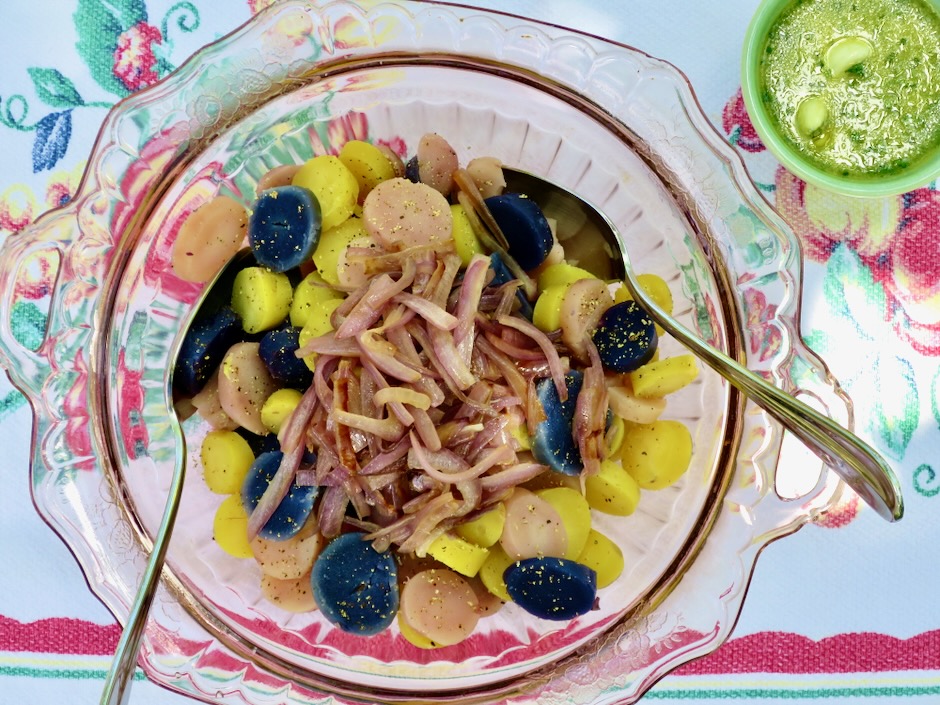
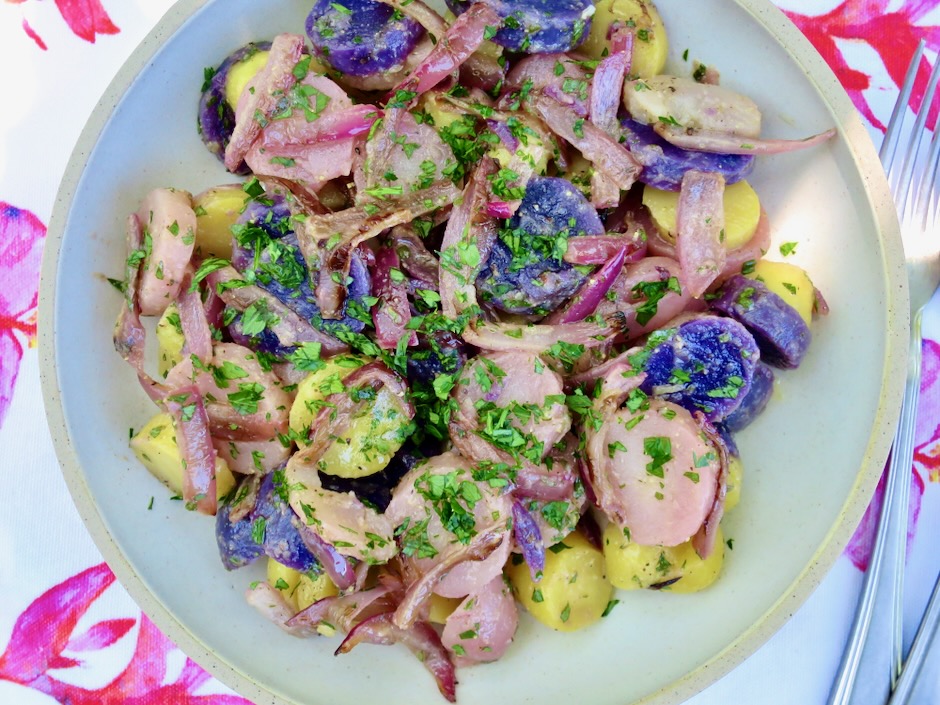
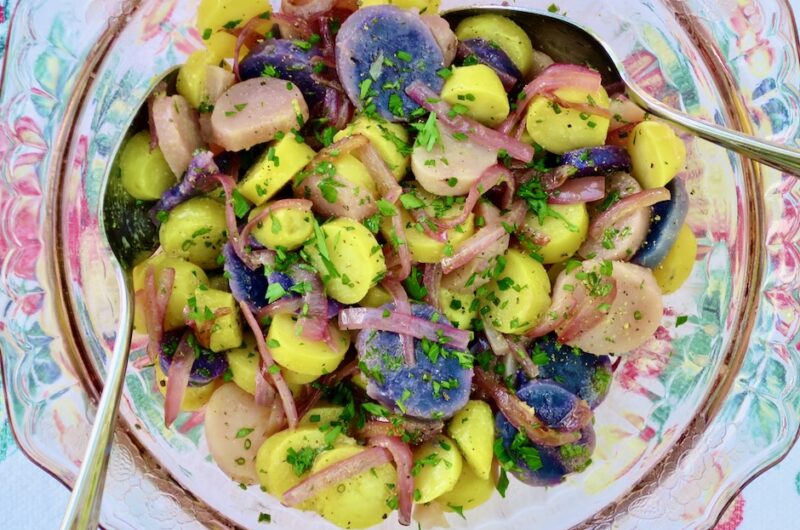
I remember not long ago markets featured only four types of potatoes; russets, white, red, and yellow. Today there are many more varieties to choose from. One of my favorites is fingerlings. They have a firm yet creamy texture which makes them perfect for this potato salad. The array of colors add a visual beauty to this dish.

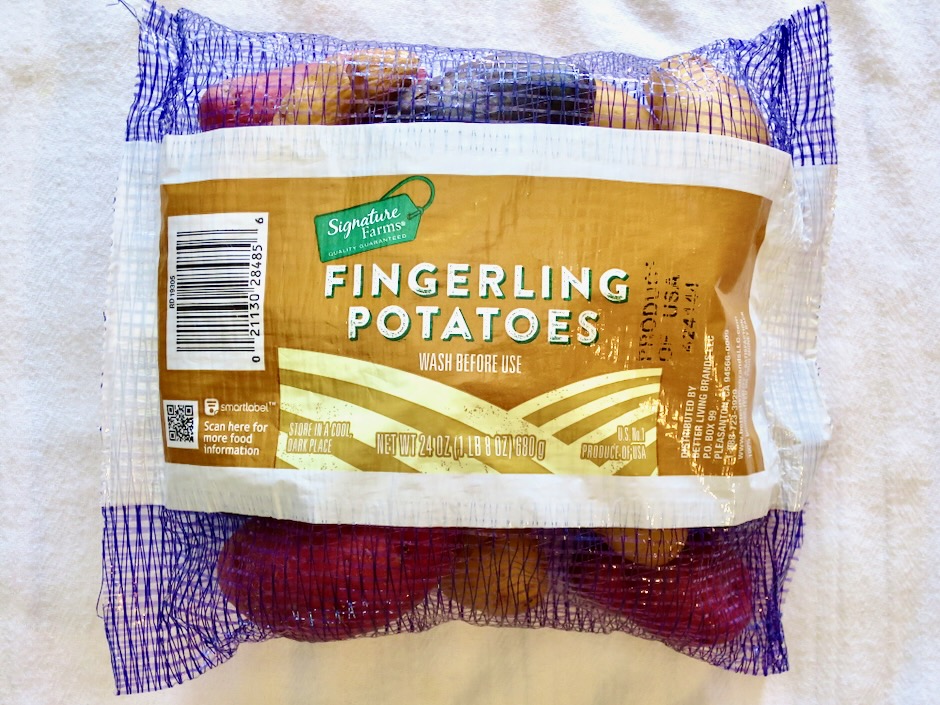
Fingerlings come in many shapes and sizes so when purchasing them (I found them at Safeway) look for the bag with the most uniform sized potatoes. This makes for even cooking.

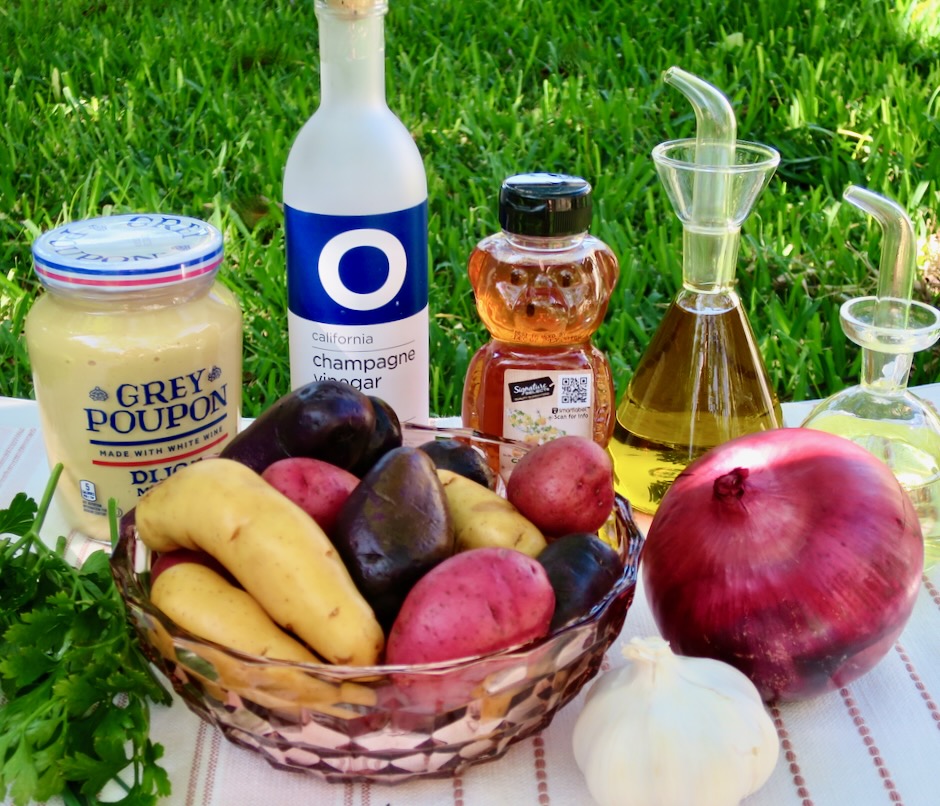
Many of us have multiple types of vinegars in our pantry. Each has its own use in different recipes. The one I reach for most often is champagne vinegar. Its flavor is crisp and light which makes it the ideal vinegar to use in dressings. Here on Maui you can find O Champagne Vinegar at Safeway and Whole Foods.

Though it is optional, peeling the potatoes once they are cooked makes for a gorgeous salad. The skins are thin and easily removed.

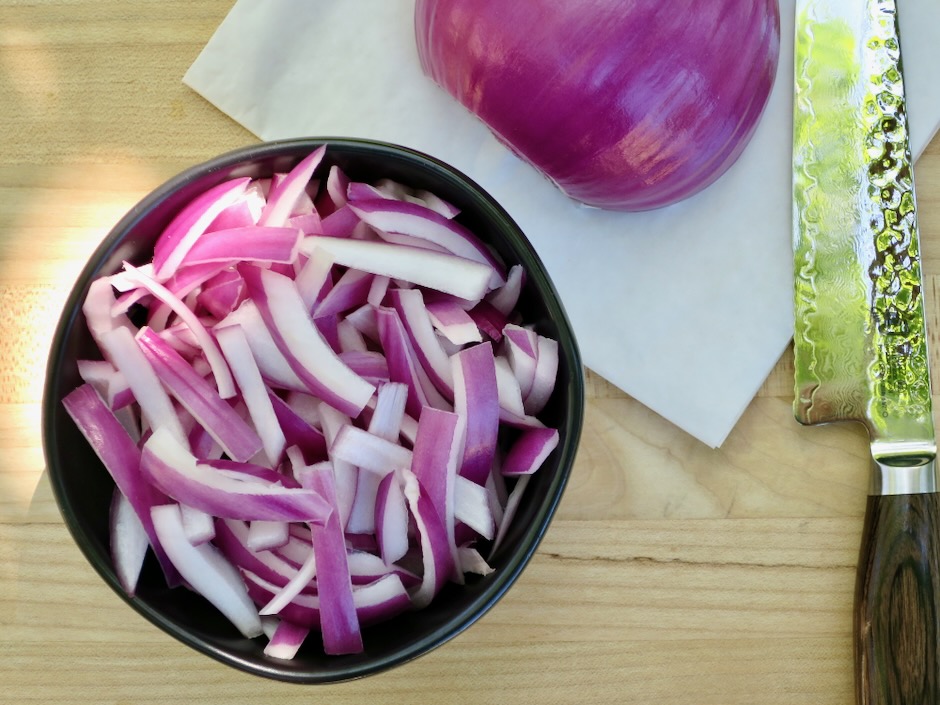
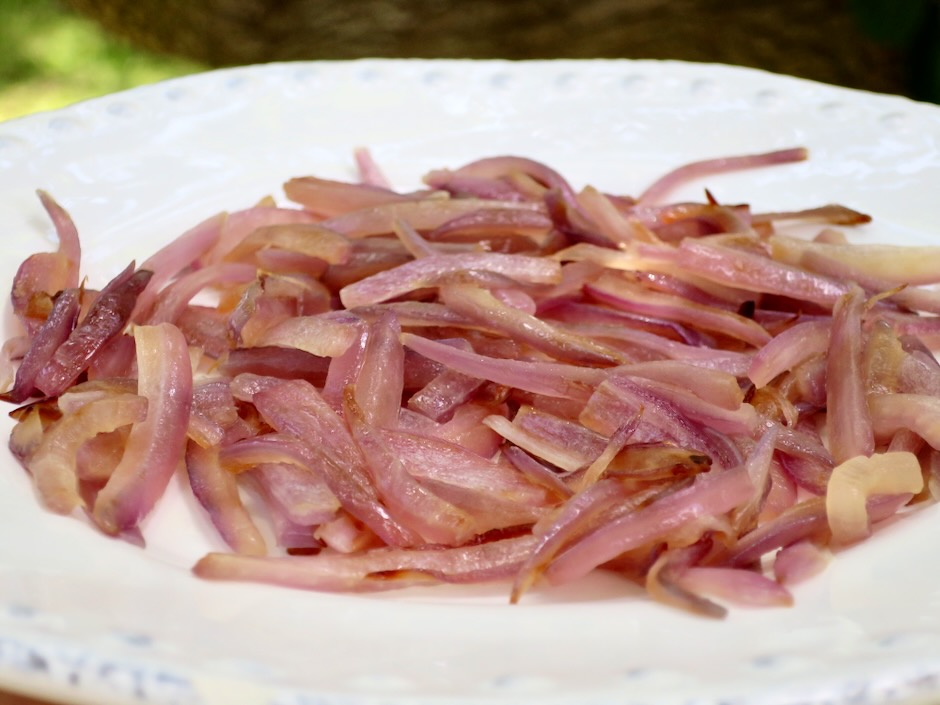
Gently sautéed red onions adds a subtle sweet flavor and color to the salad.

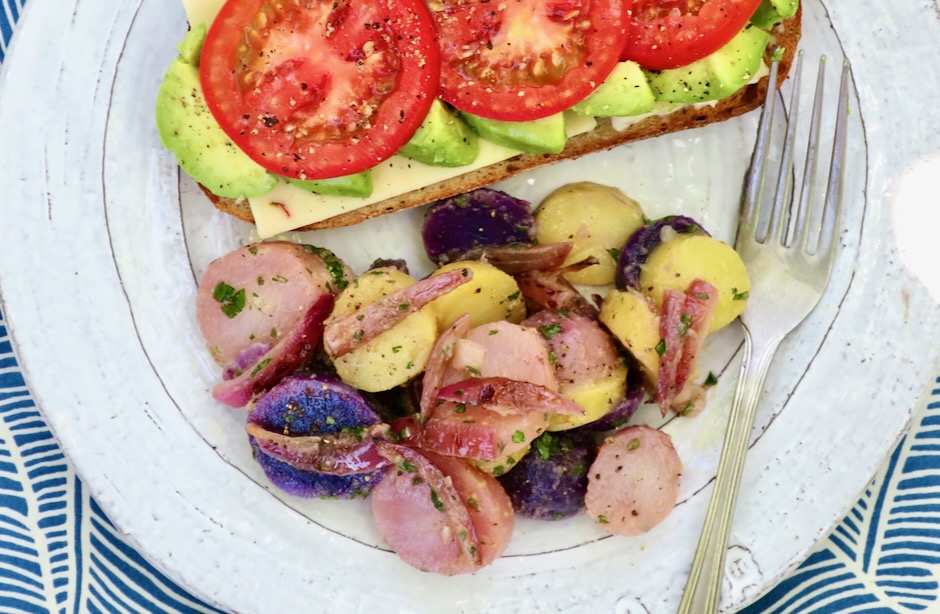
This potato salad is the perfect accompaniment to any type of sandwich, grilled chicken, pork, barbecue, tofu, or any other of your favorite summertime meals.

Tri-color Fingerling Potato Salad with Red Onions

Recipe by Kiyo
Servings

4-6

servings

Ingredients

  • 1 1/2pounds tri-colored fingerling potatoes (can substitute with mini yellow or red potatoes)

  • 4 ounces red onion, sliced 1/3-inch wide

  • 1 tablespoon + 1 teaspoon finely chopped flat leaf parsley

  • 2 teaspoons chopped chives

  • 2 teaspoons Dijon mustard

  • 1 teaspoon honey

  • 3 tablespoons champagne vinegar (or white wine vinegar)

  • 3 tablespoons extra virgin olive oil

  • 2 tablespoons canola or vegetable oil

  • 1 medium garlic clove, crushed

  • kosher salt and pepper to taste

Directions

  • Boil potatoes in a large pot of salted water for 10-15 minutes depending on size. Once cooked, remove to a plate to cool slightly. Peel potatoes once cool enough to handle (optional).
  • Meanwhile, heat a medium pan with 1 teaspoon olive oil and sauté onion slices on medium-low for 5-7 minutes or until tender but not browned. Remove to a plate and set aside to cool.
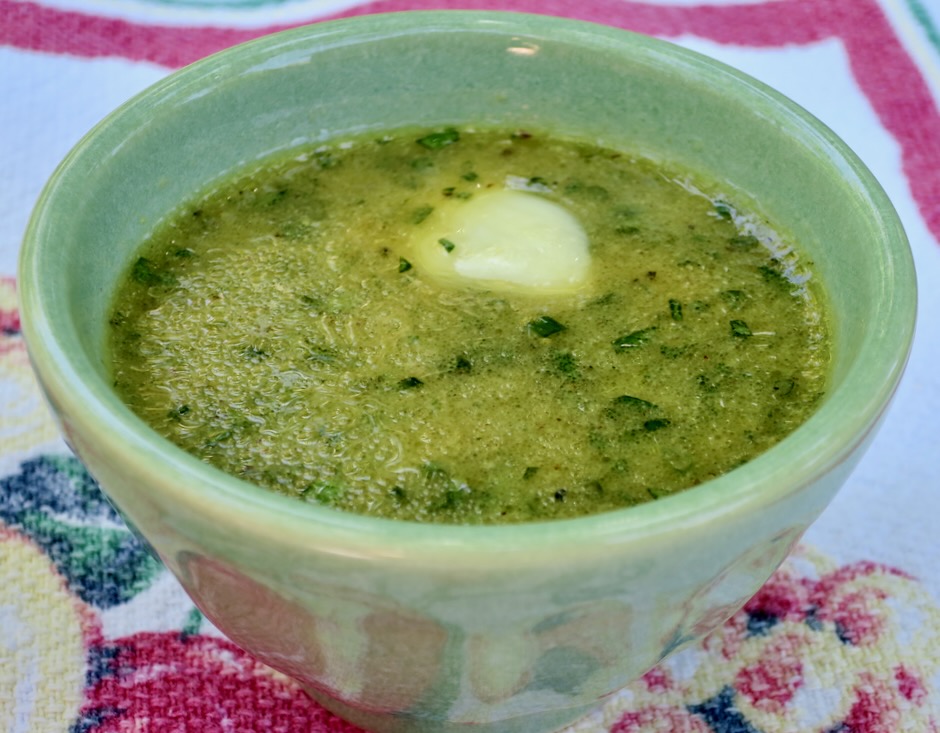
  • In a small bowl, whisk together the Dijon and honey. Whisk in the vinegar. Add olive oil and canola oil, whisking until emulsified. Stir in 1 tablespoon parsley and 2 teaspoons chives. Mix in 1/4 teaspoon kosher salt and freshly ground pepper.
  • Slice potatoes into 1/3-inch rounds and place in a low wide bowl. Season with salt and pepper. Add onions and enough dressing to coat the potatoes well. Taste and adjust seasoning if needed. Sprinkle reserved 1 teaspoon parsley over the top. Serve right away or cover and chill in the refrigerator until ready to serve. Stir in spoonfuls of remaining dressing if the salad seems dry (potatoes will absorb dressing as it sits). Salad will keep for 3 days.
Appetizers, Bread, Cheese, Dinner, Italian, Recipes, Side Dishes, Vegetarian

Pull-Apart Rosemary Garlic Bread

May 31, 2023

This made to share pull-apart rosemary garlic bread is baked until the crust is a gorgeous shade of gold, and the interior is soft and fragrant from the herbs, butter, garlic and parmesan cheese. It’s so delicious that you will be going back for seconds and thirds.

Food & Wine magazine mentions that making this bread is for bakers of all skill levels and after making it multiple times I absolutely agree. It’s a lot of fun to make and the final result is a delicious variation on garlic bread.

All-purpose flour, a bit of sugar, rapid rise yeast, milk, and butter are mixed up in a stand mixer before being formed into a ball and set aside in a warm area to rise.

When the weather is warm (always in Hawaii) I cover the dough and place the bowl out on the deck to rise. Some toaster ovens offer a dough proofing setting. If your climate is cool, you might put your bowl in the oven with the light turned on. Otherwise you may leave it out on your counter but expect it to take a bit more time to double in size.

While the dough is rising, make the filling.

Butter, cheese, parsley, rosemary, garlic, salt and pepper are mixed in a bowl and set aside until ready to use.

One hour of rise time and the dough has doubled in size.

It’s time to roll the dough into 12 round disks. Don’t worry too much about getting them perfectly round.

A tablespoon of filling is spread over the dough rounds that are stacked on top of one other before placing in the baking pan.

Occasionally the dough can be a bit uncooperative, meaning it will resist keeping its shape once rolled out. If it springs back just give it another roll or two and it should be fine.

The stacked dough circles are placed in the baking pan and set aside for the final rise.

After 45 minutes the dough has risen and filled up the empty spaces in the pan.

Baked for 45-50 minutes, the bread emerges from the oven looking spectacular.

The final touch is melted butter brushed over the warm bread followed by a sprinkling of Maldon salt.

This bread goes with just about anything. I serve it often with pasta dishes, but it is superb with roasted chicken, grilled steaks, fish and chicken, herb baked tofu and salads. Any leftover slices would be perfect toasted and topped with sunny-side up eggs for a quick lunch.

Pull-Apart Rosemary Garlic Bread

Recipe by Kiyo
Servings

4-6

servings

Adapted from Food & Wine

Ingredients

  • For the dough
  • 2 1/4 cups (270g) all-purpose flour, plus more for work surface

  • 2 tablespoons (25g) granulated sugar

  • 2 teaspoons rapid-rise yeast

  • 1 1/2 teaspoons kosher salt (I use Diamond Crystal)

  • 2/3 cup (158g) whole milk, warmed

  • 3 tablespoons (42.6g) Earth Balance Buttery Sticks or unsalted butter

  • For the filling and topping
  • 6 tablespoons (85g) Earth Balance Buttery Sticks or unsalted butter, softened

  • 1 cup (90g) finely grated parmesan cheese

  • 2 tablespoons finely chopped flat leaf parsley

  • 2 teaspoons finely chopped rosemary (1 1/2 teaspoons for a milder rosemary flavor)

  • 1 large garlic clove, finely grated (Microplane works well)

  • 1/4 teaspoon kosher salt

  • 1/4 teaspoon black pepper

  • 1 tablespoon Earth Balance Buttery Sticks or unsalted butter, melted (to brush on baked bread)

  • 1/2 teaspoon flaky sea salt such as Maldon (to sprinkle on baked bread)

Directions

  • Place flour, sugar, yeast, and salt in bowl of a stand mixer fitted with a paddle attachment. With mixer running on low speed, beat in warm milk and Buttery Sticks or unsalted butter. Beat on low speed until just combined, 30-45 seconds. Remove paddle attachment from mixer; attach dough hook. Beat on medium speed until dough is smooth and elastic, about 6 minutes. Transfer dough to a medium bowl coated with cooking spray. Cover with plastic wrap and let rise in a warm spot until doubled in size, about 1 hour. For colder climates, turn your oven light on when you start mixing the dough, then place covered dough bowl in oven. The warm oven environment will help your dough to rise.
  • Meanwhile, stir together butter, parmesan, parsley, rosemary, garlic, salt, and pepper in a small bowl until well combined. Set aside.
  • Once dough has doubled in size, punch down in bowl and transfer to a lightly floured work surface. Divide dough evenly into 12 pieces (about 3 tablespoons each). Using a small rolling pin, roll dough rounds into a 4-inch disk. You may also flatten each piece of dough with your hands (the disks do not need to be perfectly round). Spread about 1 tablespoon of filling onto one side of each disk. Stack disks, cheese side up, on top of each other. Turn stack of dough onto its side, and place in an 8 1/2-4 1/2-inch loaf pan coated with cooking spray. Slightly separate disks in loaf pan. Cover with plastic wrap and let rise in a warm spot until almost doubled in size, about 45 minutes. Preheat oven to 325 degrees.
  • Bake loaf on middle rack until golden brown, 45-50 minutes, covering loosely with aluminum foil if needed to prevent over browning. Transfer loaf pan to a wire rack and let cool for 10 minutes. Invert loaf onto wire rack, turn upright, and let cool for 10 minutes. Brush with melted butter and sprinkle with flaky salt. Serve warm.

Notes

  • Leftover garlic bread can be frozen and reheated (covered in foil) in a toaster oven.
Dinner, Lactose Free, Recipes, Salad, Side Dishes, Vegan, Vegetarian, Veggies

Cucumber Salad with Roasted Peanuts and Chile

April 29, 2023

This easy to make crispy cucumber salad has a lot going for it. Not only is it very simple to put together, it is an uncommon but tasty combination of ingredients.

Cucumbers with minimum amount of seeds and tender skins are best for this salad. You really want that “crunch” in each bite you take. Japanese cucumbers work well if you can find them.

The addition of nuts adds so much flavor and texture to salads. Including a small amount each day in your diet is very nutritious. The salad also has red pepper flakes for a bit of spice and cilantro for its unique je ne sais quoi. Of course if you don’t care for cilantro, switch it out with fresh mint or parsley.

The peanuts, cilantro, and chile flakes are chopped up together. I found that this is best done close to the time you are serving the salad. If you want to chop these ingredients in advance, it’s best to separate the cilantro from the peanuts and chile flakes as the moisture from the cilantro can affect the texture of the peanuts.

Once you have everything ready to go, toss the cucumbers with the dressing then sprinkle it with the peanut topping. A drizzle of your favorite chile crunch is the icing on the cake.

Cucumber Salad with Roasted Peanuts and Chile

Recipe by Kiyo
Servings

2-4

servings

Recipe adapted from NYT Cooking

Ingredients

  • 6 Japanese or Persian cucumbers (about 1 pound), cut lengthwise into thin spears, then cut crosswise into 2-inch pieces

  • Kosher salt

  • 1/4 cup salted, roasted peanuts

  • 1/4 cup cilantro leaves (or substitute with fresh mint or parsley)

  • 1/2 teaspoon chili flakes

  • 2 tablespoons soy sauce

  • 2 tablespoons unseasoned rice vinegar

  • 1 1/4 teaspoons granulated sugar

  • 1 small garlic clove, grated

  • Chile crisp or chile oil (optional but recommended)

Directions

  • Toss sliced cucumbers with 1/2 teaspoon kosher salt in a colander. Set aside to drain.
  • Chop peanuts, cilantro and red pepper flakes together until very fine. If you are not serving the salad within an hour, chop cilantro separately and combine with peanuts and chili flakes before serving. This will prevent the peanuts from taking on moisture from the chopped cilantro.
  • In a large bowl, whisk together soy sauce, rice vinegar, sugar and garlic. Transfer salted cucumbers to the bowl and toss to coat.
  • To serve, place half the cucumber salad on a plate, sprinkle with half the peanut mixture. Repeat with the remaining cucumbers and peanut mixture. Drizzle with chile crisp or chile oil if using. Serve immediately.

Notes

  • Leftovers will keep for a day stored in the refrigerator. Note that the peanuts may lose their crunch from being stored with the cucumbers and dressing.
Dinner, Japanese, Lactose Free, Recipes, Vegan, Vegetarian

Sesame Brown Butter Udon Noodles

March 16, 2023

Here is a quick and delicious dish to satisfy a craving for udon. Given that it includes fresh spinach, it’s nutritious as well. This is a broth-less bowl of chewy noodles flavored with browned butter and lots of sesame seeds. It’s scrumptious.

I highly recommend you seek out fresh udon. Here on Maui I buy Sun Noodle udon which is available at Island Grocery. If you are unable to find fresh udon, frozen udon would be the next option. Dried udon is very thin and lacks the wonderful chewy texture of fresh udon that makes this particular dish so delightful.

My version is vegan since I used Miyoko’s in place of regular unsalted butter. It’s an excellent substitute if you are lactose intolerant. Another plus is that you can actually brown Miyoko’s vegan butter.

The “butter” browns quickly so you’ll want to keep a close eye on it.

Once the “butter” has browned, it gets tossed with the cooked udon and spinach. Divide the noodles into bowls, sprinkle with a generous amount of roasted sesame seeds and a dollop of chili crisp and devour your bowl of noodles.

Sesame Brown Butter Udon Noodles

Recipe by Kiyo
Servings

2

servings

Adapted from NYT Cooking

Ingredients

  • 8 ounces fresh udon (in a pinch, substitute with frozen udon)

  • 5 ounce container of baby spinach (or up to 8 ounces)

  • 2 tablespoons Miyoko’s Vegan Butter (or regular unsalted butter)

  • 1/2 teaspoon coarsely ground black pepper

  • 1/2 tablespoon soy sauce

  • pinch of granulated sugar

  • 1 tablespoon roasted sesame seeds

  • Chili crisp for serving, optional

Directions

  • Bring a large pot of water to a boil. Add the noodles and cook according to package directions until just tender. Reserve 1/4 cup of cooking water. Drain the noodles in a colander and set aside.
  • Microwave spinach with 1 1/2 tablespoons water in a large bowl (cover with damp paper towel or microwavable plastic wrap with a small corner left open for steam to escape, or use microwavable steamer).
    Drain and add to noodles.
  • Set the pot used for cooking the pasta, over medium heat. Add 2 tablespoons Miyoko’s Vegan Butter and cook, stirring occasionally, until the foam subsides and the butter turns golden brown, about 3-4 minutes. Watch closely so the butter does not burn. Add the black pepper and stir until fragrant. Add 2 tablespoons reserved pasta water, plus noodles and spinach, soy sauce and sugar, and toss until the sauce is thickened and silky. Add more pasta water a tablespoon at a time if needed to ensure the sauce clings to the noodles.
  • Remove from the heat and season to taste with more soy sauce and black pepper if needed. Divide into two bowls, sprinkle with sesame seeds and serve with chili crisp.
Beans, Dinner, Lactose Free, Recipes, Side Dishes, Vegan, Vegetarian, Veggies

Roasted Green Beans with Caper Butter

March 1, 2023

Sometimes just a few simple ingredients can turn a dish into a delectable treat, as is the case with these roasted green beans. Though there’s nothing fancy about this side dish, it reminds me of something I might find at a fine restaurant. I love how uncomplicated this recipe is. You can have it ready in less than 30 minutes.

Capers are the definition of a flavor bomb. Briny, bold, salty and tart they add umami to the butter and other ingredients. The lemon zest adds a bright flavor and the fresh thyme (don’t leave it out!) is just delightful with the roasted beans. This basic compound butter can be whisked up in a jiffy.

The green beans are quickly roasted at high heat, 450 degrees for just about 12 minutes, or until slightly charred in areas.

Once roasted, the beans get tossed with the caper butter before being served.

Roasted Green Beans with Caper Butter

Recipe by Kiyo
Servings

4

servings

Ingredients

  • 1 pound fresh green beans, ends trimmed

  • 2 teaspoons olive oil

  • kosher salt

  • freshly ground black pepper

  • 2 tablespoons Earth Balance Buttery Sticks for lactose free version (or regular butter), softened

  • 1 1/2 teaspoons Dijon style mustard

  • 1 1/2 teaspoons chopped fresh thyme (not packed)

  • 2 teaspoons capers, drained and chopped

  • 1/2 teaspoon lemon zest (add additional 1/2 teaspoon for zestier flavor)

Directions

  • Preheat oven to 450 degrees. Line a sheet pan with foil for easy clean up.
  • Toss green beans with olive oil. Sprinkle with kosher salt and freshly ground pepper.
  • Roast green beans (in one layer) for 10-12 minutes or until lightly charred in areas, stirring once. They will soften a bit more once they are out of the oven.
  • Meanwhile, in a small bowl, stir together Buttery Sticks (or regular butter), mustard, thyme, capers, lemon zest and a dash of salt. Toss roasted green beans with the butter and serve immediately.
Appetizers, Dinner, Dressing, Lactose Free, Mexican, Recipes, Sauces, Vegan, Vegetarian

Guacamole Salsa

February 12, 2023

This guacamole salsa is creamy, spicy, and has just the right amount of acidity to make it one of my new favorite condiments for all things Mexican. After watching The Taco Chronicles on Netflix, I was intrigued by this beautiful salsa that was drizzled on tacos throughout Mexico. The combination of avocado and tomatillos with spicy peppers is delicious.

Each ingredient contributes loads of flavor to the salsa. Browning the vegetables a bit intensifies their flavor even more so.

It doesn’t take very long to impart a bit of color to the vegetables. A little goes a long way in developing flavor. Anyone who happens to walk by the kitchen will immediately know something tasty is in the works.

A medium avocado is all you need for this recipe. It adds texture to the salsa as well as a silky richness when combined with the other ingredients.

Everything goes into the blender before serving. I like to make this a few hours in advance and chill it before serving.

The salsa is delicious on tacos, but don’t stop there. I serve it with burritos, quesadillas, corn chips and tamales. It is quite versatile. You can even serve it with grilled fish, Mexican style grilled chicken, as a salad dressing for cabbage or crispy iceberg lettuce and as a topping for Mexican rice.

Guacamole Salsa

Recipe by Kiyo

2

cups

Ingredients

  • 1/2 pound tomatillos, husked, washed and sliced in half

  • 1 jalapeño pepper (you may use jalapeños or serrano peppers or a combination)

  • 2 serrano peppers

  • 1/2 small onion cut into 4 wedges

  • 2 medium garlic cloves, peeled

  • canola or vegetable oil for the pan

  • generous handful of cilantro

  • 1 medium avocado, seeded and peeled

  • 1 tablespoon freshly squeezed lime juice

  • 2 teaspoons kosher salt

Directions

  • Drizzle a teaspoon of canola oil into a medium sized fry pan and place over medium heat. Arrange tomatillos cut side down, along with the onion wedges, whole peppers, and garlic. Cook until vegetables are lightly charred turning as needed, about 5 minutes. Remove garlic ahead of time so that it doesn’t burn. Transfer to a bowl to cool slightly. Once cool enough to handle, slice peppers in half and remove seeds. Taste peppers to see how spicy they are and use just what you need according to how spicy you want the salsa to be.
  • Transfer tomatillos, peppers, onion and garlic to a blender. Add avocado, a handful of cilantro, 1 tablespoon of lime juice, 2 teaspoons kosher salt, and 3/4 cup water. Blend until smooth. Taste and adjust seasoning with more salt and lime juice if needed.
  • Transfer to a bowl and chill until ready to serve. The salsa is best used within 4 days. Any leftover salsa may be frozen in a plastic container. Defrost in the refrigerator overnight and stir before serving.

Notes

  • A plastic squeeze bottle is the most convenient way to serve and store the salsa.
Follow

Get every new post delivered to your Inbox

Join other followers: