The summer weather has been quite brutal here in South Maui. With temperatures reaching 90+ degrees, it’s hard to imagine cooking up a fancy meal in the kitchen all afternoon. If you’re looking for a superb summer salad, consider making this. Not only does this salad make a satisfying lunch, it can be transformed into a delightful dinner served with some good sourdough bread or focaccia.
You will briefly turn on the stove to cook the beans for a few minutes until they are tender-crisp. No other cooking is required for this dish.
We grew these beautiful beans in the garden just before the summer heat became too much for successfully growing most vegetables. There are plenty of green beans at the market that will work perfectly for this recipe.
The crisp beans, juicy tomatoes, earthy chickpeas and creamy feta works out to be the perfect combination, with fresh dill being the icing on the cake. A bright and tangy dressing makes this salad sing.
I highly recommend grilling some good sourdough bread to accompany the salad. The slightly smoky flavor of the bread completes the meal. Toasted cornbread or focaccia would also be a good option.
Tomato-Wax Bean Salad with Chickpeas, Feta and Dill
Bring a medium saucepan of water to boil over high heat. Add ½ teaspoon salt, then green beans. Cook until beans are tender and crisp, about 2 minutes. Transfer beans to a bowl of ice water to cool. Drain in a colander and blot dry with a kitchen towel.
In a small bowl, put lemon juice, vinegar, garlic, a pinch of salt and some black pepper to taste. Whisk in olive oil.
Add cherry tomatoes, green beans and chickpeas to a wide salad bowl. Season with salt and pepper. Add dressing and toss to coat. Add feta and toss once more. Let marinate 10 minutes, tossing occasionally. To serve, sprinkle generously with dill and dried oregano.
This refreshing salad comes from Samin Nosrat, writer of a James Beard award-winning New York Times best selling cookbook, Salt, Fat, Acid, Heat. We watched a documentary on Netflix featuring Ms. Nosrat a few years ago and really enjoyed it. I love the simplicity of this recipe. It has just a few ingredients but it packs loads of flavor. It’s the perfect summer salad.
The cucumbers and onions are crispy, the tomatoes are sweet, and the fresh herbs add life to this wonderful salad.
Our herbs do quite well in our hot climate. Italian parsley is an herb that we always have in our garden.
This salad is delightful on its own, but pair it with grilled chicken and tahdig, and you’re in for a real treat.
Salad-e Shirazi (Persian Cucumber, Tomato and Onion Salad)
2 tablespoons any combination of finely chopped Italian parsley, basil, dill or cilantro
2 teaspoons finely chopped fresh mint
1 tablespoon diced green onion
8 ounces diced grape or cherry tomatoes
¼ cup freshly squeezed lime juice
3 tablespoons extra virgin olive oil
Kosher salt and freshly ground black pepper
Preparation
Remove alternating stripes of peel on the cucumbers and trim ends. Dice cucumbers into ¼-inch pieces and place in a large bowl with onion and fresh herbs including mint. Cut grape or cherry tomatoes into quarters, about ¼-inch pieces.
In a small bowl, whisk together ¼ cup lime juice, olive oil, ½ teaspoon kosher salt and ¼ teaspoon pepper. Just before serving, dress vegetables with some of the vinaigrette and stir to combine. Taste and adjust seasoning with salt and pepper and more dressing. Serve slightly chilled with your favorite grilled chicken, tahdig or buttered rice. Leftover salad can be refrigerated for 1 day.
One of my favorite fruits to use in a galette is mango. During the summer months our two trees produce a good harvest of fruit that we use in all sorts of recipes. But not everyone has access to mangos so any number of other seasonal fruits or berries are suitable. I particularly like strawberries. They make a gorgeous galette that bakes up beautifully. The crust holds up well and leftovers, if any, are a real treat with coffee the following morning.
The strawberries found in the markets can vary in sweetness. It’s a good idea to buy ones that are ripe and juicy in appearance but not at all soft. Strawberries are quite perishable so plan on making the galette within a day or two of buying your strawberries.
The crust for this galette is excellent. It holds up well to the juicy strawberry filling and does not become soggy even if you have leftovers the following day.
I used Earth Balance Buttery Sticks (vegan and lactose free) but feel free to use regular unsalted butter as the original recipe calls for. Whatever you choose to use, make sure it does not sit out on the counter and is well chilled. Buttery Sticks are not as firm as regular butter so I freeze the cubes for 15-30 minutes before proceeding with the recipe.
If I am short on time I freeze the wrapped dough for 30 minutes instead of chilling it in the refrigerator for a few hours.
A little sugar is stirred into the berries which will give them a bit of sweetness, but not too much.
The strawberries are gently tossed into a mixture of strawberry jam that is mixed with cornstarch and a pinch of salt.
Roll the dough out on parchment paper. Transfer the rolled out dough to your rimmed baking sheet and continue with the recipe.
Leave a 2-inch border (sometimes I end up with 1 1/2-inches!) to fold over the filling. The original recipe calls for brushing the edges of the galette with some of the reserved strawberry juice and sprinkling sugar over the edges before baking. Try not to apply too much of the juice as it is quite thin and will drip down the sides of the crust. You can brush the crust with a bit of lactose free half and half or whole milk instead, then sprinkle with sparkling sugar. The coarse-grained sugar adds a beautiful sparkle and sweet crunch to each slice of the baked galette.
The dough is pleated every 2 inches to shape the galette and keep the strawberries the center of attention.
I brush a bit of warmed strawberry jam over the strawberries once the galette is done baking. It gives the galette extra flavor and a beautiful sheen.
For the dough: Process flour, salt, and sugar in a food processor until combined, about 4 pulses. Scatter Buttery Sticks cubes over the top and pulse until mixture resembles coarse sand and butter pieces are the size of small peas, about 10-12 pulses. Add ice water to flour mixture and pulse until dough begins to form small curds and holds together when pinched with your fingers, about 5 pulses.
Transfer mixture to a lightly floured counter. Gather dough into a rough rectangular mound about 8 inches long and 4 inches wide. Starting at the farthest end, use the heel of your hand to smear a small amount of dough against the counter, pushing firmly down and away from you. Continue doing this while turning the dough as you go. Continue until all the dough has been worked, about 8 times. This is a process of working the crumbles of flour, butter, and water together into a dough by smearing them against the counter, making for a sturdy, flaky crust. Form dough into a 6-inch disk, wrap tightly with plastic wrap and refrigerate for 2 hours or freeze (if short on time) for 30 minutes. The dough can be refrigerated for up to 2 days.
For the filling: One hour before rolling out the dough, toss strawberries with ¼ cup sugar in a medium bowl. Set aside for 1 hour. Reserve 1 tablespoon strawberry juice (if using for crust). Drain strawberries in colander while rolling out dough.
Adjust oven rack to lower-middle position and heat oven to 375 degrees. Roll dough into 12-inch circle on parchment paper. Transfer dough on parchment paper to rimmed baking sheet, cover loosely with plastic wrap and refrigerate until firm, about 15 minutes.
Whisk jam, cornstarch, and salt in a large bowl. Add drained strawberries and toss gently to coat. Remove dough from refrigerator (I transfer to dough to a second rimmed baking sheet that hasn't been chilled) and mound fruit in center, leaving a 2-inch border. Grasp one edge of dough and fold up 2-inches over fruit. Repeat around circumference of galette, overlapping dough every 2-inches. Firmly pinch pleated dough to secure. Sprinkle reserved 1 tablespoon of sugar over the strawberries. Brush top edges of dough with reserved strawberry juice, half and half or whole milk and sprinkle with sparkling sugar.
Bake until crust is deep golden brown and fruit is bubbling, about 1 hour 5 minutes. Let galette cool on baking sheet for 5 minutes. Warm reserved tablespoon of jam. Brush jam over the berries. Let cool for 15 minutes. Using parchment, carefully slide galette onto serving plate. Serve warm or at room temperature.
In the May issue of Food & Wine magazine, Hetty McKinnon (cookbook and food writer) tells the story of her visit to Tokyo and how a simple bowl of udon became life-changing. The noodles were toothsome, served with a perfectly cooked jammy egg, green onions and a bit of flavorful broth. It was served with a generous amount of freshly ground black pepper scattered over the top which paired perfectly with the udon. After reading the article, I was determined to prepare this noodle dish. Now, more than a month has gone by and I’ve made it at least three times, and every bowl has been as delightful as the last.
Sun Noodle sells fresh udon at Island Grocery market in Kahului. I will go out of my way to pick up a package of their excellent udon and ramen even if they are the only items I’ll buy that day.
I just love eggs, especially ones with soft yolks. The eggs I made for this dish are boiled for exactly six minutes and 50 seconds. They are quickly transferred to an ice bath to stop the cooking. You can use them as is, or make soy sauce eggs if you have extra time. Either way, the egg turns out perfectly with jammy centers and fully cooked whites.
It’s such a simple recipe with easy to find ingredients. The baby bok choy adds color and crunch, but it is optional. Don’t skip the green onions, egg, and pepper. Sometimes I will sprinkle shichimi togarashi pepper over the noodles to add a bit of spice to the dish. This recipe does not have a lot of broth. If you prefer more, increase that part of the recipe. However, I find that there is just enough to keep the udon hot, and the soup gets slurped up when the bowl is empty of noodles.
½ cup finely sliced green onions, green and white tender stems
freshly ground black pepper
1 tablespoon sesame oil
flaky sea salt for the eggs
shichimi togarashi Japanese pepper, optional
Preparation
Fill a small saucepan with water; bring to a boil over high heat. Gently lower eggs into boiling water. Set timer for 6 minutes and 50 seconds. Once water returns to boiling, lower the heat slightly to maintain a gentle boil. Meanwhile, fill a medium bowl with ice water. Once the eggs have cooked, transfer to the ice water bath immediately. Let cool for a few minutes before peeling.
Bring a large saucepan of water to a boil over high heat. Meanwhile, stir together the vegetable stock, soy sauce, and mirin in a small saucepan. Cook over low, stirring occasionally, until hot, about 6 minutes. Add noodles to boiling water and cook according to package directions for al dente. Drain noodles, and divide evenly among 4 bowls.
Pour hot soy sauce broth over each bowl of noodles. Add a tablespoon of butter to each bowl and allow to melt into the noodles and broth. Halve the eggs and top each bowl with 2 egg halves. Sprinkle a bit of flaky sea salt and black pepper over the eggs. Add the green onions and scatter a generous amount of freshly ground black pepper over the noodles. Finish with a drizzle of sesame oil before serving. Serve with shichimi togarashi pepper (optional).
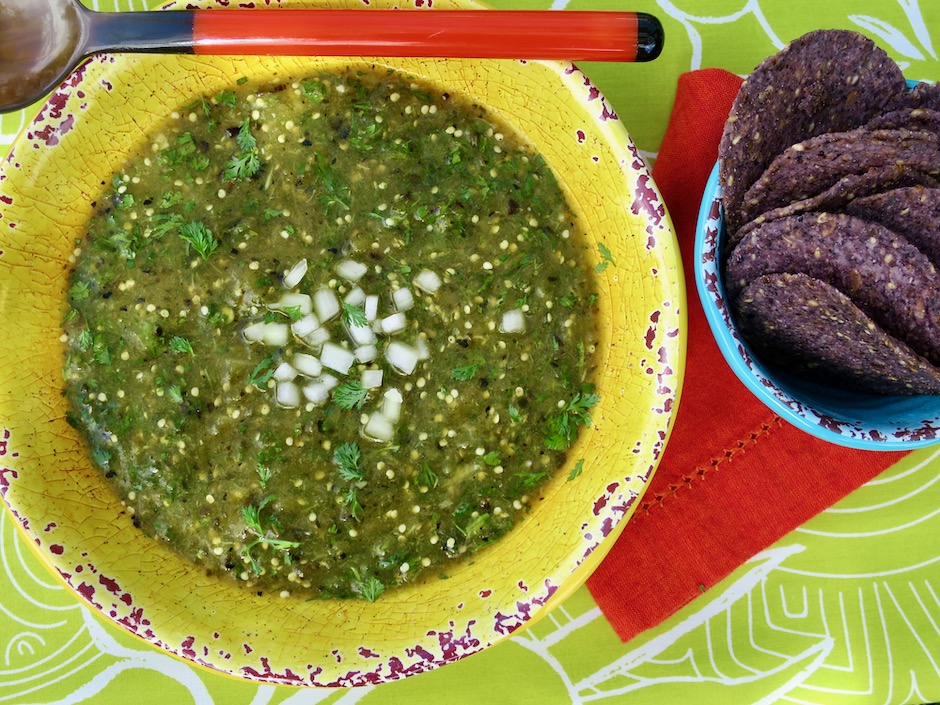
This tomatillo based salsa is delicious and because it’s homemade, it tastes far better than any jarred salsa found on the grocery store shelves. I find that store-bought salsas tend to be quite salty so making my own allows me to add just the right amount of seasoning and heat from the peppers. It’s very easy to make and can be eaten with tortilla chips or served with your favorite Mexican dishes.
I made a small batch that was just the right amount for four meals, but feel free to double the recipe if you are serving more than two people. Broiling the tomatillos, peppers, onion and garlic add an extra depth of flavor. Peppers can vary in heat. Buy a couple of serrano peppers just in case using one is too mild for your taste.
Instead of turning on my oven broiler, I use my Breville toaster oven which saves me from heating up the house during these hot summer days.
After the the tomatillos, peppers, onion and garlic are broiled, everything gets blended into a thick salsa with the immersion blender. Do you have one of these gadgets? It definitely comes in handy when you don’t want to drag out the big blender for a small project like this.
I usually chill the salsa a bit before serving it so plan ahead if you want to do the same. Otherwise serve it at room temperature with crispy tortilla chips, tacos and burritos, or our new favorite Mexican dish: Tlacoyos. It’s delicious on scrambled eggs scooped into warm corn tortillas.
¾ pound tomatillos, husked, washed and cut in half
1 small garlic clove, peeled
¼ small onion, cut into wedges
1-2 serrano peppers
3 strips of poblano pepper
½ cup lightly packed cilantro, finely chopped (reserve 2 tablespoons)
½ teaspoon kosher salt
¼ teaspoon sugar
fresh lime juice
Preparation
On a foil lined broiler pan, lay tomatillos cut side down, along with the garlic, onion and peppers. Broil for 10-15 minutes or until nicely charred (remove garlic clove earlier to avoid burning). Let cool for 5-10 minutes.
Carefully lift foil and pour ingredients into immersion cup or food processor (including juices from tomatillos). Add cilantro, salt, sugar and a few squeezes of fresh lime juice. Blend or pulse just until ingredients are thoroughly combined and have a thick consistency. Remove to a serving bowl. Adjust seasoning with extra salt and lime juice. Stir in reserved 2 tablespoons of finely chopped cilantro.
Lately I’ve been having fun making all sorts of different ramen dishes. Fresh ramen is best for this dish if you can find it. Luckily here on Maui, a few select markets sell fresh Sun Noodle ramen. The original recipe from The NY Times calls for 3-ounce packages of ramen, however, Sun Noodle ramen comes in 5-ounce packages, so that is what I used here.
Anything that calls for fresh ginger gets my attention immediately. I love the refreshing flavor it brings to various dishes. There’s no shortage of it here. It’s used in the chile oil and also stir-fried with the ramen.
The chile oil is so easy to prepare and it tastes divine. Besides using it for this ramen recipe, you might drizzle it over soft cooked eggs served over rice, on tofu, over steamed bok choy or other greens.
We used flat green beans that we grew in the garden but you can use regular round green beans as well. Just make sure your wok or pan is hot so they get a nice char. The flavor of the charred beans adds so much flavor to this dish.
Ramen with Charred Scallions, Green Beans & Chile Oil
1 piece ginger (1/2-inch), peeled and finely chopped
1 garlic clove, minced
1 teaspoon roasted white sesame seeds
½ teaspoon sesame oil
Noodles:
2 (4-5 ounce) packages fresh ramen (I use Sun Noodle brand)
1 bunch scallions (6 pieces), white and green parts separated and cut into 2-inch pieces
1 tablespoon grapeseed or canola oil
8 ounces green beans, trimmed and cut into 2-inch pieces
1 (1-inch) piece ginger, peeled and julienned
½ tablespoon roasted white sesame seeds
salt and pepper
Preparation
Prepare the chile oil: Add the red pepper flakes and salt to a heatproof bowl. Place the oil, ginger and garlic in a small saucepan, and heat over medium until it bubbles, about 1-2 minutes. Remove from the heat and carefully pour the hot oil over the red pepper flakes. Add the sesame seeds and sesame oil, and stir well. Set aside while you make the rest of the dish. (You can make the chile oil a few days in advance, store in an airtight jar in the refrigerator).
Prepare the noodles: Bring a large pot of water to a boil. Add the ramen and cook according to package directions, until just tender. Drain, rinse with cold water and drain well again.
Heat a wok or large deep skillet on high. When smoking hot, add ½ tablespoon oil, toss in the green beans and season with salt. Cook, tossing the beans for 2 - 3 minutes, until charred. Remove beans from the wok and set aside.
Heat the same wok or skillet over high, and when smoking, add 1 tablespoon of oil, along with the scallions, both white and green parts, and the ginger. Allow the scallions and ginger to sizzle for 20 seconds, to release their aromas, then stir-fry for 2 - 3 minutes until the scallions have a nice scorch.
Add the green beans and noodles back to the pan, along with 1 to 1½ tablespoons of chile oil, and season with salt and pepper to taste. Toss well to combine, just until the noodles are heated through (you want to keep the noodles chewy and not overcook them). Divide noodles between two bowls, top with roasted sesame seeds and more chile oil.