Now that it’s avocado season, we have been enjoying avocado sandwiches with cheddar, chunky guacamole, avocado toast, and avocado eggs Benedict. The Green Gold tree in our back yard is a heavy bearer and the avocados are incredibly tasty. So here we have a new addition to our ever expanding recipe file. The tart dressing and herby flavors compliment the rich, velvety avocado slices. This salad is a keeper.
The Green Gold avocado has to be one of the best varieties to grow in Hawaii (a cultivar developed by the University of Hawaii). The trees are heavy bearers and produce beautiful fruit that are rich and creamy and known for their high oil content. If you are thinking of planting an avocado tree I highly recommend seeking out the Green Gold.
The dressing is reminiscent of a chimichurri sauce. A good splash of red wine vinegar gives the right acidic touch to the herbs, jalapeño and garlic.
The addition of a jalapeño makes for a nice pop of heat. Since jalapeños vary in their level of spiciness, test the one you use and add more or less according to your taste. If you don’t have one, sprinkle in some red chili flakes. You could even use pickled jalapeños if you have those in your refrigerator.
My favorite way to serve this salad is with good, crusty grilled sourdough bread. Drizzle some of the dressing onto the grilled bread, or scoop some of the avocado salad onto the bread. Delicious.
1 small or ½ medium jalapeño, seeded and very finely chopped
¼ teaspoon fine sea salt
1 tablespoon red wine vinegar
¼ cup extra virgin olive oil
2 medium avocados, peeled, pitted and sliced
2 teaspoons capers, drained
Maldon sea salt or other flaky salt
freshly ground black pepper
Preparation
Reserve ½ cup of both whole cilantro leaves and parsley leaves. Finely chop the rest of the leaves and transfer to a medium bowl. Add scallions, garlic, jalapeños, salt and vinegar. Stir in oil. Taste and add more salt, vinegar or both if needed.
Scatter the reserved whole cilantro and parsley leaves over two serving plates. Fan the avocado slices over the top, and sprinkle lightly with salt to taste. Spoon herb dressing over the avocado slices, making sure to include the oil in the bowl (you may not use all of the dressing), and top with the capers. Sprinkle with Maldon sea salt and pepper. Serve with crusty grilled sourdough bread brushed with olive oil.
This is a very tasty tofu dish that can be made in an hour. The delicious sauce is quite versatile and can be used in multiple ways. It’s excellent with the crispy tofu but I’m sure it would be just as good with grilled chicken or pork chops if tofu is not your thing. However, it’s a must with this tofu. You will be pleasantly surprised at how yummy it is.
Serve the tofu over white or brown rice along with your favorite greens, and extra sauce on the side.
Use extra firm tofu so it holds its shape once the water is pressed out. Wildwood is my favorite brand. You can find it at Down to Earth here on Maui.
If you are looking for the very best way to press out the water from a tofu block, consider buying the TofuXpress. You will never regret it, especially if you bake tofu often. Pressing tofu with paper towels or a kitchen towel doesn’t hold a candle to this little gadget. I’ve had mine for over 10 years.
The tofu block is cut into 1/2-inch slices, then cut into short sticks.
A little bit of panko added to the cornstarch makes all the difference in giving the tofu a crispy exterior.
The barbecue sauce uses ingredients that are not difficult to find. Better yet, the sauce does not require any cooking.
Glorious homemade barbecue sauce with a twist. The sauce has Asian ingredients such as soy sauce, ginger and sesame oil, but it also has the more typical maple syrup, chili powder and tomato paste that you might find in an American style barbecue sauce. The combination turns out a sauce that’s seriously addicting.
1 small garlic clove, grated or finely minced (about ¼ teaspoon or up to ½ teaspoon for garlic lovers)
2 tablespoons tomato paste
2 tablespoons pure maple syrup
1 teaspoon mild chili powder
2 tablespoons soy sauce (Kikkoman recommended)
2 tablespoons lite soy sauce (Kikkoman recommended)
2 teaspoons sesame oil
roasted sesame seeds for serving
Preparation
Press water from tofu, preferably with tofu press if available.
Cut tofu into ½ -inch slices. Cut each slice crosswise to make two pieces, then lengthwise to make 4 pieces (about 28 pieces). Combine corn starch with panko in a pie plate or wide bowl and set aside.
For the sauce, in a medium bowl, combine ginger, garlic, tomato paste, maple syrup, chili powder, soy sauces and sesame oil. Whisk to combine, set aside.
Toss tofu pieces in cornstarch panko mixture pressing gently so the coating adheres to the tofu
Heat canola oil (enough to go up the sides of a pan about ¼-inch) in a large skillet over medium to medium-high heat. Fry tofu until crispy, turning now and then, about 4 minutes or so. Adjust heat as needed so the tofu doesn't burn and is just golden brown. Remove tofu to a paper towel-lined plate.
To serve, place tofu over rice and spoon barbecue sauce over tofu. Sprinkle sesame seeds over the top. Serve with your favorite greens (broccoli, bok choy, green beans) and extra barbecue sauce on the side.
This is one of my favorite Japanese side dishes served with rice and cold tofu. It makes for a very quick and delicious lunch. It can be prepared well in advance and doesn’t need any attention until you drizzle the sauce over it. It is so refreshing and healthy.
Spinach shrinks drastically when blanched so you’ll need a pound of fresh spinach for two servings. Once blanched, the spinach goes into an ice bath to stop the cooking quickly.
Blanched spinach has a gorgeous bright green color to it. And with the sauce drizzled over and around the spinach it makes for a beautiful presentation.
I divided the spinach (squeezed dry) into four equal pieces and shaped them into short rolls, then sliced them into rounds before adding the sauce.
Ground roasted sesame seeds are one of my favorite additions to this dish. Not only does it give the spinach a delicious nutty flavor, it also adds contrast to the bright green rounds and golden sauce.
I opted to use instant dashi because of the small amount needed for the recipe. It is convenient and tastes great in this sauce.
A side of tofu with green onions, ginger and soy sauce (and rice) complete a healthy meal for any day of the year.
½ cup dashi (I used instant dashi picture above. ½ cup warm water mixed with 1½ teaspoons dashi powder)
2 tablespoons soy sauce
1 tablespoon mirin
roasted ground sesame seeds
Preparation
Bring a large pot of water to a boil. Blanch the spinach just until wilted, about 30-40 seconds. Immediately drain and transfer spinach to an ice bath. Once thoroughly chilled, remove spinach to a colander to drain.
Meanwhile, combine dashi with soy sauce and mirin in a glass measuring cup (can be made in advance and kept refrigerated until ready to use). Set aside.
Divide spinach into four equal portions. Squeeze out as much water as possible from each portion and form into short rolls. Slice each roll into equal sized rounds (serrated knife works best). Place rounds of spinach on serving plate. Drizzle sauce over and around the spinach. Sprinkle tops with ground sesame seeds. Serve at room temperature or slightly chilled.
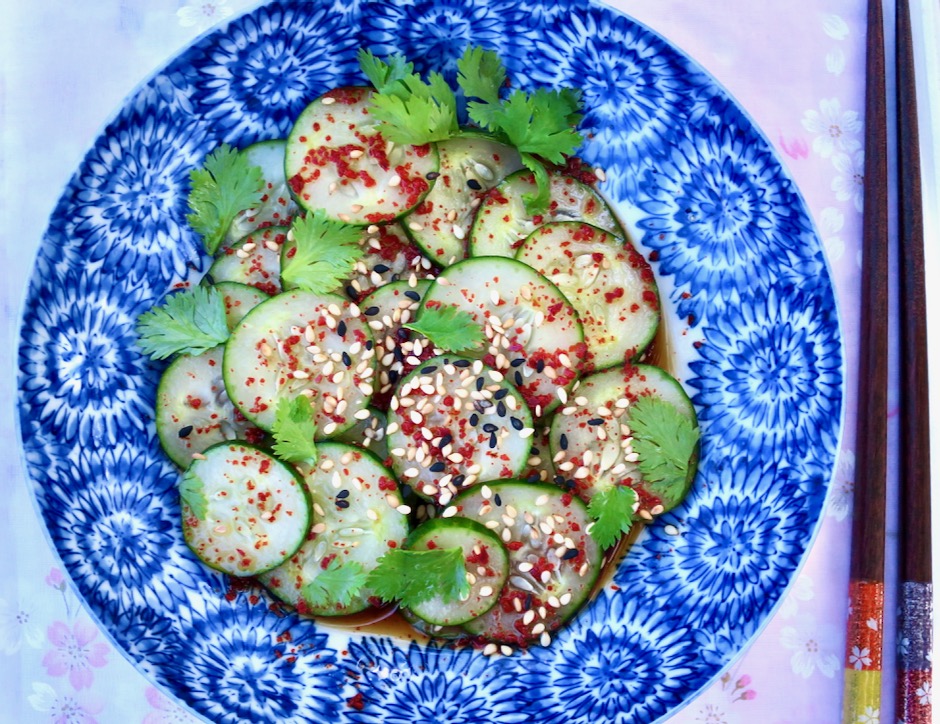
This is a quick (10 minutes max) cucumber dish that is perfect to serve alongside teriyaki meat sticks, lemon grass tofu, and Korean hamburger patties. It’s a very refreshing salad that everyone will enjoy.
Japanese cucumbers are the best choice for this salad. They are super crispy with tender skins and have very few seeds. I always have a big jar of gochugaru (Korean chili flakes) on hand. The chili flakes add a subtle heat and beautiful pop of color to salads like this one.
We have some beautiful cilantro growing in the garden so I added a few tender leaves to the salad. If you’re not a fan of cilantro, use thinly sliced green onions or chives. If you are not planning to eat the salad right away, store cucumbers and dressing separately until ready to serve.
With just three ingredients, onions, butter and miso (+ water), you might wonder how this dish from Yotam Ottolenghi, can turn out so gorgeous and flavorful. Of course these three ingredients are among the most delectable in the world of cuisine. Serve the onions alongside grilled steak or chicken, or simply over a bowl of steaming rice.
The recipe calls for very small onions, or very large shallots. Both can be difficult to find. The best option I found was to use Maui onions which tend to be on the small side. I threw in a couple of red cipollini (Italian for small onions) that I had bought at Whole Foods.
The onions are sliced lengthwise with ends trimmed ever so slightly in order to keep the onion halves intact while baking.
My version of the recipe is vegan as I switched out the butter for Miyoko’s vegan butter. It works great in this dish and all baking recipes if you are looking for a lactose free substitute for regular unsalted butter.
Light miso paste is whisked together with the melted vegan butter and warm water. This simple mixture eventually turns into a luscious sauce that coats the onions and gives them a rich, savory flavor.
The first time I made this dish, I was surprised at how much liquid there was. It crossed my mind that this might not work out! But eventually, the pale liquid reduces to a thick, flavorful sauce.
Beautifully glazed onions ready to serve alongside your favorite dinner entree.
Special equipment needed: Heavy baking dish safe for 500 degree oven
Preheat oven to 500 degrees
Halve the onions lengthwise, discarding the papery skin as well as the layer beneath it if it's tough or dry. Trim the tops and a bit off the bottom (not too much, you want to ensure the onion halves stay held together at the base). Place onions halves, cut-side down slightly spaced apart, in a 9x13-inch baking dish or one that fits your onion halves.
In a medium bowl, whisk together the melted butter and miso paste. Whisk in the warm water. Pour mixture over the onions. Cover the pan tightly with heavy duty aluminum foil. Bake for 35 minutes. Remove foil and turn the onions over so they are cut-side up. Baste onions very well, then return to the oven, uncovered for another 40-45 minutes, basting every 10 minutes, until the onions are very soft and deeply browned on the tops. The sauce should be reduced to a gravy consistency.
Transfer onions to a platter, pouring the sauce over and around them before serving. Any leftovers can be refrigerated for up to 2 days. Reheat before serving.
A few years ago I tried my hand at making bagels. I experimented with several different recipes but none stood out enough to make again. They were often beautiful bagels and we ate them all but I found some to be generally too chewy. So I put bagel making aside until a few months ago when I took up the challenge again. Good bagels are in a class of their own but they are hard to come by in the Islands. Since there is nothing better than homemade bread which we make with considerable success, why not homemade bagels?
Making the dough is actually quite simple. Bagel dough is very stiff so a heavy duty stand mixer is a must for this recipe. After shaping the bagels, they go into the refrigerator to proof overnight then are boiled and baked the following day.
After testing different methods for boiling the bagels I found that the longer you boil them, the chewier they become once they have finished baking. Many recipes call for boiling bagels for a minute on each side. My preference is to boil bagels for 10-15 seconds per side. They puff up nicely and you’ll end up with bagels that have a perfectly soft yet chewy texture.
My “almost everything bagels” are generously coated on both sides with rehydrated dried minced onion, poppy seeds, sesame seeds and flaky Maldon salt. Rehydrating the onions in hot water for a half hour keeps the onions from burning when the bagels are baking.
Be generous with your toppings because inevitably, a few of the seeds will fall off when you slice the bagels.
Bagels are superb served with smoked salmon, ham and cheese, avocado, pimento cheese or just butter. According to bagel purists, toasting a bagel is verboten and that bagels should be eaten warm as they come out of the oven. They are best eaten the day they are made. So in my case, I freeze most of the bagels since there’s no way I can eat a dozen in a day. When I am ready to have one, I take it out of the freezer to defrost, slice, and toast my bagel. Then it’s ready for whatever toppings I want to add. Sometimes just a few pats of butter does the trick.
1½ teaspoons instant yeast (recommend SAF Red Instant Yeast, proofing is not necessary)
1 tablespoon granulated sugar
2 teaspoons fine sea salt
2 teaspoons diastatic malt powder (available from Amazon)
1½ cups (12 ounces) water
1 tablespoon barley malt syrup (available from Amazon or local health food stores)
1 tablespoon baking soda
egg white wash whisked until frothy
toppings of your choice
Preparation
Special equipment: Heavy duty stand mixer, kitchen scale, parchment paper, 2 large sheet pans, diastatic malt powder, barley malt syrup, wide flat slotted spoon, kitchen timer, small pastry brush (silicone works great)
Note: I use a half sheet pan and a quarter sheet pan to bake all 12 bagels at the same time on the center rack. If you use 2 large sheet pans, boil and bake 6 bagels at a time. Then continue with the second batch after the first 6 bagels have baked. It is a good idea to leave space between the bagels and not crowd them so they bake up nice and brown on all sides.
Whisk flour, yeast, sugar, salt, and barley malt powder in the bowl of a stand mixer. Pour in water. With mixer on low speed (#2 on my KitchenAid), mix until dough starts to come together, about 4-5 minutes. Use a spatula to scrape down the sides to ensure all of the flour gets mixed in well. Bagel dough is very stiff, however, if the dough seems too dry, add a teaspoon of water.
Increase the speed (#3 on my KitchenAid) and set a timer for 5 minutes and knead dough until it is cohesive and smooth. Remove dough and weigh it. Then divide it into 12 equal portions for small bagels, 10 for larger bagels. As you work, cover the dough pieces with plastic wrap or a clean kitchen towel to prevent drying. Working with 1 piece at a time, shape the dough into a smooth ball. Pinch the dough together on the bottom of the ball. Again, cover with plastic wrap to prevent drying and continue with the rest of the dough. Let the dough balls rest for 5 minutes, covered.
To shape the dough, place dough round on the counter, push your index finger into the center of each dough round so that it goes all the way through. Twirl the dough between your two index fingers to create a hole about 1½-inches wide. Place shaped bagels on a baking sheet lined with parchment paper that has been lightly oiled. Cover with plastic wrap and refrigerate overnight.
Preheat oven to 500 degrees with rack in center.
Have ready: A thick layer of paper towels on the counter to place the boiled bagels on and a large piece of parchment paper for transferring bagels once dry (they will stick on paper towels if left too long). Have a second sheet pan lined with parchment paper ready and all of your toppings (if using) plus egg wash. Remove bagels from the refrigerator.
Fill a large wide pot or Dutch oven with at least 6-inches of water. Bring water to a boil. Add barley malt syrup and baking soda. Give it a quick stir, skim off most of the foam. Working with 2-3 bagels at a time, gently place bagels in boiling water and set timer for 20 seconds. After 10 seconds have passed, gently flip bagels over for another 10 seconds. Immediately transfer bagels to paper towels using a wide, flat slotted spoon. Then transfer to parchment paper. Continue with the rest of the bagels.
If you are adding toppings to your bagels, brush bottom side of bagel first with egg wash. Sprinkle toppings over the dough, flip bagel and repeat the process. Transfer to the parchment lined baking sheet. Continue with the rest of the bagels. You may choose to leave some of the bagels plain or simply coat with sesame seeds or other toppings of your choice. Place bagels in oven and reduce heat to 450 degrees. Bake bagels (rotate pan halfway through) for about 14 minutes or until bagels are nicely browned. Let bagels cool a bit before slicing.