Browsing Category

Vegan

Appetizers, Dinner, Lactose Free, Recipes, Side Dishes, Summertime Meal, Vegan, Vegetarian, Veggies

Smoky Sweet Corn Riblets

September 9, 2023

If there is a better way to do corn on the cob than as corn “ribs” I have yet to find it. They are so good I’ve made them twice a week for three weeks in a row. I know I’m late to the game, corn ribs became a thing back in 2021. A recipe for corn ribs went viral on TikTok and ever since, people have been making corn ribs their thing too. There are tons of variations for seasoning corn ribs. Spicy, sweet, cheesy, buttery, herby and so on. This recipe comes from Bon Appetit and it’s just about perfect. Buttery, sweet and smoky.

The first time I tried to cut the corn into ribs I almost gave up. The corn cob is tough and hard to cut through. There were corn kernels on the floor, counter and backsplash, oops. I asked my husband to give me a hand. We tried a few different knives and found two that worked great along with a mezzaluna. I know that not everyone has a mezzaluna but it sure came in handy for cutting corn ribs.

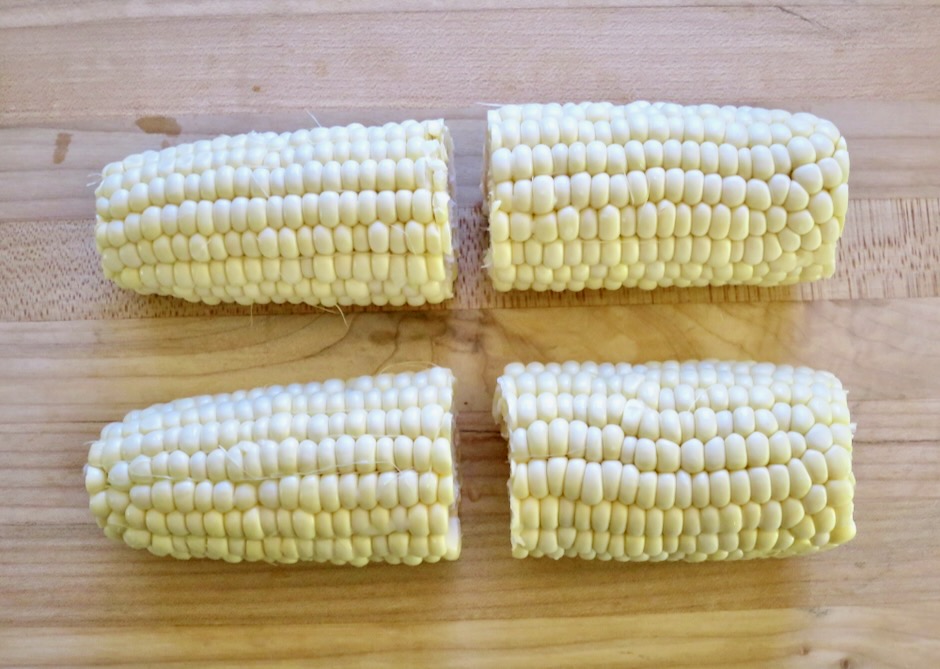
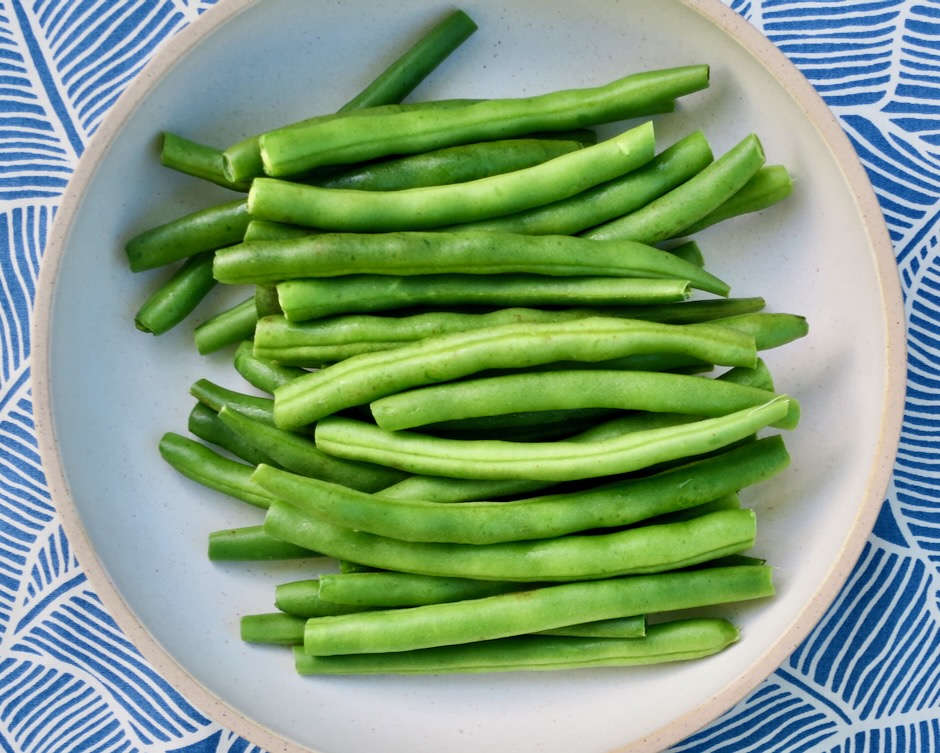
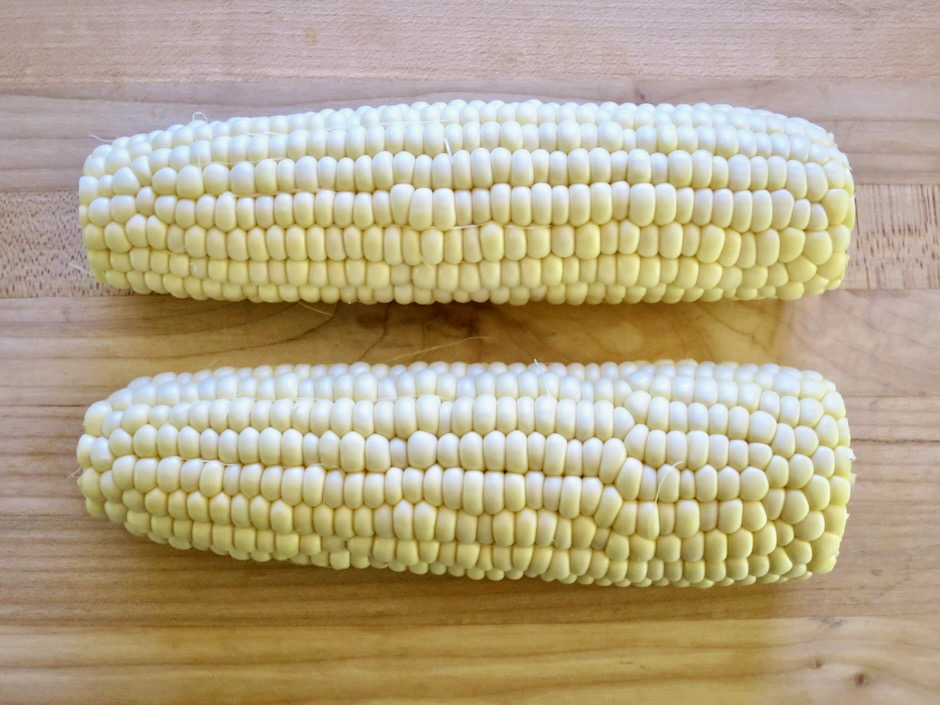
The first step after removing the husk and silk from the corn is to cut off the ends of the corn so they are flat. This is important! The next step is to cut the corn in half diagonally. This will make it much easier to cut the corn into riblets and being shorter to cut through means less risk of accidents. It is much more difficult to cut down the entire length of the corn cob when it is long. You will now be able to stand the corn on end and cut into riblets.

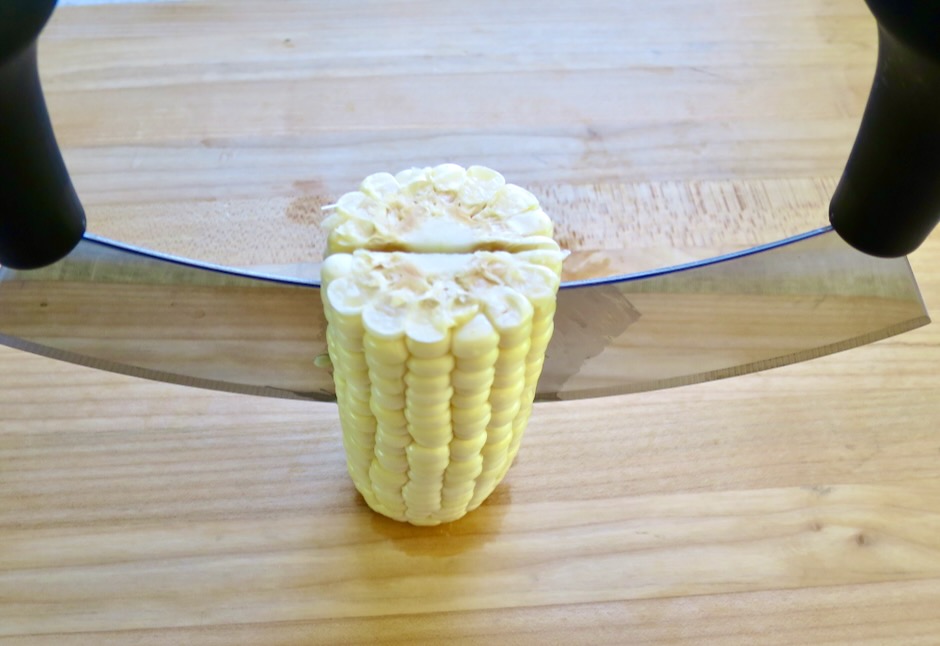
Here we are cutting the corn in half with a mezzaluna. It worked well because you are able to control your cutting with both hands. It’s very stable.

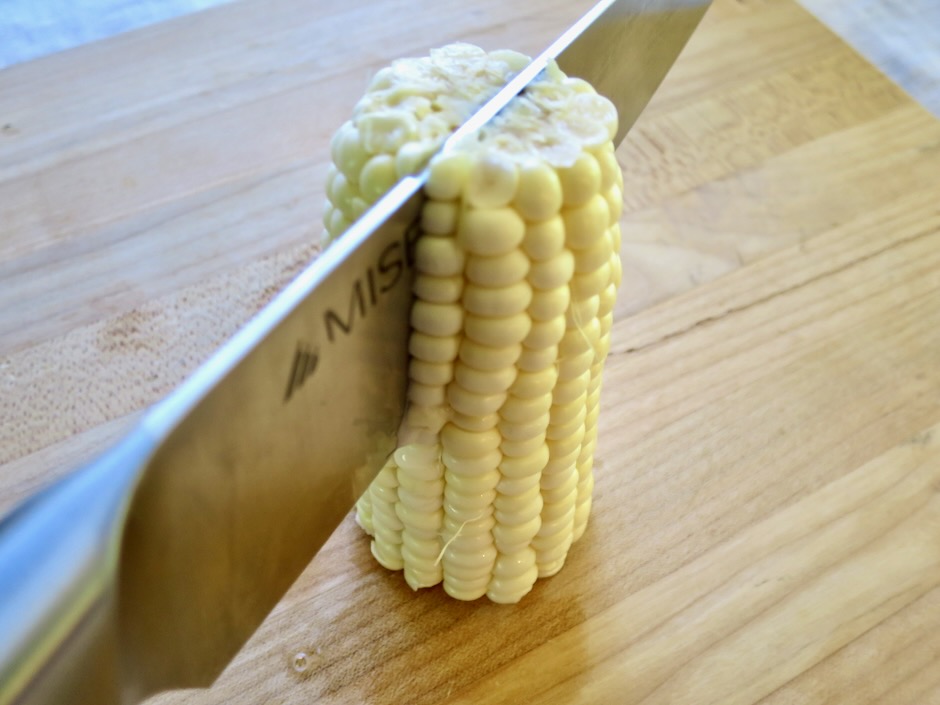
This time we cut the corn in half with a very sharp chef’s knife. It also worked well and will likely be what most people have available.

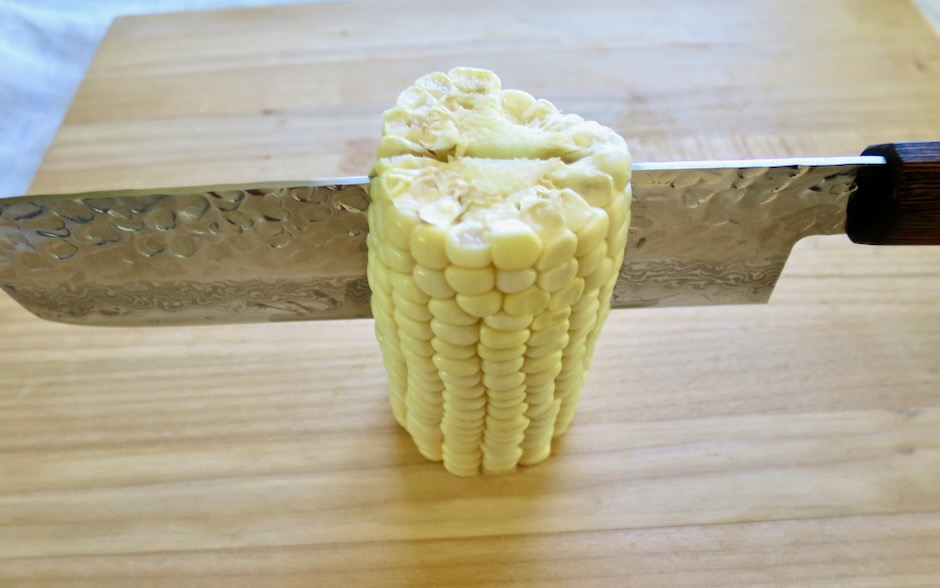
The third option is to use a very sharp Nakiri knife which is a traditional Japanese vegetable knife.

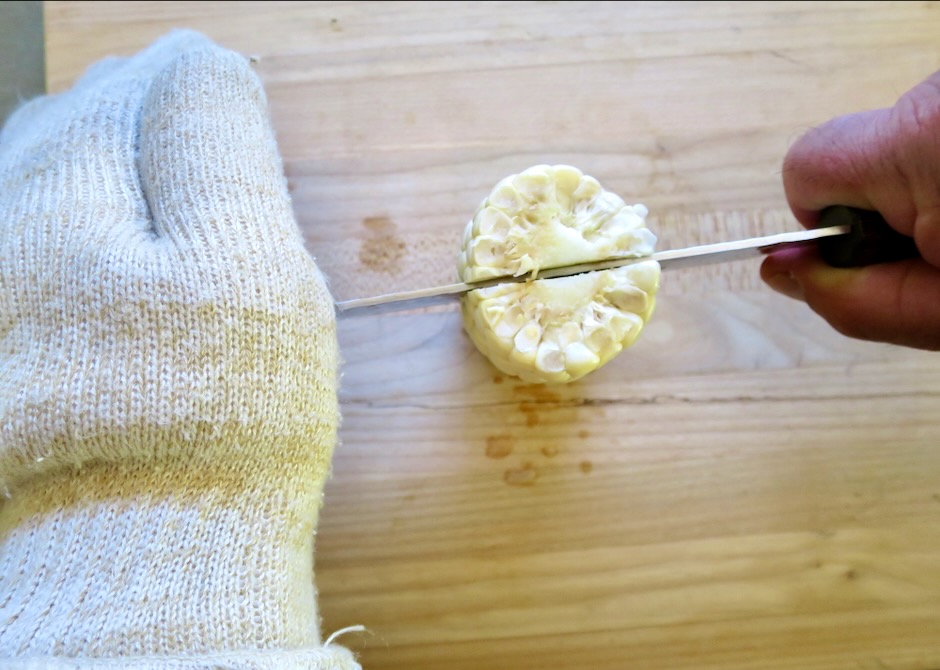
When slicing the corn with a chef’s or Nakiri knife, wearing a thick oven glove will help to stabilize the knife while you use pressure to cut through the corn cob.

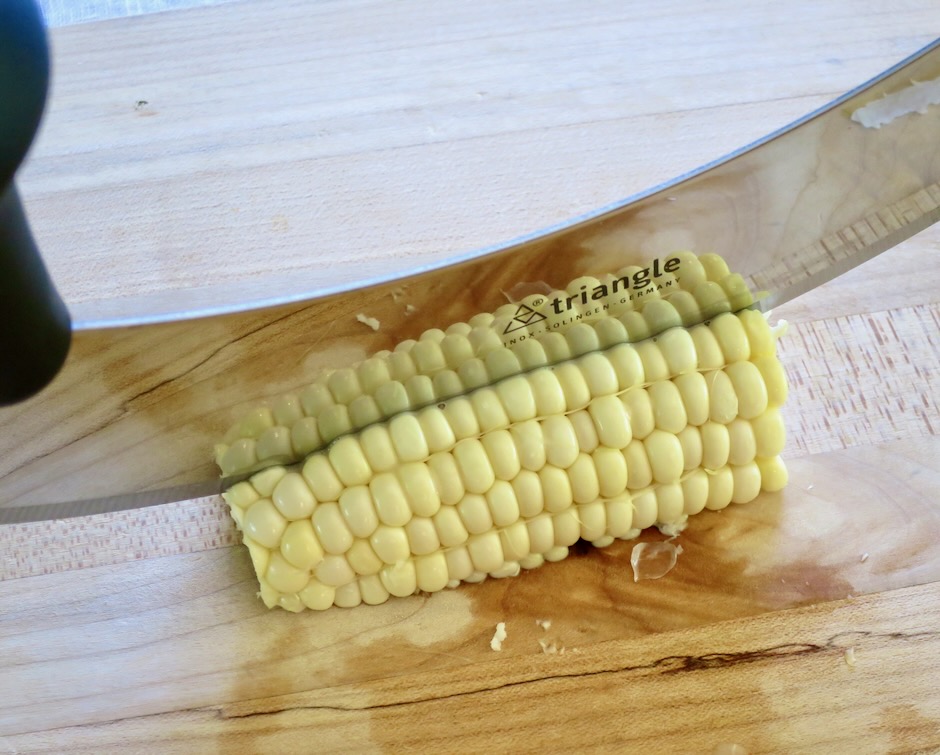
The mezzaluna was the winner for cutting the corn into quarters but both the chef’s knife and Nikiri knife also worked.

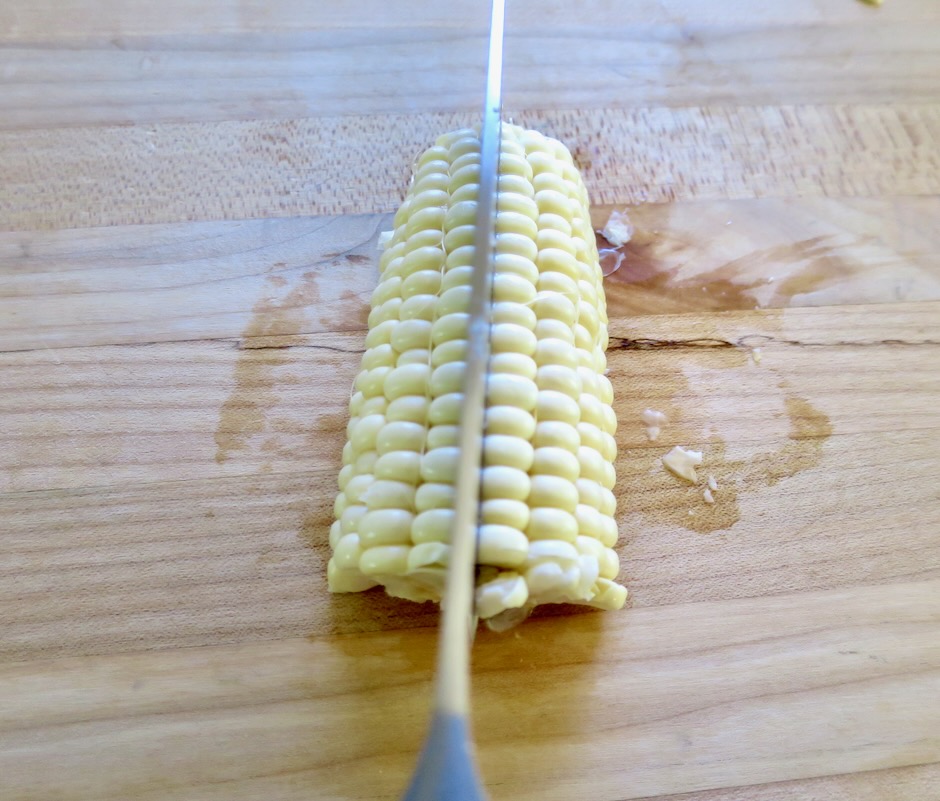
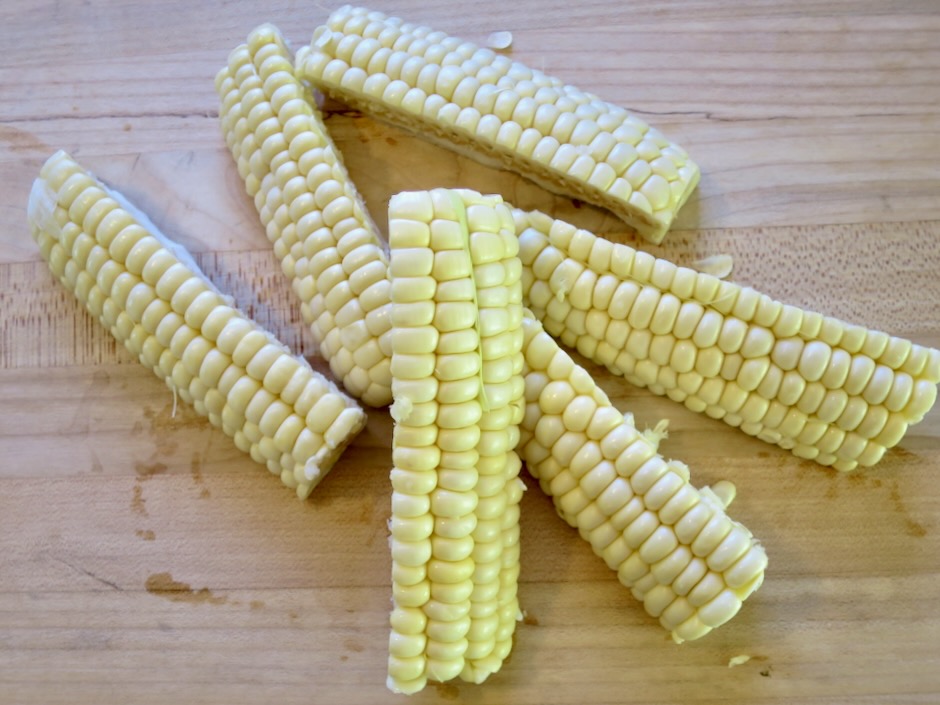
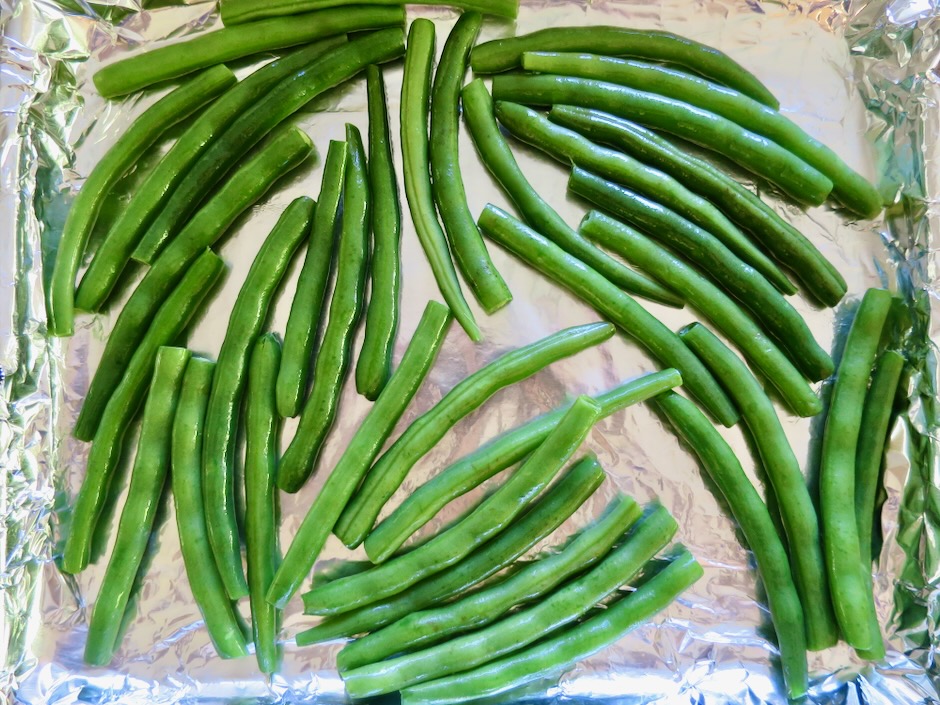
This is what your corn should look like once you cut it into riblets.

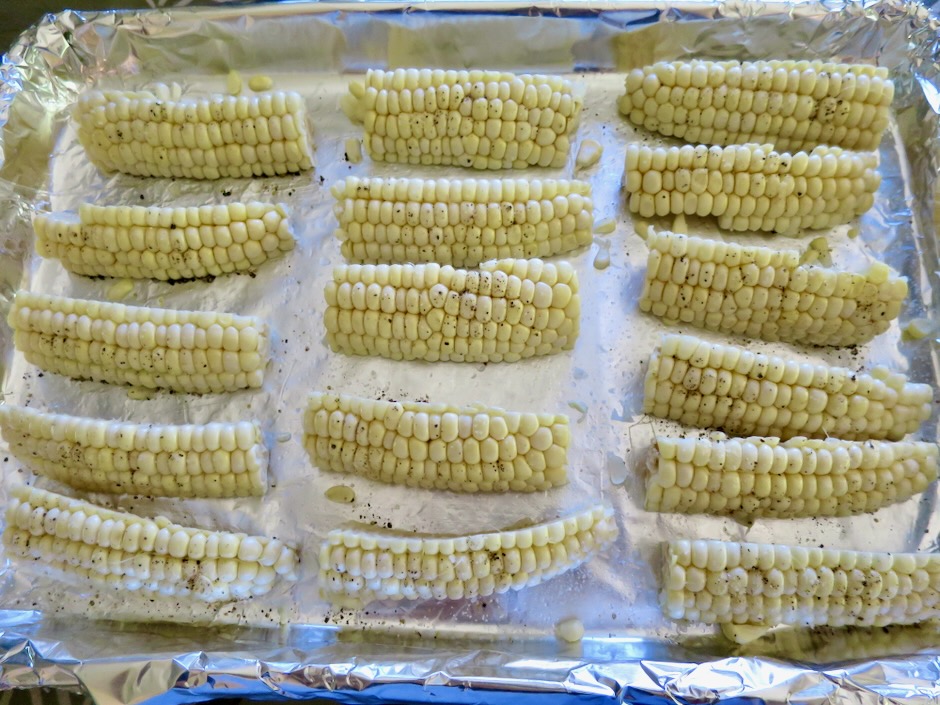
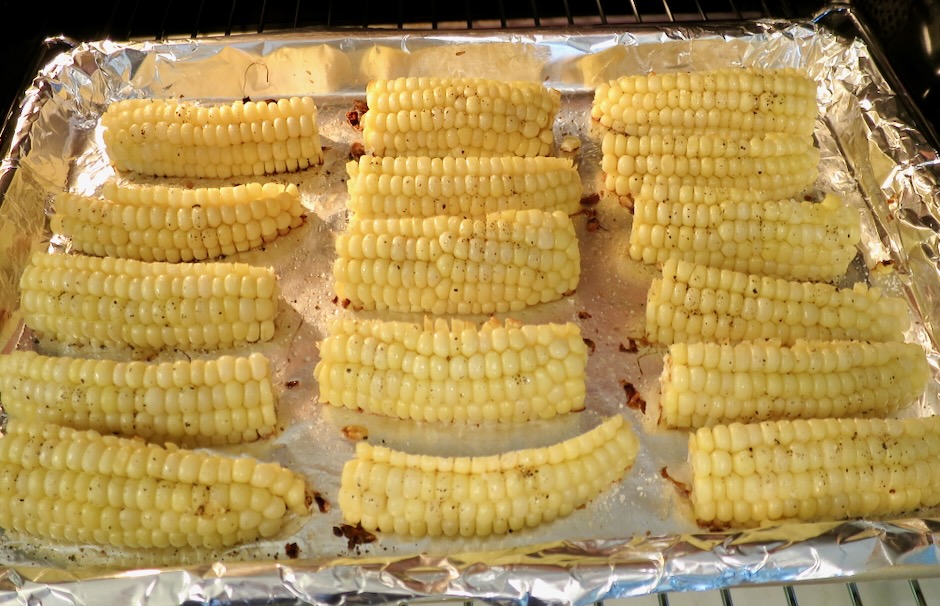
The corn is seasoned with a little oil, salt and pepper. It roasts at 450 degrees for 10 minutes before being turned.

The corn already looks delicious after being in the oven for a short time.

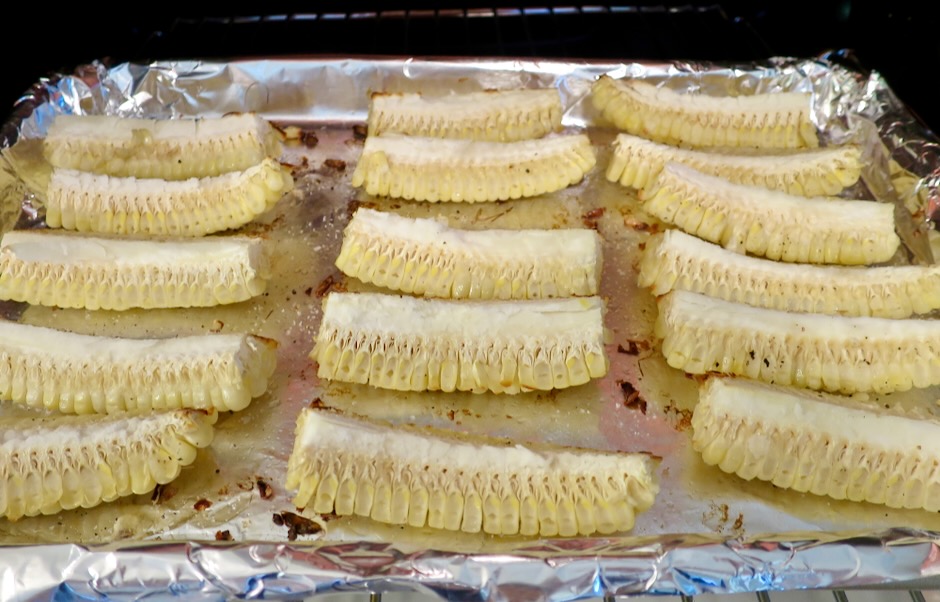
After roasting for 10 minutes, the corn wedges are turned cob side up and roasted for another 10 minutes.

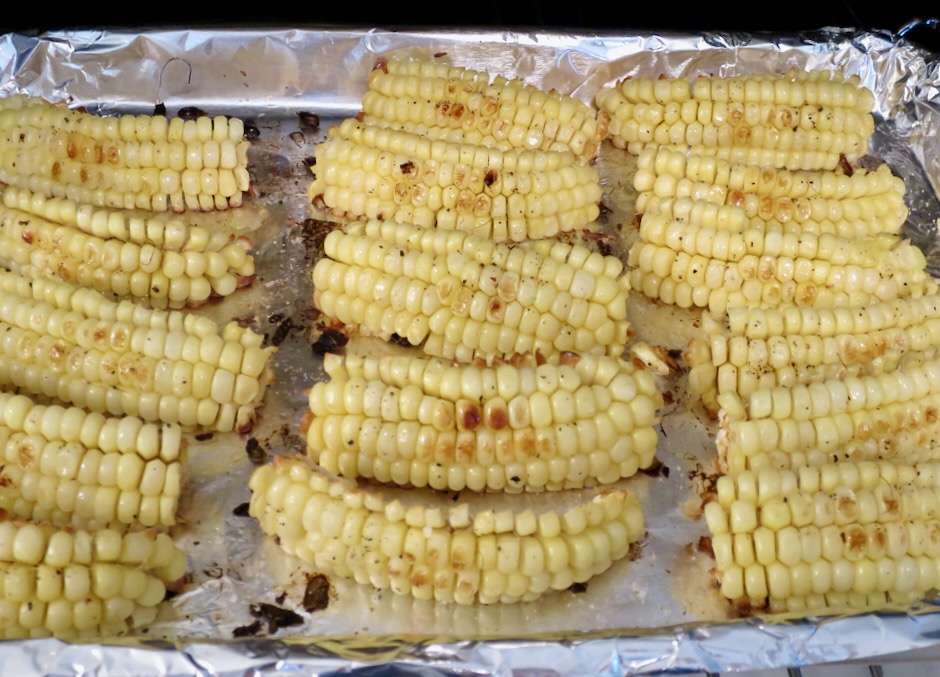
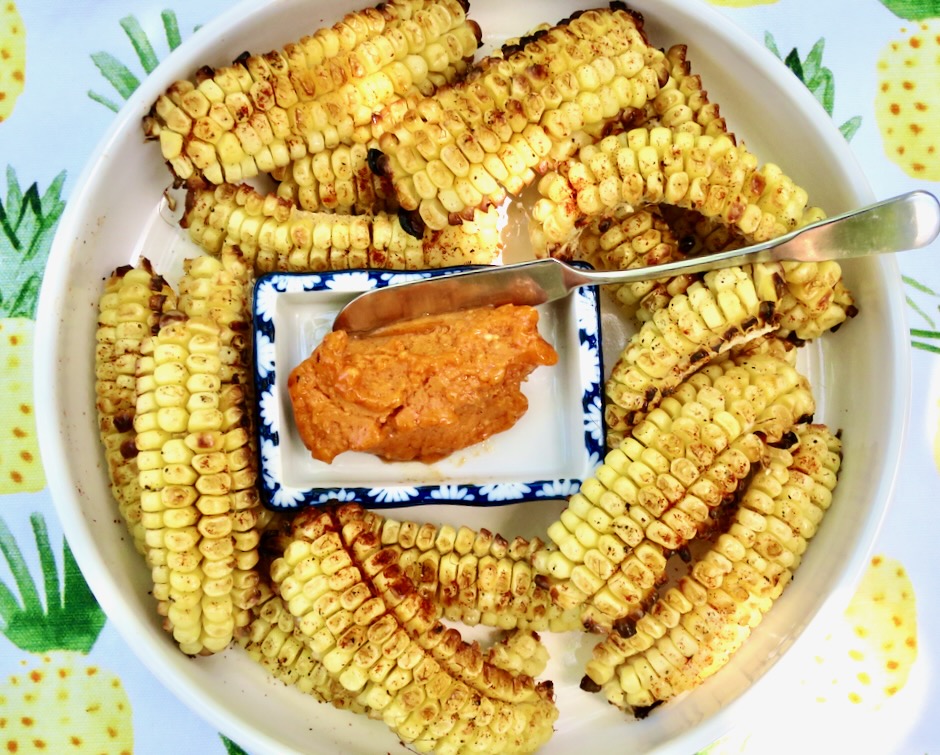
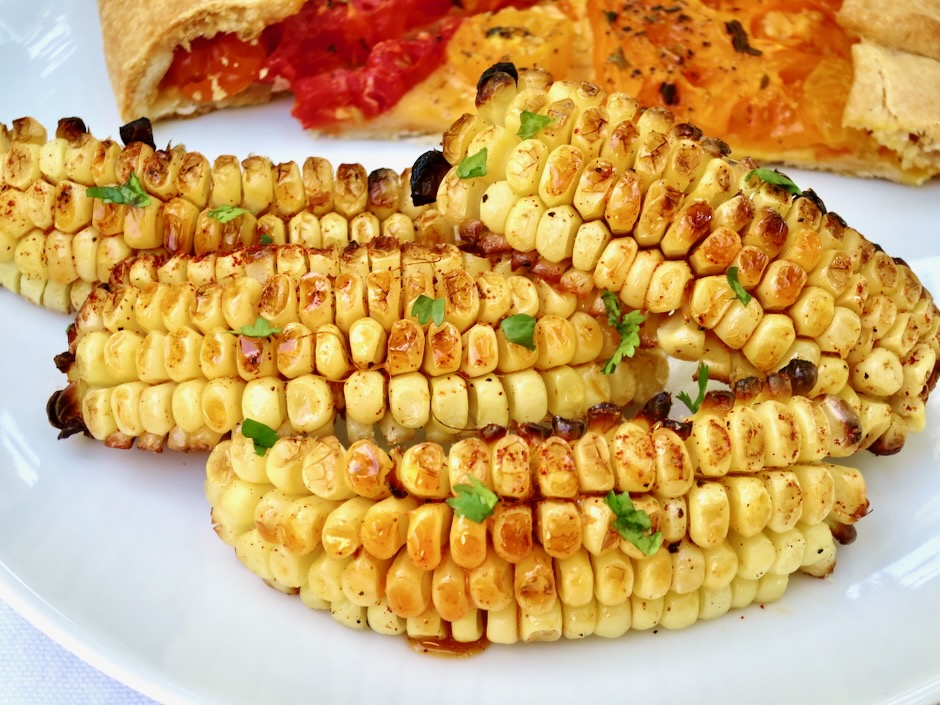
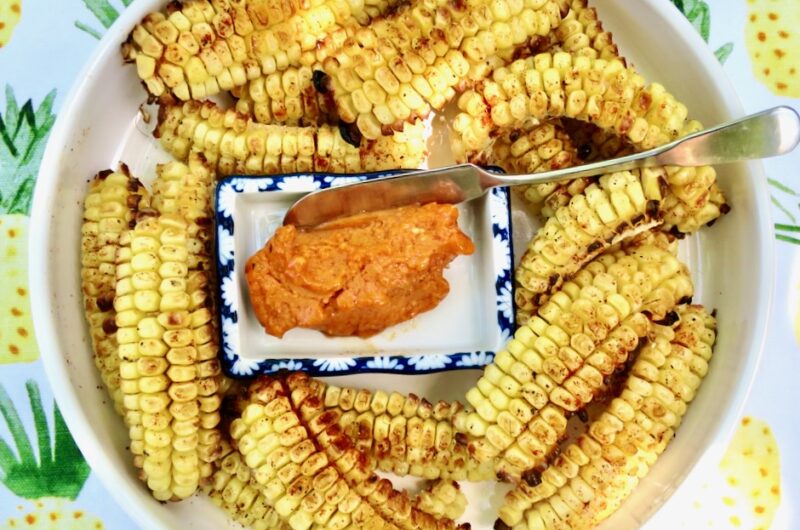
The corn riblets have been in the oven for 20 minutes and have taken on a nice color and smell divine. At this point they are cooked and ready to eat. But broiling the riblets for a minute or two will encourage lots of smoky flavor and a bit of charring around the edges which is always a good thing.

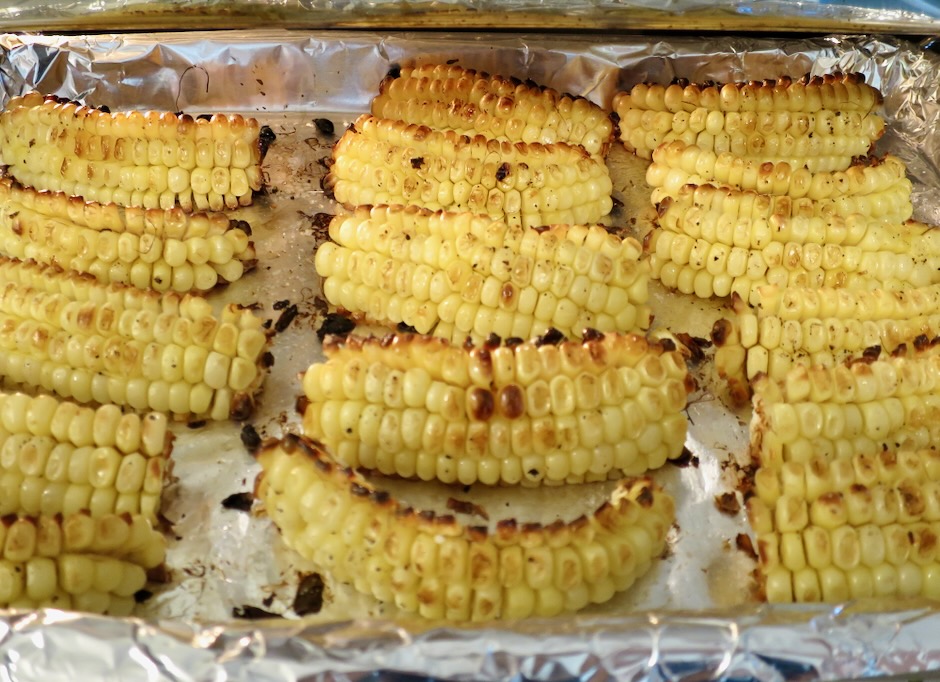
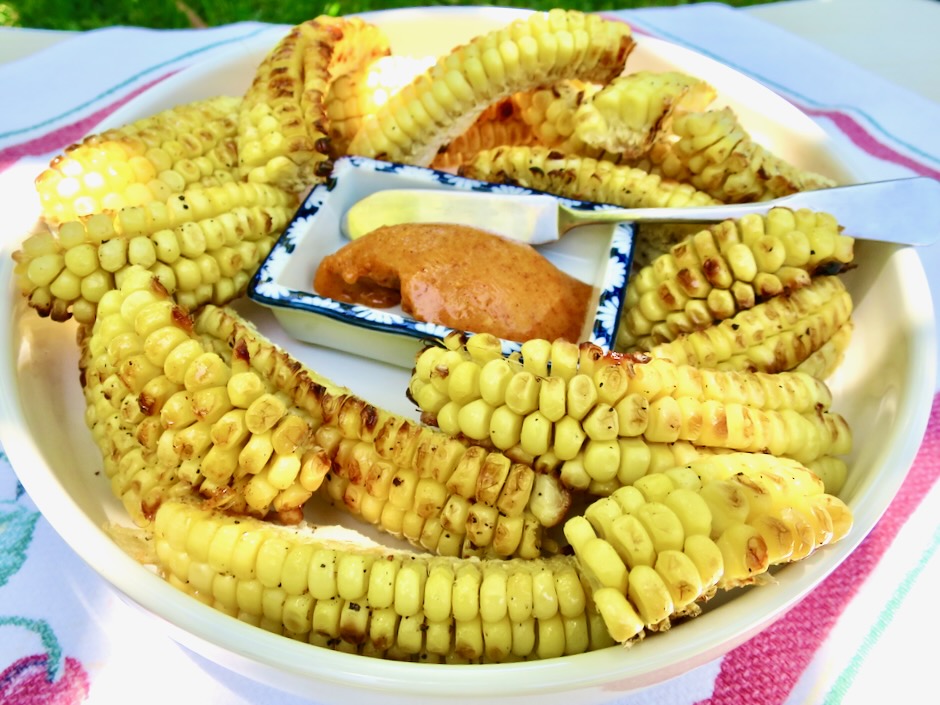
Corn riblets are best served soon after they emerge from the oven while still warm. Slather with smoky sweet butter and start nibbling on those delectable corn riblets. There’s no better way that I can think of, to prepare fresh corn.

Smoky Sweet Corn Riblets

Recipe by Kiyo
Servings

4

servings

Recipe adapted from Bon Appetit magazine.

Ingredients

  • For the corn
  • 4 ears of corn, husked and silk removed

  • 3 tablespoons vegetable oil

  • 3/4 teaspoon Diamond Crystal of 1/2 teaspoon Morton kosher salt

  • Freshly ground pepper

  • Smoky Sweet Butter
  • 1 stick (1/2 cup) Earth Balance Buttery Sticks (for lactose free version) or unsalted butter, room temperature

  • 1 tablespoon light brown sugar

  • 1 teaspoon apple cider vinegar

  • 1 teaspoon smoked paprika

  • 1/2 teaspoon garlic powder

  • few dashes of cayenne (more for spicier flavor)

  • 3/4 teaspoon Diamond Crystal or 1/2 teaspoon Morton kosher salt if using unsalted butter

Directions

  • Preheat oven to 450 degrees. Line a baking pan with foil.
  • Using a chef’s knife or Nakiri knife and securing your cutting board by placing a damp kitchen towel underneath, cut the top of the cob and bottom stem so the ends of the corn are flat. Cut each ear of corn in half crosswise. Working one at a time, stand each piece up on a cut end and slice lengthwise in half. Lay each half cob side down on cutting board and using a chef’s knife, Nakiri knife, or mezzaluna cut each in half again. You should have 8 wedges per ear. Continue with the remaining 3 ears of corn. Drizzle wedges with 3 tablespoons of vegetable oil, season with kosher salt and pepper, toss to coat. Spread out wedges evenly arranging kernel side up.
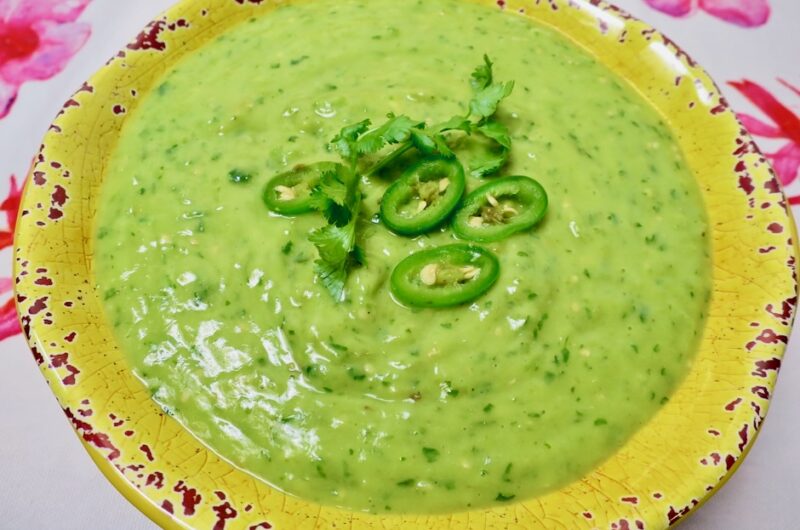
  • While oven is preheating, mix together the Buttery Sticks or unsalted butter, brown sugar, apple cider vinegar, smoked paprika, and garlic powder. If using unsalted butter mix in 3/4 teaspoon Diamond Crystal or 1/2 teaspoon Morton kosher salt.
  • Roast corn for 10 minutes then turn corn over cob side up. Continue to roast for 10 more minutes. Remove pan from oven and turn corn kernel sides up. Broil corn on upper rack for about 1 minute, or until the corn takes on more color. Watch closely so the corn doesn’t burn.
  • Transfer corn riblets to a platter and serve with seasoned butter.
Beef, Dinner, Lactose Free, Recipes, Sauces, Vegan, Vegetarian

Béarnaise Butter

September 1, 2023

A good sauce will elevate that most decadent cut of beef, the filet mignon. And especially béarnaise sauce, one of the fundamental sauces of French cuisine. It can transform any dish into one that is truly extraordinary. The piquant flavor of the reduced wine, butter, eggs, and fresh tarragon whisked into a silky sauce is divine. But we don’t always have time to whip up béarnaise sauce so that’s where béarnaise butter comes in. It can be made well in advance and stored in the refrigerator for a month or in the freezer for several months.

A perfectly cooked steak right off the grill with a generous pat of béarnaise butter is the epitome of steak perfection.

Known as “the King of Herbs” in France, tarragon is highly aromatic and essential in béarnaise sauce and this butter. It lends itself well to many dishes such as potatoes, chicken, omelettes, pasta and just about anything you use it with.

It doesn’t take but 5 minutes or so for the liquid to evaporate from the pan of shallots. You will then be left with the most flavorful shallots imaginable.

Once the shallots have cooled, they are mixed with the softened butter along with the minced tarragon, parsley, salt and pepper. The butter is transferred to a piece of plastic wrap and shaped into a tube then chilled in the freezer until slightly firm (it will be quite soft). Once it firms up a bit you will be able to re-shape the tube into a perfect circular log and re-wrap until ready to use.

Lightly smoked then grilled filet mignon with béarnaise butter is surely one of the grandest meals imaginable.

Leftover béarnaise butter is delicious tossed with long strands of linguine and asparagus. Use leftover béarnaise butter on sautéed vegetables, steamed green peas, on baked fish or chicken. Swirl some béarnaise butter in a pan before pouring in lightly beaten eggs then serve on toast.

Béarnaise Butter

Recipe by Kiyo
Servings

8-10

servings

Adapted from Food & Wine magazine

Ingredients

  • 1/4 cup finely minced shallots

  • 1/4 cup dry white wine

  • 1 1/2 tablespoons white wine vinegar

  • 6 ounces (170g) Miyoko’s hint of salt vegan butter or regular butter
    (1 1/2 sticks), at room temperature

  • 1/4 cup minced tarragon

  • 1 tablespoon minced flat leaf parsley

  • kosher salt and freshly ground black pepper

Directions

  • In a medium saucepan, combine shallots with wine and vinegar. Cook over moderate heat until all of the liquid has evaporated, about 5 minutes. Transfer shallots to a small bowl to cool to room temperature. You can speed up the cooling process by placing shallots in the refrigerator.
  • Scrape shallots into bowl with butter. Beat together with a handheld mixer until creamy. Fold in herbs and season to taste with salt and pepper. Transfer butter to a piece of plastic wrap and shape into a log. The butter will be soft at this point so don’t worry too much about getting the perfect shape. Transfer to the freezer for 10 minutes then re-shape as needed. Wrap a piece of foil around the plastic wrapped butter. Store in the refrigerator for up to 1 month or freezer for up to 3 months.

Notes

  • Remove butter from the refrigerator 30 minutes before serving. The butter will be easier to slice into neat rounds and will melt perfectly over the steak.
Dinner, Lactose Free, Recipes, Salad, Side Dishes, Vegan, Vegetarian, Veggies

Cucumber Salad with Roasted Peanuts and Chile

April 29, 2023

This easy to make crispy cucumber salad has a lot going for it. Not only is it very simple to put together, it is an uncommon but tasty combination of ingredients.

Cucumbers with minimum amount of seeds and tender skins are best for this salad. You really want that “crunch” in each bite you take. Japanese cucumbers work well if you can find them.

The addition of nuts adds so much flavor and texture to salads. Including a small amount each day in your diet is very nutritious. The salad also has red pepper flakes for a bit of spice and cilantro for its unique je ne sais quoi. Of course if you don’t care for cilantro, switch it out with fresh mint or parsley.

The peanuts, cilantro, and chile flakes are chopped up together. I found that this is best done close to the time you are serving the salad. If you want to chop these ingredients in advance, it’s best to separate the cilantro from the peanuts and chile flakes as the moisture from the cilantro can affect the texture of the peanuts.

Once you have everything ready to go, toss the cucumbers with the dressing then sprinkle it with the peanut topping. A drizzle of your favorite chile crunch is the icing on the cake.

Cucumber Salad with Roasted Peanuts and Chile

Recipe by Kiyo
Servings

2-4

servings

Recipe adapted from NYT Cooking

Ingredients

  • 6 Japanese or Persian cucumbers (about 1 pound), cut lengthwise into thin spears, then cut crosswise into 2-inch pieces

  • Kosher salt

  • 1/4 cup salted, roasted peanuts

  • 1/4 cup cilantro leaves (or substitute with fresh mint or parsley)

  • 1/2 teaspoon chili flakes

  • 2 tablespoons soy sauce

  • 2 tablespoons unseasoned rice vinegar

  • 1 1/4 teaspoons granulated sugar

  • 1 small garlic clove, grated

  • Chile crisp or chile oil (optional but recommended)

Directions

  • Toss sliced cucumbers with 1/2 teaspoon kosher salt in a colander. Set aside to drain.
  • Chop peanuts, cilantro and red pepper flakes together until very fine. If you are not serving the salad within an hour, chop cilantro separately and combine with peanuts and chili flakes before serving. This will prevent the peanuts from taking on moisture from the chopped cilantro.
  • In a large bowl, whisk together soy sauce, rice vinegar, sugar and garlic. Transfer salted cucumbers to the bowl and toss to coat.
  • To serve, place half the cucumber salad on a plate, sprinkle with half the peanut mixture. Repeat with the remaining cucumbers and peanut mixture. Drizzle with chile crisp or chile oil if using. Serve immediately.

Notes

  • Leftovers will keep for a day stored in the refrigerator. Note that the peanuts may lose their crunch from being stored with the cucumbers and dressing.
Dinner, Japanese, Lactose Free, Recipes, Vegan, Vegetarian

Sesame Brown Butter Udon Noodles

March 16, 2023

Here is a quick and delicious dish to satisfy a craving for udon. Given that it includes fresh spinach, it’s nutritious as well. This is a broth-less bowl of chewy noodles flavored with browned butter and lots of sesame seeds. It’s scrumptious.

I highly recommend you seek out fresh udon. Here on Maui I buy Sun Noodle udon which is available at Island Grocery. If you are unable to find fresh udon, frozen udon would be the next option. Dried udon is very thin and lacks the wonderful chewy texture of fresh udon that makes this particular dish so delightful.

My version is vegan since I used Miyoko’s in place of regular unsalted butter. It’s an excellent substitute if you are lactose intolerant. Another plus is that you can actually brown Miyoko’s vegan butter.

The “butter” browns quickly so you’ll want to keep a close eye on it.

Once the “butter” has browned, it gets tossed with the cooked udon and spinach. Divide the noodles into bowls, sprinkle with a generous amount of roasted sesame seeds and a dollop of chili crisp and devour your bowl of noodles.

Sesame Brown Butter Udon Noodles

Recipe by Kiyo
Servings

2

servings

Adapted from NYT Cooking

Ingredients

  • 8 ounces fresh udon (in a pinch, substitute with frozen udon)

  • 5 ounce container of baby spinach (or up to 8 ounces)

  • 2 tablespoons Miyoko’s Vegan Butter (or regular unsalted butter)

  • 1/2 teaspoon coarsely ground black pepper

  • 1/2 tablespoon soy sauce

  • pinch of granulated sugar

  • 1 tablespoon roasted sesame seeds

  • Chili crisp for serving, optional

Directions

  • Bring a large pot of water to a boil. Add the noodles and cook according to package directions until just tender. Reserve 1/4 cup of cooking water. Drain the noodles in a colander and set aside.
  • Microwave spinach with 1 1/2 tablespoons water in a large bowl (cover with damp paper towel or microwavable plastic wrap with a small corner left open for steam to escape, or use microwavable steamer).
    Drain and add to noodles.
  • Set the pot used for cooking the pasta, over medium heat. Add 2 tablespoons Miyoko’s Vegan Butter and cook, stirring occasionally, until the foam subsides and the butter turns golden brown, about 3-4 minutes. Watch closely so the butter does not burn. Add the black pepper and stir until fragrant. Add 2 tablespoons reserved pasta water, plus noodles and spinach, soy sauce and sugar, and toss until the sauce is thickened and silky. Add more pasta water a tablespoon at a time if needed to ensure the sauce clings to the noodles.
  • Remove from the heat and season to taste with more soy sauce and black pepper if needed. Divide into two bowls, sprinkle with sesame seeds and serve with chili crisp.
Beans, Dinner, Lactose Free, Recipes, Side Dishes, Vegan, Vegetarian, Veggies

Roasted Green Beans with Caper Butter

March 1, 2023

Sometimes just a few simple ingredients can turn a dish into a delectable treat, as is the case with these roasted green beans. Though there’s nothing fancy about this side dish, it reminds me of something I might find at a fine restaurant. I love how uncomplicated this recipe is. You can have it ready in less than 30 minutes.

Capers are the definition of a flavor bomb. Briny, bold, salty and tart they add umami to the butter and other ingredients. The lemon zest adds a bright flavor and the fresh thyme (don’t leave it out!) is just delightful with the roasted beans. This basic compound butter can be whisked up in a jiffy.

The green beans are quickly roasted at high heat, 450 degrees for just about 12 minutes, or until slightly charred in areas.

Once roasted, the beans get tossed with the caper butter before being served.

Roasted Green Beans with Caper Butter

Recipe by Kiyo
Servings

4

servings

Ingredients

  • 1 pound fresh green beans, ends trimmed

  • 2 teaspoons olive oil

  • kosher salt

  • freshly ground black pepper

  • 2 tablespoons Earth Balance Buttery Sticks for lactose free version (or regular butter), softened

  • 1 1/2 teaspoons Dijon style mustard

  • 1 1/2 teaspoons chopped fresh thyme (not packed)

  • 2 teaspoons capers, drained and chopped

  • 1/2 teaspoon lemon zest (add additional 1/2 teaspoon for zestier flavor)

Directions

  • Preheat oven to 450 degrees. Line a sheet pan with foil for easy clean up.
  • Toss green beans with olive oil. Sprinkle with kosher salt and freshly ground pepper.
  • Roast green beans (in one layer) for 10-12 minutes or until lightly charred in areas, stirring once. They will soften a bit more once they are out of the oven.
  • Meanwhile, in a small bowl, stir together Buttery Sticks (or regular butter), mustard, thyme, capers, lemon zest and a dash of salt. Toss roasted green beans with the butter and serve immediately.
Appetizers, Dinner, Dressing, Lactose Free, Mexican, Recipes, Sauces, Vegan, Vegetarian

Guacamole Salsa

February 12, 2023

This guacamole salsa is creamy, spicy, and has just the right amount of acidity to make it one of my new favorite condiments for all things Mexican. After watching The Taco Chronicles on Netflix, I was intrigued by this beautiful salsa that was drizzled on tacos throughout Mexico. The combination of avocado and tomatillos with spicy peppers is delicious.

Each ingredient contributes loads of flavor to the salsa. Browning the vegetables a bit intensifies their flavor even more so.

It doesn’t take very long to impart a bit of color to the vegetables. A little goes a long way in developing flavor. Anyone who happens to walk by the kitchen will immediately know something tasty is in the works.

A medium avocado is all you need for this recipe. It adds texture to the salsa as well as a silky richness when combined with the other ingredients.

Everything goes into the blender before serving. I like to make this a few hours in advance and chill it before serving.

The salsa is delicious on tacos, but don’t stop there. I serve it with burritos, quesadillas, corn chips and tamales. It is quite versatile. You can even serve it with grilled fish, Mexican style grilled chicken, as a salad dressing for cabbage or crispy iceberg lettuce and as a topping for Mexican rice.

Guacamole Salsa

Recipe by Kiyo

2

cups

Ingredients

  • 1/2 pound tomatillos, husked, washed and sliced in half

  • 1 jalapeño pepper (you may use jalapeños or serrano peppers or a combination)

  • 2 serrano peppers

  • 1/2 small onion cut into 4 wedges

  • 2 medium garlic cloves, peeled

  • canola or vegetable oil for the pan

  • generous handful of cilantro

  • 1 medium avocado, seeded and peeled

  • 1 tablespoon freshly squeezed lime juice

  • 2 teaspoons kosher salt

Directions

  • Drizzle a teaspoon of canola oil into a medium sized fry pan and place over medium heat. Arrange tomatillos cut side down, along with the onion wedges, whole peppers, and garlic. Cook until vegetables are lightly charred turning as needed, about 5 minutes. Remove garlic ahead of time so that it doesn’t burn. Transfer to a bowl to cool slightly. Once cool enough to handle, slice peppers in half and remove seeds. Taste peppers to see how spicy they are and use just what you need according to how spicy you want the salsa to be.
  • Transfer tomatillos, peppers, onion and garlic to a blender. Add avocado, a handful of cilantro, 1 tablespoon of lime juice, 2 teaspoons kosher salt, and 3/4 cup water. Blend until smooth. Taste and adjust seasoning with more salt and lime juice if needed.
  • Transfer to a bowl and chill until ready to serve. The salsa is best used within 4 days. Any leftover salsa may be frozen in a plastic container. Defrost in the refrigerator overnight and stir before serving.

Notes

  • A plastic squeeze bottle is the most convenient way to serve and store the salsa.
Follow

Get every new post delivered to your Inbox

Join other followers: