This tuna macaroni salad is delicious and quick to make with ingredients you already have in your pantry. It makes the perfect side dish for sandwiches, grilled chicken, tofu, pork or any of your favorite grilled foods. Include it as part of your bento lunch along with a spam musubi or katsu sando.
I love crispy bits of celery in my salads though you can leave it out if it’s not your thing. That goes for the onion as well. When using them raw, I go for sweet onions that have a more subtle flavor than their yellow or red counterparts.
You may use sweet relish right out of the jar or chop bread and butter pickles for a chunkier, crisper texture.
Serve the salad after it has chilled for at least 3 hours. Everyone will enjoy this summertime side dish.
¼ cup chopped bread and butter pickle chips or sweet relish
1 tablespoon Dijon mustard
¼ teaspoon onion powder
¼ teaspoon freshly ground black pepper
½ cup chopped celery
2 tablespoons sweet onion, finely chopped
paprika for garnish
Preparation
Bring a large pot of well-salted water to a boil and cook the macaroni according to package instructions. For this salad you don't want the pasta to be al dente, but fully cooked. Drain, rinse with cold water until the pasta is cool. Pour pasta onto a clean kitchen towel or a few stacks of paper towels to dry thoroughly.
Meanwhile, mix the mayonnaise with the chopped pickles or sweet relish, Dijon mustard, onion powder, and pepper. In a large mixing bowl, combine the cooked macaroni with the tuna, egg, celery and onion. Fold in the mayonnaise dressing until macaroni is evenly coated.
Taste and add kosher salt and more mayonnaise as needed. Cover and refrigerate for a least 3 hours until well chilled. Sprinkle with paprika before serving.
Notes: Salad can be made 1 day in advance (keeps well for 3 days). Double the recipe to feed a larger crowd.
The Caesar salad is iconic and one of the best salads ever created. A simple combination of crispy greens, a creamy dressing with a hint of anchovies, and crunchy croutons make it the perfect salad. In this version, kale replaces the romaine and toasted panko replaces the croutons. If you are fond of kale, you will love this salad. If you are on the fence about kale, you will still love this salad.
The dressing does not include an egg but you won’t miss it. With the flavorful anchovies, Parmesan, garlic and other ingredients, it makes a very tasty dressing that is perfect for the nooks and crannies of the curly kale leaves.
Having crunchy breadcrumbs with every bite of the salad is an additional plus.
Kale is a hardy green that keeps well. If you are serving the salad for fewer than four people, store the remaining freshly torn kale in an airtight bag in your refrigerator until you are ready to make another salad. The dressing will keep for several days, as will the panko bread crumbs.
4 cups packed curly kale (1 large bunch with ribs and stems removed, leaves torn into 1-inch pieces)
2 tablespoons plus ¼ cup extra virgin olive oil
2 oil-packed anchovy fillets
¼ cup fresh lemon juice (3 tablespoons if you prefer a less tangy dressing)
3 tablespoons mayonnaise
1 teaspoon Dijon mustard
1 teaspoon Worcestershire sauce
2 medium garlic cloves, finely grated (Microplane works great)
½ ounce Parmesan, finely grated (about ½ cup) plus more for serving
Preparation
Melt Buttery Sticks or butter in medium skillet over medium-low heat. Add panko, ⅛ teaspoon salt (1/4 teaspoon if using unsalted butter), and a few grinds of pepper. Cook panko, stirring often, until golden brown, about 4 minutes. Transfer to a small bowl and stir in half of the lemon zest.
Place torn kale into a very large bowl and drizzle 2 tablespoons olive oil over the greens. Massage kale with your hands until dark green and very soft, about 4 minutes.
Using the flat side of a chef's knife, smash the anchovy fillets on a cutting board to a fine paste. Transfer the paste to a medium bowl. Whisk in lemon juice, mayonnaise, mustard, Worcestershire sauce, garlic,1/2 ounce grated Parmesan, and ¼ teaspoon kosher salt. Gradually stream in remaining ¼ cup olive oil, whisking constantly until dressing is smooth and creamy.
Add half of the dressing to bowl with kale and toss evening to coat. Taste and add more dressing by the tablespoon until salad is well dressed. Taste and season with more salt and pepper if needed.
Mound salad onto a platter or divide among plates. Drizzle any remaining dressing over the top with more Parmesan, reserved panko, and lemon zest. Serve immediately.
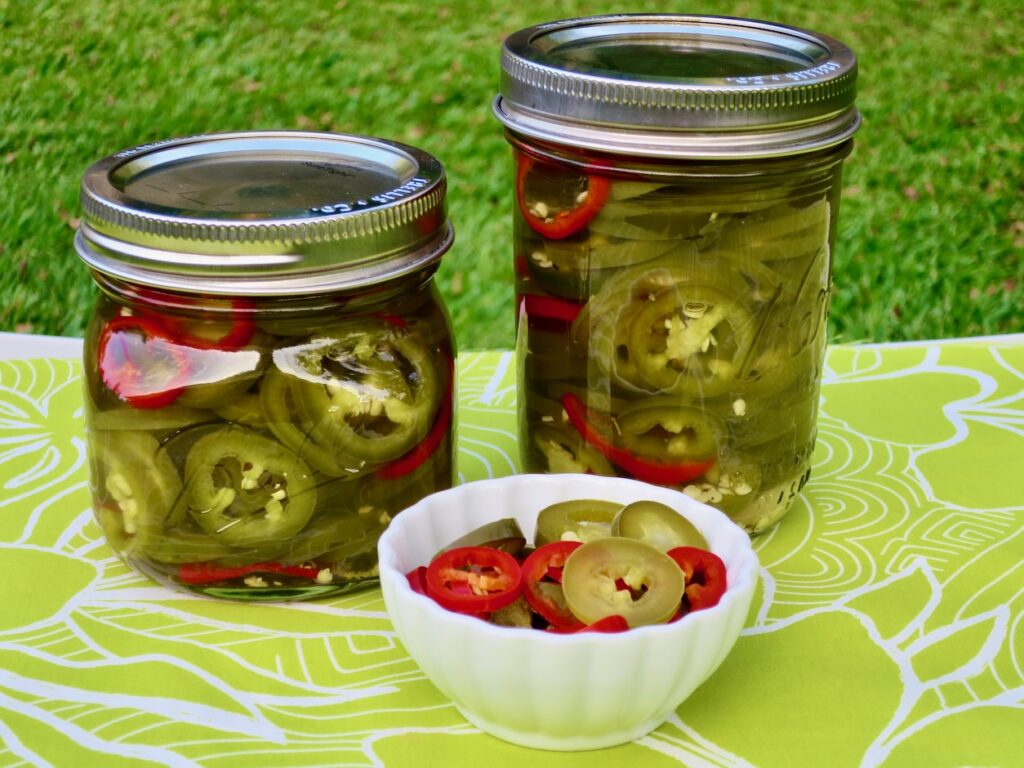
Most every year John grows a variety of jalapeños which he prepares and cans as nacho rings and hot sauce. We skipped a year and our jalapeño stash ran out. Not good! Especially because we love Mexican dishes and cook them often. I bought a couple of supermarket pickled jalapeños and ended up throwing out two of the three jars, and kept one out of desperation. Their mushy texture was a real let down.
Something had to give, so I bought fresh jalapeños and a few Fresno peppers for their beautiful bright red color and made a batch of quick nacho rings. They turned out to be just what we needed on short notice.
Use green or a combination of green and red peppers for a colorful jar of nacho rings.
We use the jalapeños in quesadillas, tacos, burritos, Mexican cabbage slaw, and nachos. They are crisp, tart and delicious.
Slice jalapeños into rings and set aside while you make the brine.
Combine vinegar, water sugar, salt, garlic and dried oregano in a pot large enough to hold the jalapeños. Bring brine to a boil. Turn off heat and add jalapeños to the brine. Let sit for about 10 minutes then transfer to mason jars. Let cool on a rack for 20 minutes or so, before refrigerating to chill completely. The jalapeños will become delightfully crisp and will keep for about a month.
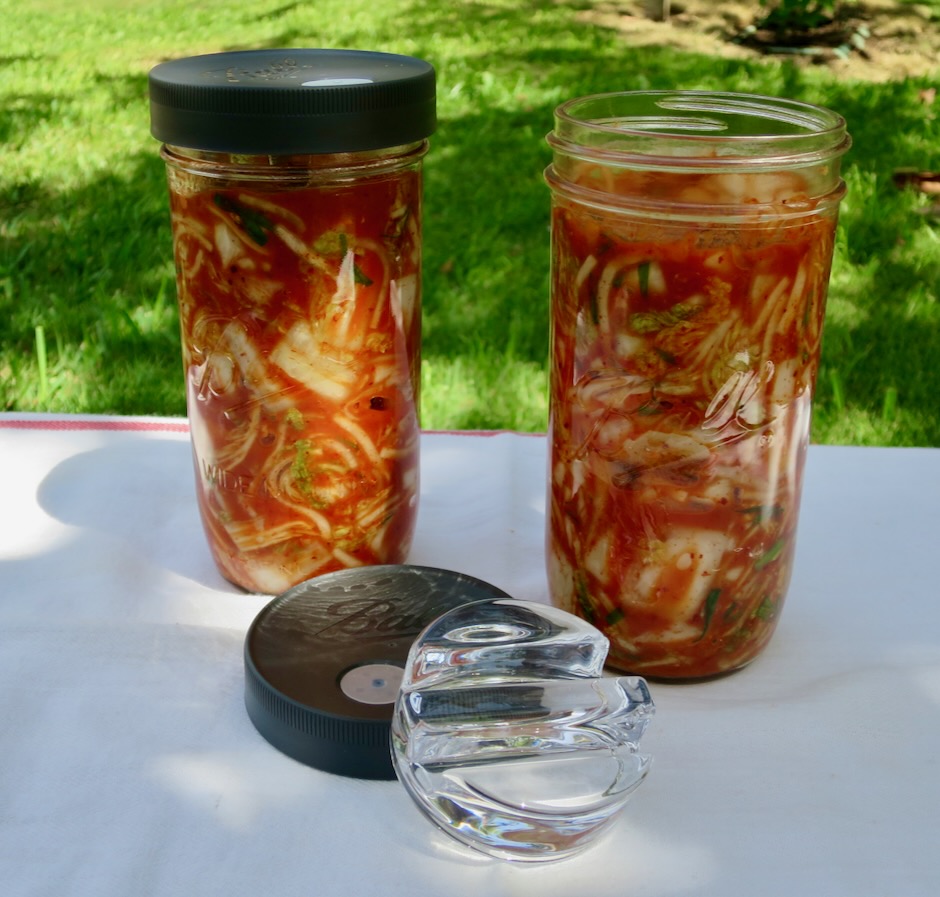
I’ve had a keen interest in homemade kimchi for sometime now. I attempted to make it before with ingredients that varied slightly, but they weren’t keepers. I finally tried again, and this time the kimchi was delicious. There are so many variations of kimchi, yet the main ingredients never change: Won bok cabbage, salt, garlic and gochugaru. Additional ingredients such as thin strips of daikon radish and carrots, grated ginger, green onions, and a bit of sugar can be added to the mix. With so many options, the kimchi you make will be your own unique recipe.
Start off with head of crispy won bok cabbage. The outer leaves should be rinsed well, or removed if damaged.
Slice the won bok into quarters and remove the core.
I bought a large bag of gochugaru from H Mart on Oahu. You can easily purchase this online. Gochugaru has a gorgeous deep red color and gives the kimchi its beautiful red hue.
The chopped cabbage is tossed with water and coarse salt. It will shrink dramatically by the end of this step.
I’ve had this bag of salt for years. I prefer to use this medium grain salt. I read that there is a Korean version of this so I will look out for it the next time I’m at H Mart.
Thin strips of daikon are a nice addition to the won bok. It has its own unique flavor and adds a bit of crunch to the kimchi.
The garlic, ginger and onion are grated very finely. I highly recommend the Microplane to grate the garlic and ginger. I use a fine grater for the onion as the Microplane is too fine (you’ll end up with onion water!).
After studying different preparations for kimchi, I noticed that some recipes make a kimchi paste as they refer to it, by heating mochiko flour (sweet rice flour) with water, then adding a bit of sugar. The mixture is cooled completely before the seasonings are mixed in. This method is a winner and I will always use it when making kimchi. The grated onion, garlic, ginger and gochugaru are mixed into the paste. Once the cabbage has been rinsed and drained, the kimchi seasoning paste is mixed in along with the daikon and green onions. The paste coats the vegetables thoroughly ensuring that they are all well seasoned. It is a brilliant idea.
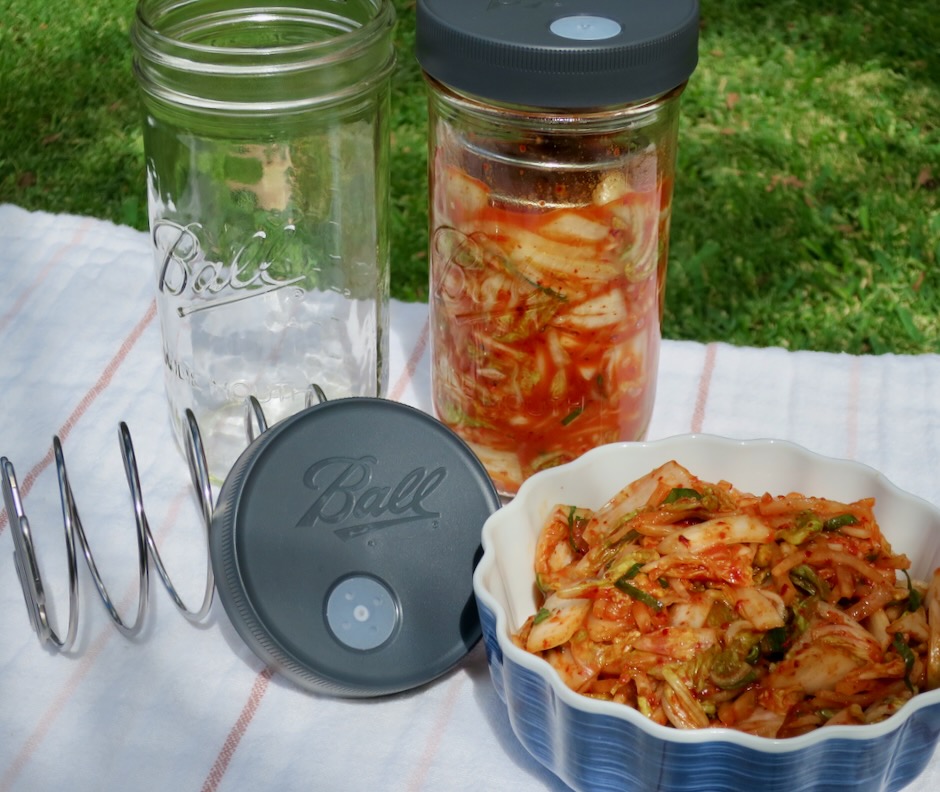
If you have fermenting weights or springs it helps to keep the cabbage submerged under the liquid. Otherwise, press the cabbage down firmly with a spoon.
I never thought I would say that kimchi is beautiful but if you make your own, it truly is. There is no kimchi like this available at stores where I live. It’s fresh, spicy, and delicious.
Kimchi is delicious served with rice and sesame tofu.
1 head Napa cabbage (about 2½ pounds) bottom trimmed, quartered, core removed, leaves cut into 2-inch pieces
¼ cup medium grain salt (I use Pacific Brand by Aloha Salt Co.)
1 cup distilled or purified water
Kimchi paste: ½ cup distilled or purified water
1 tablespoon mochiko rice flour
1 tablespoon granulated sugar
Vegetables: ½ small bundle green onions, julienned
¾ cup daikon radish cut into 2-inch long matchsticks (optional)
¼ medium sweet onion finely grated
4 cloves garlic (medium size) peeled and finely grated
1 2-inch piece ginger, peeled and finely grated
¼ cup gochugaru (Korean red pepper)
Preparation
Place cut cabbage in a large, wide bowl. Mix salt with 1 cup water (distilled or filtered). Pour salt water over the cabbage and toss well (I use food-safe disposable gloves). Not all of the salt will have dissolved but that's OK, just mix the salt in with the cabbage and water. Cover the bowl and set aside for 1½ hours, tossing a few times.
Meanwhile, whisk ½ cup water with mochiko flour in a small saucepan over medium heat, stirring constantly. Once the mixture begins to thicken and bubble (pudding consistency) add the sugar and whisk until combined. Remove from the burner, transfer kimchi paste to a bowl and let cool completely. Once kimchi paste has cooled, measure out 4 tablespoons and mix in grated onion, garlic, and ginger. Add gochugaru and mix thoroughly, adding more paste as needed.
Drain cabbage in a colander and rinse under cool water to remove some of the salt. I give mine a fairly quick rinse making sure not to remove all of the salt. Drain and add back to the large bowl. Toss in daikon if using, and green onions. With food-safe gloves or clean hands, mix in kimchi seasoning paste and toss to coat the vegetables well. Transfer to clean quart jars leaving at least 2-inch headspace. Use fermenting springs or glass weights and lids if you have them. Otherwise press down on the kimchi firmly with a spoon so it is packed tightly. Cover with a lid and set aside away from the sun for 24 hours before refrigerating. This will allow enough time for fermentation to begin. You may leave the kimchi out at room temperature for another day if you prefer a more sour flavor. Taste the kimchi to see if the flavor is just right for you. The kimchi will continue to ferment very slowly when kept in the refrigerator. Kimchi will keep well in the refrigerator for months, if you can make it last that long.
The summer weather has been quite brutal here in South Maui. With temperatures reaching 90+ degrees, it’s hard to imagine cooking up a fancy meal in the kitchen all afternoon. If you’re looking for a superb summer salad, consider making this. Not only does this salad make a satisfying lunch, it can be transformed into a delightful dinner served with some good sourdough bread or focaccia.
You will briefly turn on the stove to cook the beans for a few minutes until they are tender-crisp. No other cooking is required for this dish.
We grew these beautiful beans in the garden just before the summer heat became too much for successfully growing most vegetables. There are plenty of green beans at the market that will work perfectly for this recipe.
The crisp beans, juicy tomatoes, earthy chickpeas and creamy feta works out to be the perfect combination, with fresh dill being the icing on the cake. A bright and tangy dressing makes this salad sing.
I highly recommend grilling some good sourdough bread to accompany the salad. The slightly smoky flavor of the bread completes the meal. Toasted cornbread or focaccia would also be a good option.
Tomato-Wax Bean Salad with Chickpeas, Feta and Dill
Bring a medium saucepan of water to boil over high heat. Add ½ teaspoon salt, then green beans. Cook until beans are tender and crisp, about 2 minutes. Transfer beans to a bowl of ice water to cool. Drain in a colander and blot dry with a kitchen towel.
In a small bowl, put lemon juice, vinegar, garlic, a pinch of salt and some black pepper to taste. Whisk in olive oil.
Add cherry tomatoes, green beans and chickpeas to a wide salad bowl. Season with salt and pepper. Add dressing and toss to coat. Add feta and toss once more. Let marinate 10 minutes, tossing occasionally. To serve, sprinkle generously with dill and dried oregano.
This refreshing salad comes from Samin Nosrat, writer of a James Beard award-winning New York Times best selling cookbook, Salt, Fat, Acid, Heat. We watched a documentary on Netflix featuring Ms. Nosrat a few years ago and really enjoyed it. I love the simplicity of this recipe. It has just a few ingredients but it packs loads of flavor. It’s the perfect summer salad.
The cucumbers and onions are crispy, the tomatoes are sweet, and the fresh herbs add life to this wonderful salad.
Our herbs do quite well in our hot climate. Italian parsley is an herb that we always have in our garden.
This salad is delightful on its own, but pair it with grilled chicken and tahdig, and you’re in for a real treat.
Salad-e Shirazi (Persian Cucumber, Tomato and Onion Salad)
2 tablespoons any combination of finely chopped Italian parsley, basil, dill or cilantro
2 teaspoons finely chopped fresh mint
1 tablespoon diced green onion
8 ounces diced grape or cherry tomatoes
¼ cup freshly squeezed lime juice
3 tablespoons extra virgin olive oil
Kosher salt and freshly ground black pepper
Preparation
Remove alternating stripes of peel on the cucumbers and trim ends. Dice cucumbers into ¼-inch pieces and place in a large bowl with onion and fresh herbs including mint. Cut grape or cherry tomatoes into quarters, about ¼-inch pieces.
In a small bowl, whisk together ¼ cup lime juice, olive oil, ½ teaspoon kosher salt and ¼ teaspoon pepper. Just before serving, dress vegetables with some of the vinaigrette and stir to combine. Taste and adjust seasoning with salt and pepper and more dressing. Serve slightly chilled with your favorite grilled chicken, tahdig or buttered rice. Leftover salad can be refrigerated for 1 day.


")
")
")
")
")