Browsing Category

Recipes

Dinner, Lactose Free, Pork, Recipes, Side Dishes

Braised French Lentils with Bacon

June 4, 2019

Braised French Lentils with Bacon

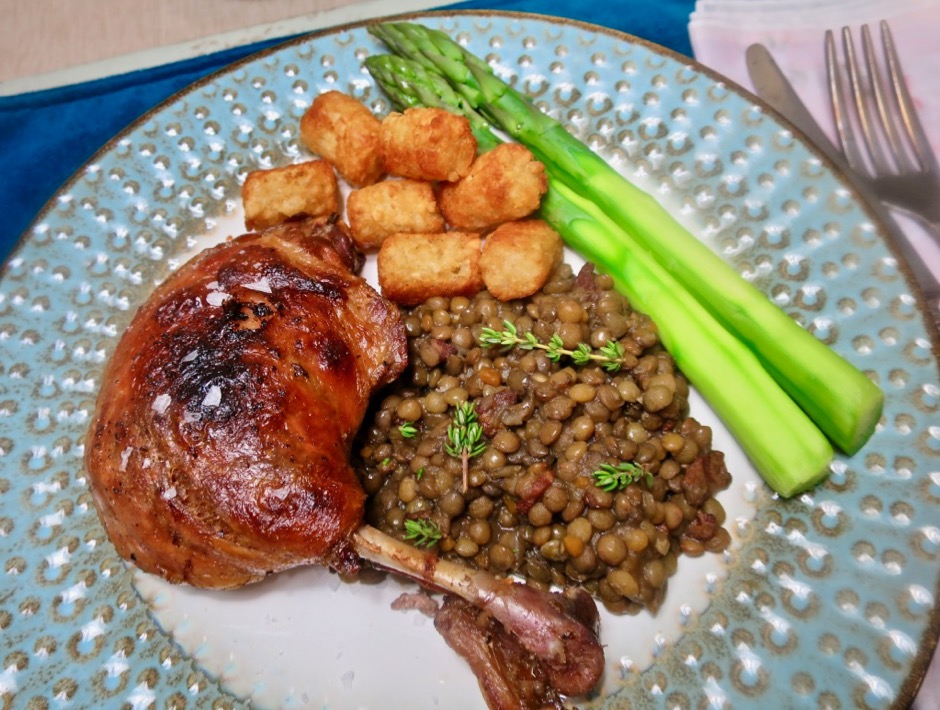
When visiting San Francisco, I always return to Fringale restaurant for their duck confit and French lentils (we have successfully made sous vide duck confit at home which I will cover in a future post).  You may serve duck confit with side dishes other than lentils, but to me, there is nothing that compliments the savory duck as well.  French lentils are small so they cook very quickly but unlike other lentils they hold their shape extremely well.  But cooking quickly does not mean they aren’t full of flavor. Mirepoix, the foundation for many French dishes, is a combination of carrots, onions and celery that are finely diced and sautéed gently in olive oil or butter.  Mirepoix will add aromatic flavor to your dish as they do here, without being too bold. All of the elements meld together to make a delicious meal.

Braised French Lentils with Bacon & Sous Vide Duck Confit

Dried Lentils

French lentils, which are a must for this dish, can be found packaged or in the bulk section of many markets.  For a real treat buy French lentils du Puy.  Wash them well in a sieve before using them in any recipe.  The rinsed and drained lentils are added to the pot along with chicken broth. They will braise in the liquid and aromatics for about 45 minutes.  Then they are ready to serve.

Dried Lentils

Mire Poix, Thyme, Bay Leaf & Garlic

The mirepoix consists of onion, carrots and celery.  Fresh thyme, garlic and bay leaf also contribute to the flavor of the braised lentils.

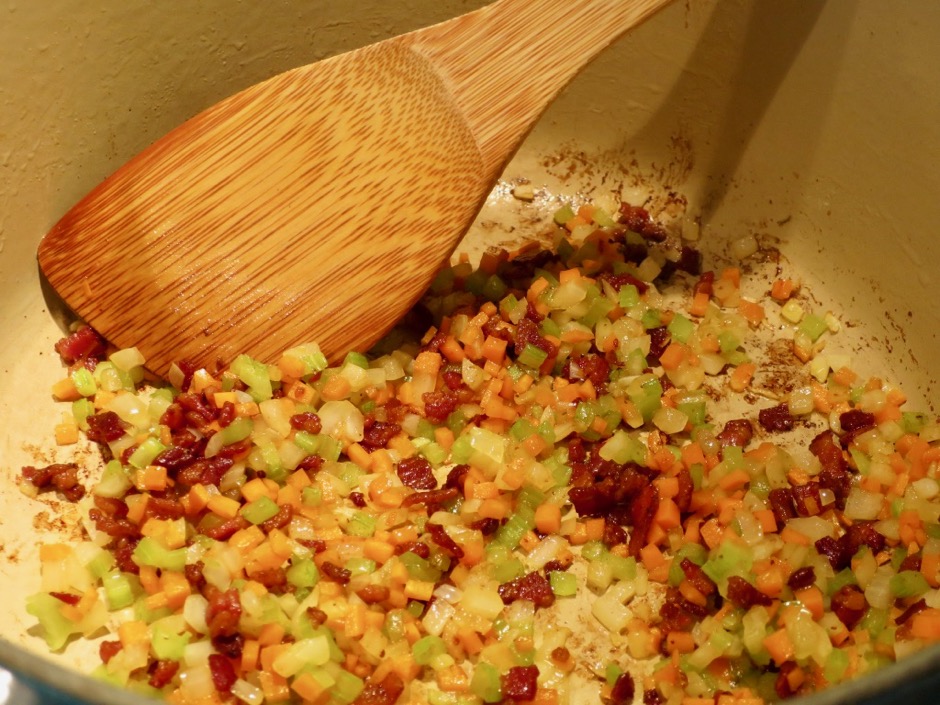
One of the highlights of this recipe is bacon.   Not only does bacon smell divine when it’s cooking, it adds so much flavor to this humble dish. The vegetables are sautéed  just until they soften a bit.  The idea is to coax out the flavors without browning them too much. They should me meltingly tender and sweet.

Braised French Lentils with Bacon

A bit of garlic goes in the pot along with a bay leaf and fresh thyme, followed by Sherry to deglaze the pan.  You could also use red wine, however, there’s something about Sherry that is magical.  It’s the secret ingredient in Granny’s Teriyaki Sauce.  Be sure to use the real deal Sherry from Spain.  One that we like to use is Hartley & Gibson’s Blend of Amontillado Medium Sherry.  It’s not expensive and relatively easy to find in larger supermarkets or local wine stores.

Braised French Lentils with Bacon

Braised French Lentils with Bacon
 
Author:
Serves: 4
Ingredients
  • 1 cup French lentils, rinsed and drained
  • 3 pieces bacon, finely diced
  • 2 heaping tablespoons minced onion
  • 2 heaping tablespoons finely diced carrot
  • 2 heaping tablespoons finely diced celery
  • 1 small garlic clove, minced
  • 1 bay leaf
  • 2 - 3 sprigs fresh thyme
  • ⅓ cup sherry (Hartley & Gibsons Amontillado Medium Sherry recommended)
  • 2¾ cups chicken broth
  • few grinds of pepper (optional)
Preparation
  1. Wash lentils and drain in a sieve.
  2. In a medium saucepan (I use my Le Creuset 3½ quart Dutch oven) cook diced bacon until crisp and rendered. If there is too much bacon fat in the pan you may pour off some of it. Once the bacon is crisp, turn heat down to medium-low and add mirepoix. Sauté gently (do not brown) until vegetables soften a bit, about 5 minutes. Add minced garlic, bay leaf and thyme stirring continuously for 1 minute.
  3. Deglaze pan with the Sherry, scraping the bottom of the pan with a wooden spoon. Add lentils and chicken broth to the pan. Bring to a simmer, cover the pan and cook for about 45 minutes, or until the lentils are just tender. Check the lentils occasionally making sure they are not boiling. Adjust the heat as necessary. I usually have the heat set to low allowing the lentils to simmer gently.
  4. The lentils are done when just tender. You may uncover the pan for a few minutes if there is too much liquid (the lentils should not be dry). Keep in mind the lentils will absorb some of the liquid once refrigerated.


Dessert, Fruit, Lactose Free, Recipes

Aunty Ruby’s Country Inn Lemon Loaf

May 15, 2019

Aunty Ruby's Country Inn Lemon Loaf

It has been nearly 30 years since my late Aunty Ruby shared this recipe with me.  She was such an excellent cook and baker. Ever so thoughtful, she sent me 2 loaf pans with liners along with the recipe. This is one of those recipes that has family heirloom status.  There are no fancy ingredients, just flour, eggs, sugar, milk, lemons.  The essence of simplicity.

Aunty Ruby's Country Inn Lemon Loaf

This cake is reminiscent of a dessert you might find at a quaint bed and breakfast or country inn. Or, for that matter, even a 5-star restaurant. It is that good!  I serve it without any accompaniments, however you might choose to serve it with a scoop of vanilla ice cream or fresh fruit.

Lemon Loaf Glaze

The glaze is a simple mixture of fresh lemon juice and sugar. It may seem that there is too much glaze, but make sure to use all of it.  The tangy-sweet lemon glaze moistens the cake with a wonderful flavor. I use a toothpick and poke holes all over the top of the cake so that the glaze seeps into each bite you take.

Aunty Ruby's Country Inn Lemon Loaf

Aunty Ruby's Country Inn Lemon Loaf
 
Ingredients
  • 1½ cups all-purpose flour
  • ¼ teaspoon salt
  • 1 teaspoon baking powder
  • 6 tablespoons (3/4 of a cube) Earth Balance Buttery Sticks at room temperature (or regular butter)
  • 1 cup sugar
  • 2 large eggs at room temperature
  • grated rind of 1 lemon
  • ½ cup 2% lactose free milk at room temperature (or regular milk)
  • Glaze:
  • Juice of 1 lemon and 6 tablespoons granulated sugar
Preparation
  1. Preheat oven to 350 degrees.
  2. Butter an 8½ x 4½-inch loaf pan (or use a loaf liner).
  3. Sift together flour, salt and baking powder.
  4. Cream together Buttery Sticks and sugar. Beat in eggs one at a time. Do not overbeat. Mix in grated lemon rind. Add alternatively, flour mixture and milk.
  5. Pour batter into prepared loaf pan. Bake for 50-55 minutes or until a toothpick inserted in the middle comes out clean. Check for doneness at 50 minutes.
  6. While cake is baking, make the glaze. Combine the lemon juice and sugar, stirring occasionally.
  7. Let cake rest in pan for about 5 minutes. Remove cake gently from pan and place on a small cooling rack with foil under the rack. Spoon glaze over the cake allowing it to soak in. You may use a toothpick to make small indentations in the cake so that the glaze will moisten the entire cake. Slice and serve lemon loaf at room temperature.
  8. Recipe may be doubled to make two loaves.

Dinner, Japanese, Lactose Free, Pork, Recipes

Spicy-Sweet Sambal Pork Noodles

May 8, 2019

Spicy-Sweet Sambal Pork with Udon Noodles

Leave it to Chris Morocco, Senior Editor of Bon Appetit magazine to come up with this terrific pork and noodle dish.  The flavors of both sweet and spicy along with the crispy bits of pork and chewy noodles can’t be beat.  I made this with fresh ramen noodles and udon noodles. They are both delicious, but if I had to choose one or the other, it would be the udon noodles because they are a bit thicker, springy, and toothsome (ramen noodles are my favorite for soup based bowls).  Luckily, we have some pretty decent fresh noodles available at the markets.

Sun Noodle Fresh Udon

Sun Noodle is one of the largest producers of specialty Asian style noodles.  They make over 300 different types of fresh noodles for markets and restaurants.  Both the ramen and udon are made by Sun Noodle and sold at our local Island Grocery store.

Rice Vinegar, Sambal Oelek, Ginger, Garlic, Basie

A few of the seasoning ingredients are shown above.  There’s also a bit of tomato paste, soy sauce and sugar that gets mixed in with the pork.

Spicy-Sweet Sambal Pork with Ramen Noodles

Don’t skip the basil.  It is an essential topping that brings the dish together just before serving it.

Sun Noodle Fresh Ramen

Cooking Pork with Seasonings

A portion of the pork is first cooked until the edges are crisp.  The rest of the pork and seasonings are added to the pan along with water.  Everything simmers until the sauce is thickened and the flavors have melded.

Simmering Pork

If you happen to have any leftovers (rarely the case) pack it up and take it to work for lunch.

Spicy-Sweet Sambal Pork Noodles

Spicy-Sweet Sambal Pork Noodles
 
Adapted from Bon Appetit Magazine
Author:
Serves: 2-4 servings
Ingredients
  • 1 tablespoon extra virgin olive oil
  • 1 pound ground pork, divided
  • 1-inch piece of fresh ginger, peeled and finely chopped
  • 2 large garlic cloves, minced
  • 1 tablespoon sugar
  • 1 tablespoon tomato paste
  • 2 sprigs fresh basil
  • 2 tablespoons Sambal Oelek ground chili paste
  • ⅛ cup soy sauce
  • ⅛ cup unseasoned rice vinegar
  • ¾ pounds fresh udon or ramen noodles
  • 1 tablespoon butter (optional)
  • kosher salt to taste
Preparation
  1. Heat oil in a large wide heavy pot (Le Creuset works great) over medium to medium-high heat. Add half of the pork, breaking apart into 3 large chunks with a wooden spoon. Cook, undisturbed, until well browned underneath, about 5 minutes. Turn pieces and continue to cook until pork is nicely browned on both sides, about 3-4 minutes longer.
  2. Add ginger, garlic, sugar, and remaining pork to the pot and cook, breaking up pork into small clumps, until meat is nearly cooked through, about 5 minutes, adjusting heat as necessary. Add tomato paste and 1 basil sprig. Cook, stirring occasionally until tomato paste darkens, about 2 minutes. Add chili sauce, soy sauce, vinegar, and 1 cup of water. Bring to a simmer and reduce heat too low. Cook uncovered, stirring occasionally , until sauce is slightly thickened and flavors have melded, about 30 minutes.
  3. Cook noodles per the instructions, in a large pot of boiling salted water (short of al dente). Add noodles to the pot with sauce along with the butter. Add a splash of pasta cooking water if sauce seems too thick. Simmer, tossing occasionally until the sauce begins to cling to the noodles, about 1 minute. Remove basil sprig.
  4. Divide noodles among plates or bowls and top with torn basil.


Bread, Dinner, Fruit, Gardening, Italian, Lactose Free, Pasta, Recipes, Vegan, Vegetarian

Summer Tomatoes on Capellini & Sourdough Bread

April 23, 2019

This year we planted two Early Girl tomato seedlings in the garden and were they ever a great surprise.  They produced more than 100 pounds of gorgeous, sweet fruit.  Though the plants are looking rather scraggly after several months, they are still bearing fruit.  These tomatoes are deep red in color, meaty, have very few seeds and a tiny stem that’s not woody when you cut into the fruit. They are the perfect tomato.  Unlike the Big Beef tomatoes that we usually grow, the Early Girls are small in size.  My friend Hano and her sister Charlotte eat them as if they were apples!

With all of these tomatoes ripening faster than we knew what to do with them, I wanted to whip up something delicious that would show off their exceptional flavor.  This was the perfect recipe. It is a raw sauce so there’s no cooking involved and everything goes into one bowl.  This really is the way to showcase your homegrown tomatoes.  The original recipe that I wrote down nearly 10 years ago comes from Deborah Mele. It’s one of my favorite summer meals.

Homegrown Early Girl Tomatoes

This dish requires the best tomatoes you can find.  If you don’t grow your own, check out your local farmer’s markets.  The tomatoes that are sold at supermarket chains in our area just won’t do.  Heirloom tomatoes would work if you can find them.

Kalamata & Castelvetrano Olives

You may use kalamata olives or a mix of olives.  I added a few castelvetrano olives along with the kalamatas.

Summer Tomato Sauce

I love that this recipe can be thrown together in 20 minutes.  All you need is a good, sharp knife to chop up all the ingredients.

Summer Tomatoes on Toasted Sourdough Bread

My favorite way to serve the tomato sauce is on thin capellini noodles or on toasted sourdough bread.

Summer Tomatoes on Toasted Sourdough Bread

Toast the bread until it’s nice and crisp.  Then spoon the tomatoes over the top and let it sit for a minute so that it soaks up all of that delicious sauce.

Summer Tomatoes on Capellini

Summer Tomatoes on Capellini & Sourdough Bread
 
Adapted from Deborah Mele's recipe
Author:
Serves: 6
Ingredients
  • 2 pounds ripe tomatoes, coarsely chopped
  • 2 tablespoons finely diced sweet onion
  • 12 seedless kalamata olives, or a mix of olives, diced
  • 1½ tablespoons drained capers
  • 2 medium garlic cloves, minced
  • 1 tablespoon chopped Italian parsley
  • ½ teaspoon finely chopped oregano
  • ¼ cup finely chopped fresh basil
  • ¼ teaspoon red pepper flakes (optional)
  • 2 tablespoons red wine vinegar
  • ⅓ cup extra virgin olive oil
  • freshly ground black pepper and salt to taste
  • capellini or sourdough bread
  • grated parmesan (optional)
Preparation
  1. Combine tomatoes, onion, olives, capers, garlic, parsley, oregano, basil and red pepper flakes if using. Stir in red wine vinegar and olive oil. I normally don't add any salt since the olives and capers are salty. Add a few grinds of black pepper and salt to taste.
  2. Mix well, cover with plastic wrap and let sit at room temperature for a few hours. Serve over capellini pasta or thinly sliced and toasted sourdough bread. Scatter grated parmesan cheese over the top. Leftovers keep well in the refrigerator for another day.


Chicken, Dinner, Lactose Free, Mexican, Recipes

Mexican Style Grilled Chicken

April 5, 2019

Mexican Style Grilled Chicken Breasts

Chicken breasts are an ideal foil for brines, marinades, and flavor-rich sauces.  These Mexican style grilled chicken breasts are now a favorite recipe of ours.  The chicken is tender and juicy and the marinade is delicious.  The best thing about this recipe is its versatility.  If we have leftovers, we use it in tacos, burritos and sandwiches.

Mexican Style Grilled Chicken Breasts

Juicy and flavorful chicken breasts are sometimes hit or miss. The most important technique is to pound the chicken breasts into even thickness.  This will ensure each piece is uniformly cooked.  Otherwise, you may end up with that lopsided piece of chicken cooked through on one side and not the other.  Chicken breasts do not have to be bland.  A tasty marinade will infuse the chicken in just a couple of hours.  Using the indirect grilling method helps to keep the breasts tender and moist.  Direct high heat can lead to a leathery exterior as well as an overdone interior.  A digital thermometer is an essential tool in preventing overcooking.  Once the temperature reads 160 degrees remove the chicken from the grill.

Chicken Marinade

This marinade does its magic in just 2 hours.  Reserve some of the marinade before adding it to the chicken, and use it later to baste when you grill.  The beautiful color of the chicken comes from the ancho chile powder.  You should be able to easily find this in your grocery store (McCormack brand is what I found at Safeway).  The chipotle chile gives the chicken a nice smoky kick.

Mexican Style Grilled Chicken Breast Tacos

Leftover chicken makes splendid tacos, burritos or sandwiches.

Mexican Style Grilled Chicken Breasts

Mexican Style Grilled Chicken
 
Delicious moist and tender grilled chicken breasts
Author:
Serves: 6
Ingredients
  • 6 boneless and skinless chicken breasts, pounded to uniform thickness
  • Marinade:
  • ¼ cup canola oil
  • 3 tablespoons ancho chile powder
  • 2 tablespoons apple cider vinegar
  • ¼ cup fresh lime juice
  • 2 teaspoons honey
  • 1 teaspoon chipotle chile in adobo sauce, finely chopped
  • 2 teaspoons dried Mexican oregano
  • 2 medium garlic cloves, minced
  • 4 green onions, white and green parts, thinly sliced
  • ¼ cup chopped cilantro
  • 1 teaspoon kosher salt
Preparation
  1. Place 1 or 2 chicken breasts in a Ziploc freezer bag and pound lightly with a meat mallet, rolling pin or skillet to uniform thickness. This will ensure the chicken will cook evenly, be moist and tender.
  2. In a small bowl mix all of the marinade ingredients and whisk to combine. Set aside about ⅓ cup of the marinade for basting the chicken later. Pour the remainder of the marinade in a Ziploc freezer bag along with the chicken. Massage marinade into the chicken so that it is evenly distributed and all pieces are coated well. Place in the refrigerator for 2 hours. If you are not ready to grill the chicken after the 2 hours are up, remove the chicken from the bag to a plate and discard the marinade.
  3. Light your grill for indirect grilling. We found that this produces the best, juiciest, chicken breasts. After the chicken has cooked for a few minutes on each side, baste generously a few times on each side with the reserved marinade. Remove chicken when it reaches 160 degrees as measured with a digital thermometer. Serve with your favorite side dishes.


Dinner, Fish, Japanese, Lactose Free, Recipes

Furikake Ahi with Soy Vinaigrette

March 25, 2019

Furikake Ahi with Soy Vinaigrette

Virtually no one reads the newsletters that often accompanies utility bills, but John does.  He suggested that I take a look at this one that came with the gas bill and featured a recipe from Diamond Head Grill & Market on Oahu.  Don’t cook with gas?  Your electric stove will do just fine.  I’ve made this on numerous occasions and never tire of it.  The most important ingredient is of course the fresh ahi.  A few years ago I discovered Oki’s Fish Market tucked in the corner of the Kahului Foodland market.  Oki’s always has fresh ahi blocks and ahi steaks at reasonable prices.  So when I’m in the neighborhood, I always stop by to pick up fresh fish.

Fresh Ahi Block

I usually buy a 10-12 ounce ahi block, enough to serve two people. Look for ahi with the least sinew lines (they make it difficult to cut the fish in neat slices).

Best Furikake

My favorite furikake is Mishima’s Nori Komi Furikake.  It’s a simple mix of roasted white and black sesame seeds and seaweed.  This is the best type for coating the ahi block.  Other furikake flavors may include dried salmon, shiso, wasabi and other ingredients.  These are delicious served over hot rice but I would avoid using them for this recipe.

Ahi Block Coated in Furikake

Once the fish is coated with furikake, it gets a quick sear on all sides in a hot pan.

Soy Vinaigrette

The vinegar, soy sauce, sugar and sesame oil makes a delicious vinaigrette.

Wasabi Sauce

I always have a bottle of this delicious wasabi sauce in my refrigerator.  It is excellent served with the furikake ahi. Once you try it, I’m sure you’ll agree that its “velvety zing” makes it a perfect condiment for fish.

Furikake Ahi with Soy Vinaigrette

The furikake ahi can be served as an appetizer however my favorite way to have it is with hot Japanese rice and steamed baby bok choy.

Furikake Ahi with Soy Vinaigrette


Furikake Ahi with Soy Vinaigrette
 
Adapted from Diamond Head Market & Grill
Author:
Serves: 2 servings
Ingredients
  • Fish:
  • 10-12 ounce block of fresh ahi
  • 3 tablespoons furikake such as Mishima Nori Komi Furikake
  • 1 teaspoon sesame oil
  • Sauce:
  • 1 tablespoon rice vinegar (unseasoned)
  • 1 tablespoon soy sauce
  • 2 teaspoons sugar
  • 1 tablespoon water
  • 1 teaspoon sesame oil
  • 1 teaspoon roasted sesame seeds
  • 1 teaspoon finely sliced green onions (to finish)
Preparation
  1. Crust ahi block with furikake. Coat a small frying pan with 1 teaspoon sesame oil and over medium to medium-high heat quickly sear the ahi to create a crust. I typically sear each side for about 1 minute, however the time will depend on how thick your piece of fish is, and how rare you prefer your fish. Remove fish to a cutting board.
  2. Whisk vinegar, soy sauce, sugar, water, sesame oil and sesame seeds together in a 1-cup glass measuring cup. Stir to combine and microwave for a few seconds until warm.
  3. Slice ahi and transfer to a plate. Drizzle warm vinaigrette over the fish. Sprinkle with green onions and serve with wasabi sauce (optional).


Follow

Get every new post delivered to your Inbox

Join other followers: