These flourless cookies are decadently rich with pockets of melted chocolate tucked beneath their crinkly tops. They are light, with crisp edges and chewy, chocolatey centers. They are pure delight for anyone who enjoys a chocolate treat occasionally (or frequently).
With just 7 ingredients these cookies are easily made in 30 minutes. Two types of chocolate and toasted pecans pair up beautifully.
Egg whites and powdered sugar are what brings the batter together, giving these cookies a wonderful texture. Stash some in the freezer for an anytime chocolate fix.
Sift together powdered sugar, cocoa, and salt in a large bowl.
Whisk egg whites until frothy (hand mixer works great). Stir egg whites and vanilla into powdered sugar mixture. The batter will be very thick. Stir in chopped chocolate and pecans until well combined.
Drop cookies 3-inches apart using a 1½-inch cookie scoop (about 2 tablespoons) on a parchment-lined baking sheet lightly greased (otherwise they will stick) with cooking spray.
Bake until tops are shiny and cracked, about 8 - 10 minutes. Cool on baking sheet for 5 minutes before transferring cookies to a wire rack to cool completely.
One of the delights of a galette is its free-form crust. The dough doesn’t require any trimming after being rolled out. In fact, the ragged edges of the crust are what gives a galette its beautiful, rustic appearance. Whether you are making a savory or sweet filling, a galette is a gorgeous dish to bring to the table.
This year we grew Katana beefsteak tomatoes (Kitazawa Seed Co.) which turned out to be our new favorite. They are meaty, juicy, and so flavorful with a gorgeous deep red color. They are the perfect tomato for this galette and on a side note, they make for an exceptional BLT sandwich.
A sprinkling of sharp cheddar cheese is all you’ll need. The small amount of cheese is just enough to add a bit of richness allowing the tomatoes to really shine.
Choose tomatoes that are meaty and hold up well to slicing. I prefer to peel the tomatoes (except for the mini ones) because the skin has a different texture than the tomato flesh and it is especially noticeable once tomatoes have been cooked.
Fresh thyme and tomatoes are a perfect match. I included a handful of colorful sweet cherry tomatoes that added a nice contrast with the red beefsteaks.
The edges of the dough are folded over the tomatoes to make a rustic crust that will bake up beautifully.
Galette dough adapted from Dorie Greenspan's recipe
Author: Kiyo Miller
Serves: 4
Ingredients
For the dough:
1½ cups (204g) all-purpose flour
½ teaspoon sugar
½ teaspoon kosher salt (1/2 teaspoon fine sea salt if using unsalted butter)
1 Earth Balance Buttery Stick (8 tablespoons, 4 ounces, 113g), frozen for 30 minutes, then cut into small cubes
¼ cup ice water
1 tablespoon milk or cream for brushing the crust (optional)
For the tomato galette:
1 cup coarsely grated sharp cheddar cheese, not packed
1 pound meaty ripe tomatoes, peeled and sliced into ⅓-inch rounds
handful of assorted cherry tomatoes sliced (optional)
olive oil for brushing
Maldon sea salt or other flaky salt
freshly ground black pepper
a few fresh thyme sprigs
julienned basil (optional)
Preparation
Place flour, sugar and salt in a food processor. Pulse a few times to blend. Add cubes of cold Buttery Sticks and pulse until mixture resembles coarse meal. Add some of the ice water and pulse. Continue to add more water, pulsing each time (about 3 additions). Use longer pulses until dough holds together when you pinch it (dough will not be formed into a ball). Transfer dough to a clean work surface and use the heel of your hand to smear small pieces of dough, which will help to incorporate the Buttery Sticks. Gather the dough and form into a flat disk. Place between 2 sheets of parchment paper. Roll out dough into a 12-inch circle. Place dough with parchment papers onto a sheet pan. Refrigerate for at least 2 hours. Keep refrigerated until you have all other ingredients ready to go.
Preheat oven to 400 degrees ½ hour before you bake the galette. Meanwhile, place sliced tomatoes on paper towels if very juicy. This will help to avoid a soggy crust. Strip thyme leaves from stems and set aside.
Remove galette dough from the refrigerator. Discard top layer of parchment paper. Sprinkle cheese over the dough leaving a 1½-inch border. Place tomatoes over the cheese in a single layer. Brush tomatoes with olive oil. Sprinkle Maldon or other flaky salt over the tomatoes along with a few grinds of black pepper. Sprinkle fresh thyme leaves over the top. Gently fold the pastry over the tomatoes, making pleats as you go. Brush edges with cream or milk (optional). Bake galette for about 35 minutes or until the crust is golden brown. Let galette cool for a few minutes before cutting into wedges. It is best served just warm or at room temperature. Sprinkle with julienned basil if using. The galette makes for a terrific meal served with a crispy green salad.
Not long ago, my sister gave me an excellent bag of locally made granola. I wondered what would be the best way to make it shine. At first, I thought about just sprinkling it over yogurt for breakfast but then decided that granola muffins would be much more exciting. This simple recipe turns out some mighty tasty muffins.
I love the name of Deb’s baked in Hawaii granola. Besides the more common ingredients such as oats and almonds that you might find in many granolas, this one includes rich and buttery macadamia nuts and coconut chips that get nice and toasty when sprinkled over the top of the muffins.
Besides the granola in the batter, you’ll want to sprinkle more granola over the top of each muffin before baking. This lends a very tasty and crispy texture to each bite.
1 cup (99g) granola + ¾ cup (74g) for muffin topping
1 teaspoon vanilla extract
⅓ cup (67g) canola oil
1½ cups (340g) lactose free buttermilk
(To make lactose free buttermilk add 1½ tablespoons of white vinegar to a 2-cup liquid measuring cup. Pour lactose free whole or 2% milk over the vinegar to measure 1½ cups. Allow the milk to sit for 5-10 minutes to thicken a bit).
Preparation
Preheat oven to 400 degrees. Lightly grease the cups of a standard muffin pan.
Whisk together all of the dry ingredients including 1 cup of granola.
In a separate bowl, whisk together the vanilla, canola oil and lactose free buttermilk. Pour the liquid ingredients into the dry ingredients, stirring just to combine. Spoon the batter into the prepared muffin cups, filling nearly full. Sprinkle the remaining ¾ cup of granola over the tops of the muffins.
Bake the muffins for 16-18 minutes. Test for doneness by inserting a toothpick in the middle of one of the muffins. The toothpick should come out clean.
Remove the muffins from the oven and set pan on a cooling rack for at least 5-10 minutes. When they are cool enough to handle, remove muffins from pan and cool on a rack. Muffins freeze well for a few months.
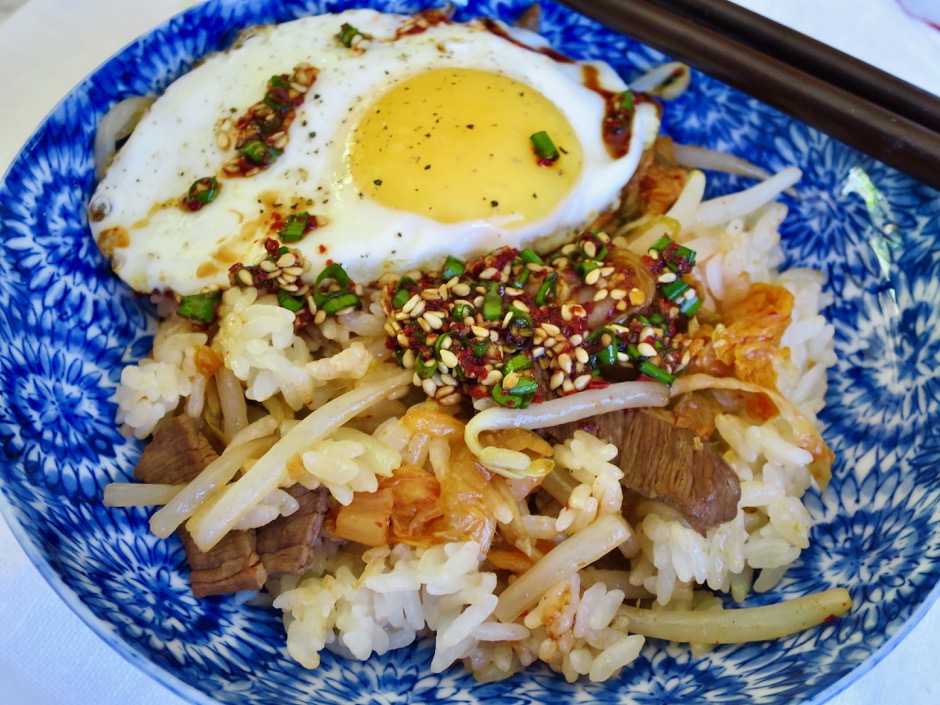
To say that I love rice would be an understatement, so making this umami filled rice bowl was an easy decision. Once you do a little prep work, everything goes into a rice cooker. It’s a suitable meal for lunch or dinner.
Even thought the sprouts are cooked with the rice and other ingredients, they still retain a nice texture. The kimchi adds such a wonderful flavor to the rice, with just a bit of heat.
The original recipe from Korean Bapsang calls for adding a bit of seasoned beef or pork to the rice dish as an option. However, you can omit this for a vegetarian version. I have cooked this dish with and without meat and both are equally delicious. All ingredients are added on top of the rice (pictured above) then cooked together.
Once your rice timer goes off, you are ready to serve your meal.
The sauce is drizzled over the rice bowl. I couldn’t resist adding a sunny-side up egg to mine.
1 cup (measuring cup for rice cooker) short grain white rice
Vegetables & Meat:
8 ounces soy bean sprouts, rinsed and drained well
3 ounces filet mignon, thinly sliced (omit meat and next 4 ingredients for vegetarian version)
½ teaspoon minced garlic
2 teaspoons soy sauce
1 teaspoon mirin
1 teaspoon sesame oil
½ cup kimchi, thinly sliced
1 tablespoon kimchi juice
Sauce:
2 tablespoons soy sauce
1 teaspoon sesame oil
½ teaspoon gochugaru (Korean red pepper flakes)
1 teaspoon roasted sesame seeds
½ teaspoon garlic, minced
½ teaspoon sugar
2 green onions, finely chopped
2 sunny-side up eggs (optional)
Preparation
Rinse rice and drain well. Place in rice cooker. Add water to 1 cup line minus 1 tablespoon.
Marinate meat (if using) with garlic, soy sauce, mirin and sesame oil. Meanwhile, heat a small skillet with a 1½ teaspoons of canola oil over medium high heat. Stir fry kimchi for 2 minutes, adding some juice from the kimchi to intensify the flavor. Remove to a small plate. Add meat (if using) to the same pan and stir fry for a minute or two, just until barely cooked through.
Spread soy bean sprouts over the the rice, followed by the kimchi, and meat. Start the rice cooker (do not use quick cooking option).
While the rice is cooking, mix all of the sauce ingredients together in a small bowl. When the rice is nearly done, cook your sunny-side up eggs. When the rice timer goes off, gently fluff the rice distributing the bean sprouts, kimchi and meat. Serve in bowls with sauce drizzled over the rice and top with sunny-side up eggs.
These fudge brownies are ultra moist with tons of chocolatey flavor thanks to both the Dutch-process cocoa and chocolate chips. This combination makes for a divine brownie that will surely satisfy any chocolate craving.
Dutch-process cocoa powder is treated with an alkali that neutralizes its acidity that makes it darker in color with a milder flavor than natural cocoa powder. When baking, Dutch-process cocoa powder is usually combined with another neutralized ingredient such as baking powder. When a recipe calls for Dutch-process cocoa powder, it is not always interchangeable with natural cocoa powder especially when baking. Many brownie recipes that call for natural cocoa such as Hershey’s, do not use any leavening, or very little (baking soda). So for this recipe, it is essential to stay with Dutch-process cocoa. Safeway stores carry the excellent Guittard brand in their baking aisle.
¾ cup (89g) King Arthur unbleached all-purpose flour
1 cup (170g) semisweet chocolate chips
Preparation
Preheat oven to 350 degrees. Lightly grease an 8" x 8" pan.
Beat eggs with a hand mixer on medium speed with cocoa, salt, baking powder, espresso powder (if using), and vanilla for about 1 minute until smooth.
Melt butter over low heat in a medium saucepan, then add the sugar. Stir to combine. Continue to stir until mixture is hot, but not bubbling (about 110-120 degrees). Add the hot butter/sugar mixture to the egg/cocoa mixture, stirring until smooth. Add the flour and chips, stir until smooth.
Spoon the batter into the prepared pan, smoothing the top to make an even layer. Bake the brownies for about 32 minutes (check after baking for 28 minutes as oven temperatures vary). A toothpick inserted into the center should come out clean or with just a few moist crumbs clinging to it. Remove pan from the oven and cool on a rack before cutting and serving, about 45-60 minutes.
Lilikoi fruit has the most amazing fragrance. The flowers on the vines are spectacular with delicate tendrils that stand out with their vivid purple centers. The plants seem to do well in our warm, dry climate here in Kihei. We grow both the yellow and purple varieties. If we are not using the puree right away, it goes in our freezer to be used at a later date for lilikoi jelly, tarts, and pound cake.
The gorgeous flowers of the lilikoi plant open up in the sunlight. The bumble bees do their thing flying from flower to flower pollinating as they go. You may notice the purple lilikoi tucked in the back of the vine.
The rind of the fruits are unassuming, however, once you cut the fruit in half, you’re in for a wonderful surprise. The aromatic juicy pulp is a delight. Don’t let the seeds deter you from tasting one. They can be eaten if you don’t mind a bit of “texture” but for jelly, glazes, sauces and such, I leave them out.
The easiest method for separating the pulp from the seeds is to use a blender on low speed. I then use a food mill and discard the seeds. You may use a sieve if you do not have a food mill.
The lilikoi glaze is what takes this pound cake to another level. It has become my favorite cake to bake these days.
Miyoko’s cultured vegan butter is a perfect alternative to real butter if you are lactose intolerant.
Our neighbors Judy and John spoil us with their fresh eggs. Not only are they superior to store-bought eggs (so much fresher) but they are lovely to look at with their various colors. A real treat.
Though not particularly attractive at this point, poking holes is the best way to get the lilikoi glaze to seep down into the cake. Spoon the glaze over the cake, wait for a few seconds for it to be absorbed and then continue with the remainder of the glaze.
This cake is tender, moist and not too sweet. Just how a pound cake should be. Once the glaze sets, it develops into a crisp and light sugar coating over the top of the cake.
Recipe adapted from King Arthur's Lemon Glazed Pound Cake
Author: Kiyo Miller
Serves: 2 cakes
Ingredients
Cake:
¾ cup + 2 tablespoons (14 tablespoons, 198g) Miyoko's vegan butter (substitute with Earth Balance Buttery Sticks or unsalted butter) at room temperature
⅜ cup (85g) Green Valley lactose free cream cheese (or regular cream cheese), at room temperature
½ teaspoon kosher salt
1½ cups (298g) granulated sugar
1¾ cups (206g) unbleached all-purpose flour (King Arthur recommended)
1 teaspoon baking powder
1 teaspoon vanilla extract
1 tablespoon lilikoi puree
5 large eggs, at room temperature
Glaze:
⅓ cup lilikoi puree
¾ cups granulated sugar
Preparation
Preheat oven to 350 degrees. Line the bottoms of two 8½ x 4½-inch loaf pans with parchment paper and grease each pan.
In a medium-sized mixing bowl, beat together the butter and cream cheese with a hand-held mixer until soft and fluffy. Add the salt, sugar, flour, and baking powder. Beat for 4-5 minutes; the batter will be stiff (use a firm spatula).
Add the vanilla, 1 tablespoon lilikoi puree, and 1 egg. Beat well. Continue to add the eggs one at a time, beating well and scraping the sides and bottom of the bowl after each addition. When done, the batter will be very fluffy. Spoon the batter into the prepared pans.
Bake the cakes for 35-40 minutes, or until a toothpick inserted into the center comes out clean.
Remove the cakes from the oven and let cool on a wire rack for 15 minutes. Meanwhile, make the glaze by mixing the lilikoi puree and sugar together in a small bowl. Mix until well combined. The sugar will not have dissolved, but this is what gives the cake a light and crisp topping.
Turn cakes out onto a wire rack (gently turn right side up) with a piece of aluminum foil underneath the rack. Poke holes with a wooden skewer all over the tops of each cake. Slowly spoon glaze over the cakes. Allow time for the cakes to absorb the glaze before adding more glaze. Slice and serve cake once it has cooled for several hours. You may freeze the pound cake for a few months. Wrap cooled cake in foil, place in plastic freezer bag.