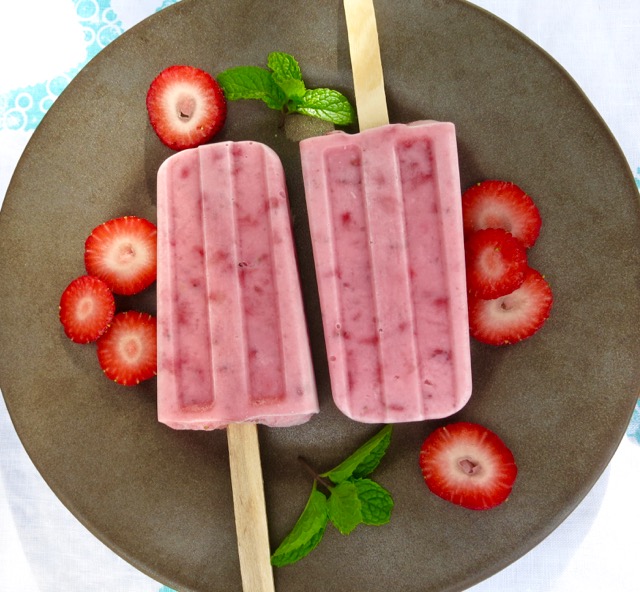
These popsicles are so easy to make I can’t believe I never thought of making them before. It all began a few months ago when my sister in-law, Paula, brought over a refreshing mango popsicle she had made. From that day on I was determined to make my own.
There’s a plethora of popsicle recipes out there in internet land. It seems you can pretty much use any type of fruit whether it be fresh or frozen. From there, you can keep it simple and add nothing more, or you might add cream, milk, nuts, coconut milk, or yogurt which I did in this case. They are very easy to make and homemade popsicles taste so good.
Cream of coconut is normally found in the liquor section of the market where the drink mixers are sold.
I bought this popsicle maker from Amazon the moment Paula came over with her mango popsicle. It’s just $12.99 and with Amazon Prime you get free shipping. It’s easy to use and makes 10 refreshing popsicles at a time. If you don’t have a popsicle maker, I urge you to get one right away! Popsicles are great all year round.
Leave a little space at the top for expansion otherwise it will be difficult to remove the top of the ice pop maker once they are frozen. I didn’t do that the first time around but with a little nudging I was able to remove it without disturbing my precious pops.
16 ounces fresh strawberries, rinsed, hulled, and halved if large
2 tablespoons sugar
1 6 ounce container Green Valley lactose free strawberry yogurt (or your favorite brand)
1 6 ounce container Green Valley lactose free vanilla yogurt (or your favorite brand)
3 tablespoons cream of coconut
Preparation
Crush strawberries with a pastry cutter or potato masher. Stir in 2 tablespoons white sugar and set aside
In a medium bowl, whisk yogurt and cream of coconut until smooth. Fold in crushed strawberries
Pour mixture into ice pop maker leaving a little space at the top to allow for expansion. Place cover over ice pop maker and insert popsicle sticks. Freeze for at least 4 hours or over night.
To remove popsicles, run warm water around the mold for a few seconds to loosen them slightly. Wrap popsicles with a small piece of waxed paper and store in an airtight container.
I bought a beautiful, sweet, pineapple (that most versatile fruit) at Costco to use in a batch of mango-pineapple jam. It was so large there was quite a bit of fruit left after making the jam. Hmmm. What could I make with the rest of the fruit? Dessert immediately came to mind. I did a quick search on-line to get some ideas and ended up with this delightful coconut pineapple bread from Maria and Josh’s blog Two Peas & Their Pod. The coconut scattered over the top of the batter bakes up into a beautiful golden brown toasted coconut crust.
Though this coconut pineapple bread is baked in a loaf pan I think of it more as a cake than bread. It’s divine.
Coconut Pineapple Bread
Adapted from Two Peas & Their Pod
Ingredients
1 1/2 cups sweetened shredded coconut
1/2 cup Earth Balance Buttery Sticks (or unsalted butter) at room temperature
1 1/2 cups all-purpose flour
1/2 teaspoon baking soda
1/4 teaspoon kosher salt (1/2 teaspoon if using unsalted butter)
1 cup granulated sugar
3 large eggs
3/4 cup sour cream (I used Green Valley lactose free sour cream)
2 cups fresh pineapple cubes (small dice)
Preparation
Preheat oven to 350°F. Butter a 9×5-inch loaf pan and set aside.
Spread 1 cup shredded coconut on a foil lined baking sheet. Bake until lightly toasted, tossing occasionally, about 6 minutes. Watch closely so the coconut does not burn (edges tend to brown quickly). Set toasted coconut aside.
In a medium bowl, whisk together the flour, baking soda, and salt.
In the bowl of a stand mixer, beat the butter and sugar on medium speed until light and fluffy. Add eggs, one at a time, beating well after each addition. Reduce speed to low, and alternately add flour mixture in three parts and sour cream in two, beginning and ending with the flour mixture. Mix just until combined. If you don’t have a stand mixer you can substitute it with a hand mixer.
Using a rubber spatula, fold pineapple and toasted coconut into the batter. Pour batter into prepared pan and smooth top. Sprinkle with remaining 1/2 cup coconut.
Bake until a toothpick inserted in the center comes out clean, about 60 minutes (cover pan with foil after baking for 35 – 40 minutes so the coconut on top of the bread doesn’t burn).
Remove bread from oven and let cool in pan for at least 30 minutes. Remove from pan and transfer to a wire rack to cool completely. Slice and serve!
I’m still on the “Brownie Quest,” searching for the perfect brownie. These may be that perfect brownie. Besides the eight ounces of melted chocolate, there’s a cup of chocolate chips stirred into the batter. As the brownies bake, the little chocolate nuggets melt perfectly and become pure decadence in every bite.
The recipe comes from Sally’s blog. I love the idea of a somewhat chewy brownie. The baking time is a bit forgiving, due to all the chocolate in the recipe. If you take the pan out of the oven just as soon as the brownies are set, you’ll have softer brownies (above) but leave them in for a few more minutes, they’ll become a bit chewier (below). Either way, they are so delicious.
Chewy Fudgy Homemade Brownies
Adapted from Sally’s Baking Addiction
Makes 16 – 20 brownies
Ingredients
1/2 cup Earth Balance Buttery Sticks (or salted butter)
8 ounces (228g) coarsely chopped bittersweet or semi-sweet chocolate
3/4 cup (150g) granulated sugar
1/4 cup (50g) packed light brown sugar
3 large eggs
1 teaspoon vanilla extract
1/2 cup + 2 tablespoons (80g) all-purpose flour (measure accurately)
2 tablespoons (11g) unsweetened cocoa powder
1/4 teaspoon salt
1 cup (180g) semi-sweet chocolate chips
Preparation
Melt the Buttery Stick and chopped chocolate in a medium saucepan on medium-low heat, stirring constantly, about 3 minutes. Remove from the heat, pour into a large mixing bowl and allow to cool slightly for 10 minutes.
Adjust the oven rack to the lower third position and preheat oven to 350°F. Line the bottom and sides of a 9×9 inch square baking pan with aluminum foil, leaving an overhang on all sides. Butter the foil.
Whisk the granulated and brown sugars into the cooled chocolate/butter mixture. Add the eggs, one at a time, whisking until smooth after each addition. Whisk in the vanilla. Gently fold in the flour, cocoa powder, and salt. Fold in the chocolate chips.
Pour batter into the prepared pan and bake for 35 – 40 minutes or until the brownies begin to pull away from the edges of the pan. A toothpick inserted in the center should come out with a few moist crumbs when the brownies are done. As oven temperatures vary, check for doneness at the 35 minute mark. If the brownies need more time, continue to bake and check every few minutes.
Allow the brownies to cool completely in the pan set on a wire rack. Once cooled, lift the foil out of the pan using the overhang on the sides and cut into squares using a sharp knife. (Wipe the knife clean after each cut). Brownies freeze beautifully.
“The New Basics Cookbook” published 16 years ago, is still one that I turn to for reliable, delicious food. Authors Julee Rosso and Shelia Lukins are also the authors of the well-known Silver Palate Cookbook. With 849 pages it’s a treasure trove of recipes. This carrot cake recipe was created by Sheila’s mother Berta, and it’s now one of my favorite desserts. You can prepare it a few days in advance which means it’s perfect for a party or potluck gathering. It seems everyone loves carrot cake.
Instead of using raw, grated carrots, the recipe instructs you to cook the carrots and purée them before adding them to the batter. Worth the extra step, it brings out the carrot’s natural sweetness and ensures the cake is going to be moist and delicious. To me, there is nothing more luscious than Berta’s carrot cake.
Drain the cooked carrots and with quick pulses finely mince the carrots. I don’t process the carrots to a fine purée as I prefer to keep a little texture to them.
A cup of shredded coconut is called for in the original recipe. I use a lesser amount, but go ahead and use a cup if you want to. The recipe doesn’t state whether to use unsweetened or sweetened coconut. I use the sweetened type. As you’ll notice in the photo above, the coconut I had on hand has some fairly long strips. I used my kitchen scissors and snipped the coconut into small, even pieces. Instead of adding the cup of chopped walnuts to the batter, I left them out but toasted some coarsely chopped pecans and sprinkled them over the frosting.
1 8 ounce can crushed pineapple in 100% pineapple juice (not heavy syrup), drained well
1/2 cup coarsely chopped pecans, toasted (optional, for sprinkling over the frosting)
Cream Cheese Frosting:
4 ounces cream cheese, at room temperature (I used Green Valley lactose free cream cheese)
3 tablespoons butter, at room temperature (I used Earth Balance Buttery Sticks)
2 cups + powdered sugar
1/2 teaspoon vanilla extract
juice from 1/4 lemon
Preparation
Cake:
Preheat the oven to 350°F. Line the bottom of a 13 x 9-inch cake pan with parchment paper, and grease the paper and sides of pan.
Cut peeled carrots into 1 1/2 inch pieces. Place in pot and cover with water. Bring to a boil, turn down heat and cook carrots until tender, about 10 minutes. Drain and cool carrots. Once carrots have cooled slightly, place them in a food processor and with quick pulses (about 17 pulses), finely mince the carrots scraping down the sides of the bowl now and then.
Sift the flour, baking soda, cinnamon, and salt into a large bowl. Add the granulated sugar and stir to combine. Add the oil, eggs, and vanilla, mixing well. Fold in the carrots, coconut and pineapple.
Pour batter into prepared pan. Place it on the middle rack of the oven and bake until the edges have pulled away slightly from the sides of the pan and a toothpick inserted in the center comes out clean, about 35 minutes. If it needs more time, bake a little longer, checking every few minutes to ensure it does not over bake.
Transfer cake pan to a cooling rack. Let cool completely. At this point, you may cover the pan tightly and refrigerate the cake until you are ready to frost it. When the cake is completely cool, transfer to a cake platter. I find it easiest to line a cutting board or other flat tray with aluminum foil, place over the cake pan, invert the cake on to the foil and discard the parchment paper. I then place my cake platter over the bottom of the cake, and invert right side up. Do this right away as the cake has a tendency to stick to the foil. Now you’re ready to frost the cake.
Cream Cheese Frosting:
Cream the cream cheese and butter together in a mixing bowl with an electric mixer. Do not over beat. Slowly sift in the confectioners’ sugar, and continue beating until frosting is smooth. Stir in the vanilla and a teaspoon of the lemon juice at a time. Adjust consistency by adding more powdered sugar or lemon juice. The frosting should not be runny or it will not set properly. Frost top and sides of carrot cake. Sprinkle toasted pecans over the frosting if using. If you are not serving the cake right away, cover and refrigerate until ready to serve.
I’ve been searching for a “perfect scone.” After trying numerous recipes, I’ve concluded that there is no single “perfect scone.” There are a number of them! I discovered this delicious recipe on Nicole’s blog, Pinch My Salt. She has come up with a streamlined recipe for these little treats. Freshly baked scones in under 30 minutes? With that thought in mind, I’ll be making them very often.
Dried cranberries, sweet and tart, are perfect in this recipe. Sometimes I swap out the cranberries for dried, tart cherries.
The dough is quite sticky so be sure to flour the countertop and your hands. Handle the dough as little as possible for tender scones.
Cranberry Scones
Adapted from Nicole’s recipe
Makes 10 – 12 medium scones
Ingredients
2 cups all-purpose flour
2 teaspoons baking powder
1/4 teaspoon kosher salt (1/2 teaspoon if using unsalted butter)
1/3 cup sugar
1 large egg
scant 1/2 cup half and half (I used Organic Valley lactose free half and half)
zest of 1 orange, divided
1/2 cup Earth Balance Buttery Sticks or unsalted butter (cut into small pieces and well chilled)
1/2 cup dried cranberries, roughly chopped
Glaze
1 cup sifted powdered sugar
2 tablespoons orange juice
1/2 teaspoon orange zest (reserved from above)
Preparation
Preheat oven to 425°. Line a baking sheet with parchment paper.
In a large bowl, whisk together the flour, baking powder, salt , and sugar.
In a separate small bowl, whisk together egg, half and half, and most of the orange zest (reserving 1/2 teaspoon for glaze). Set aside.
Using a pastry blender, cut butter into flour mixture until it resembles course crumbs. Alternatively, you may use two butter knives or rub cold butter pieces into the flour with your fingertips. Stir in the chopped cranberries.
Add egg mixture to the flour mixture all at once and stir until the mixture clumps together. Dump mixture onto a floured countertop and, with floured hands, gather into a ball and knead once or twice to combine everything. The dough will be quite sticky. Sprinkle a little extra flour on the counter and on top of the dough to keep it from sticking (not too much or the dough will be dry). Pat dough into a circle about 3/4 – 1 inch thick. Cut 10 – 12 circles using a 2 1/2 – 3 inch biscuit cutter. Arrange scones on the parchment lined baking sheet.
Bake for 12 – 13 minutes or until lightly browned. Remove to a cooling rack and let cool completely.
While scones are cooling, make the glaze. Combine sifted powdered sugar with 2 tablespoons orange juice and the reserved orange zest. Whisk until smooth, adding more orange juice or powdered sugar to reach the desired consistency. Glaze scones using a small silicone pastry brush or dip scones directly into the glaze.
The scones freeze beautifully so go ahead and make a double batch.
Tartine Book No. 3 is devoted primarily to rustic naturally leavened whole grain bread. It is one of John’s two “bread bibles.” However, tucked away in the back of the book are a few delightful dessert recipes including these unusual “Salted Chocolate Rye Cookies.” Rye as a dessert flour doesn’t immediately come to mind, but we were intrigued. There’s just three words that best describes these cookies. To die for. With a pound of chocolate, this recipe produces rich, fudge brownie-like cookies. To top it off, a sprinkling of flaky sea salt? A perfect combination.
The recipe calls for Muscovado sugar which I found at Mana Foods. Muscovado sugar is unrefined which gives this sugar a rich, molasses flavor. Brown sugar is refined sugar with molasses added to it. In a pinch, you could substitute brown sugar in the recipe however reading other comments about Muscovado sugar, well it seems its superior flavor makes it a bakers dream come true. So go ahead and seek it out. It’s readily available on-line.
57g (4 tablespoons) unsalted butter (I used Earth Balance Buttery Sticks, lactose free and reduced the salt to 1/4 teaspoon)
85g (3/4 cup) whole-grain dark rye flour
1 teaspoon baking powder
1/2 teaspoon salt
200g eggs (4 large) at room temperature
340g (2 cups very tightly packed) Muscovado sugar
1 tablespoon vanilla extract
good quality sea salt such as Maldon or flaky fleur de sel, for topping
Preparation
Note: I strongly recommend weighing your ingredients for this particular recipe for the best results. The book has an apparent error in the sugar amount. The gram measurement in the book is correct, however, the cup measurement is incorrect. It should be 2 very tightly packed cups to more or less equal the gram measurement.
Place a saucepan filled with 1 inch of water over medium heat and bring to a simmer. Set a heatproof bowl over simmering water (make sure the bottom of the bowl is not touching the water). Melt together the chocolate and butter, stirring occasionally. Remove bowl from heat and let cool slightly.
In a small bowl, whisk together the flour, baking powder, and salt and set aside.
Place the eggs in a bowl of a stand mixer fitted with the whisk attachment. Whip on medium high-speed, adding the sugar a bit at a time. Turn the mixer to high and whip until the egg mixture has nearly tripled in volume, about 6 minutes.
Reduce the mixer speed to low and add the melted chocolate butter mixture and the vanilla. Mix to combine, scraping down the sides of the bowl as needed, then mix in the flour mixture just until combined. At this point the dough will be very soft which is normal. It will firm up as it chills.
Refrigerate the dough in the mixing bowl until it is just firm to the touch, about 30 minutes (the longer you chill the dough, the harder it is to scoop).
Preheat oven to 350°F and line two baking sheets with parchment paper. Remove the dough from the refrigerator and scoop with a rounded tablespoon onto the baking sheets, spacing the balls of dough about 1 1/2 inches apart. Top each mound of dough with a few flakes of sea salt, pressing gently so it adheres. Bake for 8 – 10 minutes until the cookies have completely puffed up and have a smooth bottom and rounded top.
Remove the baking sheets from the oven and let cool slightly, then transfer to a wire rack and let cook completely. The cookies will keep up to 3 days in an airtight container. They can also be frozen for longer storage.
 These popsicles are so easy to make I can’t believe I never thought of making them before. It all began a few months ago when my sister in-law, Paula, brought over a refreshing mango popsicle she had made. From that day on I was determined to make my own.
 There’s a plethora of popsicle recipes out there in internet land. It seems you can pretty much use any type of fruit whether it be fresh or frozen. From there, you can keep it simple and add nothing more, or you might add cream, milk, nuts, coconut milk, or yogurt which I did in this case. They are very easy to make and homemade popsicles taste so good.
 Cream of coconut is normally found in the liquor section of the market where the drink mixers are sold.
 I bought this popsicle maker from Amazon the moment Paula came over with her mango popsicle. It’s just $12.99 and with Amazon Prime you get free shipping. It’s easy to use and makes 10 refreshing popsicles at a time. If you don’t have a popsicle maker, I urge you to get one right away! Popsicles are great all year round.
 Leave a little space at the top for expansion otherwise it will be difficult to remove the top of the ice pop maker once they are frozen. I didn’t do that the first time around but with a little nudging I was able to remove it without disturbing my precious pops.