Archives

Beef, Dinner, Lactose Free, Recipes, Sauces, Vegan, Vegetarian

Béarnaise Butter

September 1, 2023

A good sauce will elevate that most decadent cut of beef, the filet mignon. And especially béarnaise sauce, one of the fundamental sauces of French cuisine. It can transform any dish into one that is truly extraordinary. The piquant flavor of the reduced wine, butter, eggs, and fresh tarragon whisked into a silky sauce is divine. But we don’t always have time to whip up béarnaise sauce so that’s where béarnaise butter comes in. It can be made well in advance and stored in the refrigerator for a month or in the freezer for several months.

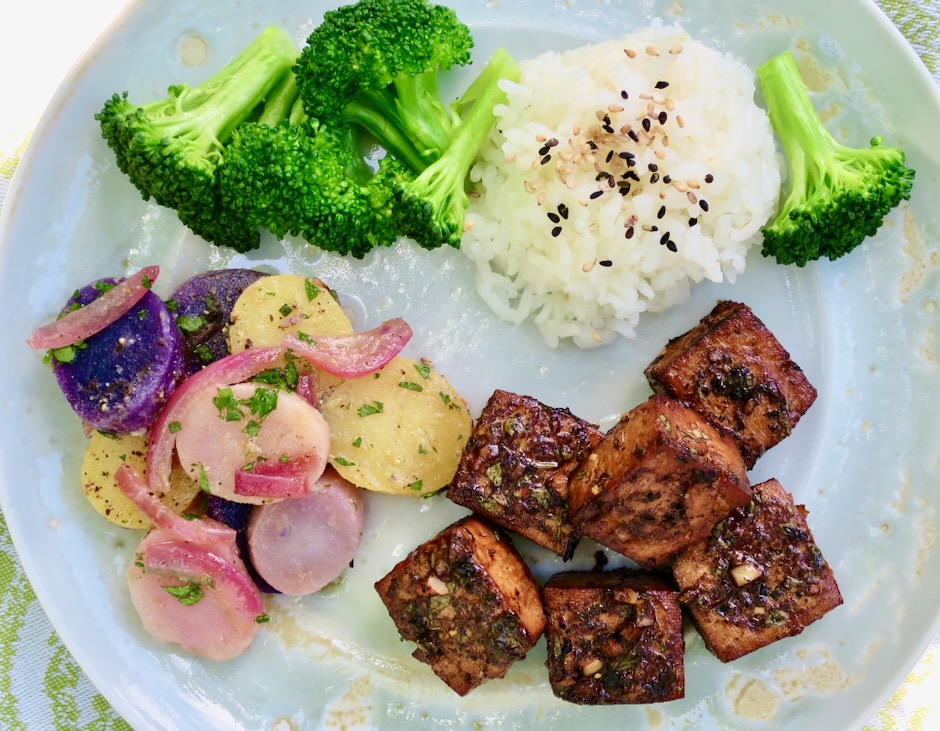
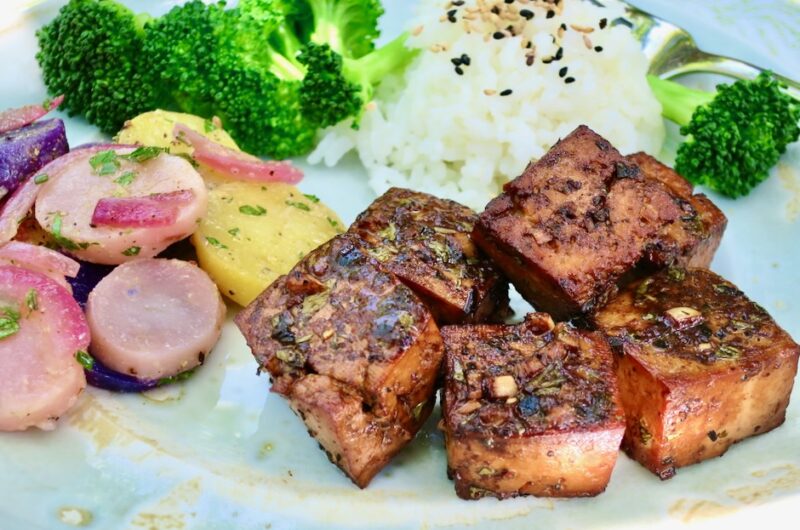
A perfectly cooked steak right off the grill with a generous pat of béarnaise butter is the epitome of steak perfection.

Known as “the King of Herbs” in France, tarragon is highly aromatic and essential in béarnaise sauce and this butter. It lends itself well to many dishes such as potatoes, chicken, omelettes, pasta and just about anything you use it with.

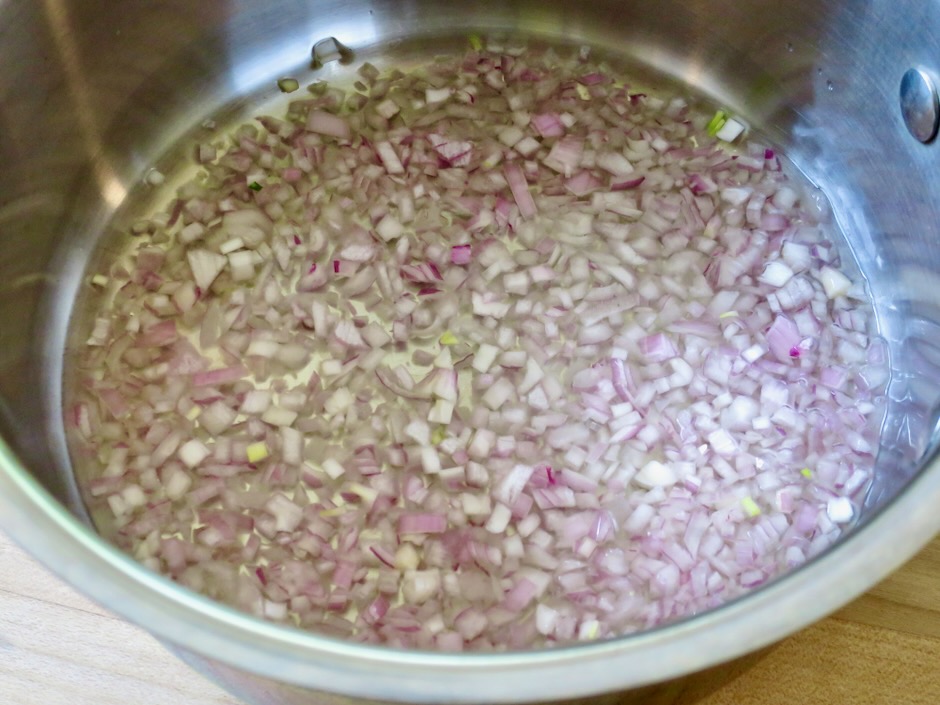
It doesn’t take but 5 minutes or so for the liquid to evaporate from the pan of shallots. You will then be left with the most flavorful shallots imaginable.

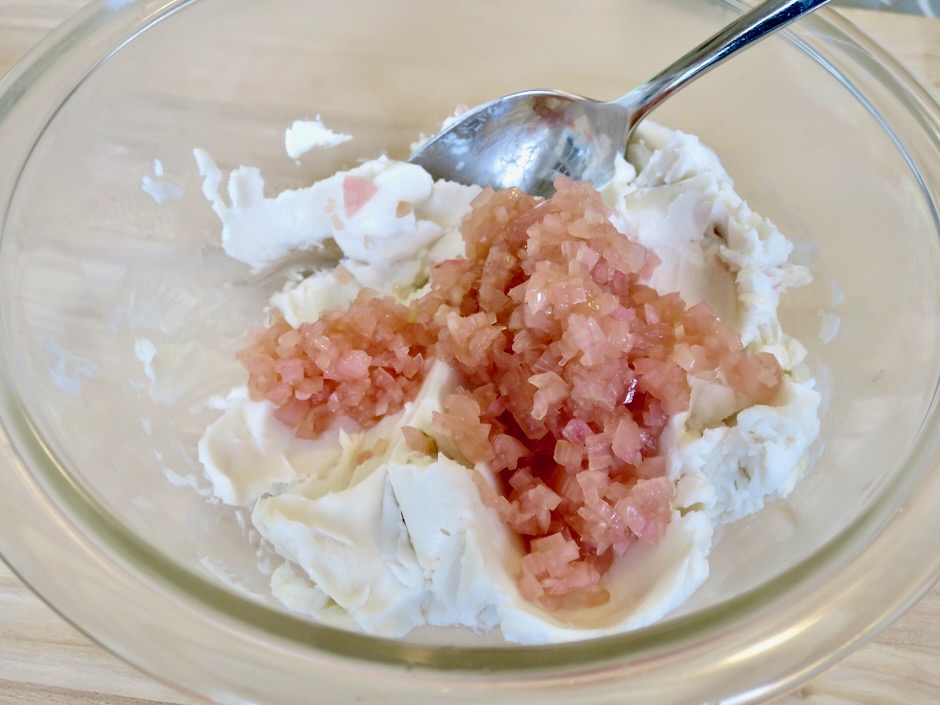
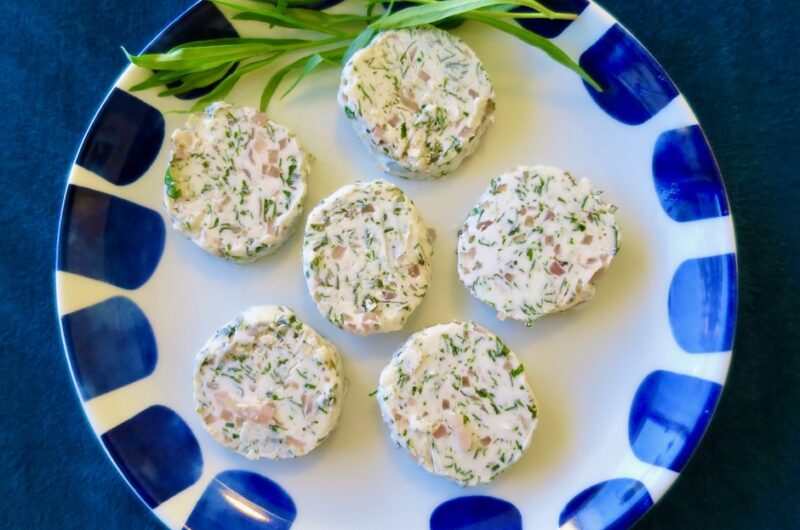
Once the shallots have cooled, they are mixed with the softened butter along with the minced tarragon, parsley, salt and pepper. The butter is transferred to a piece of plastic wrap and shaped into a tube then chilled in the freezer until slightly firm (it will be quite soft). Once it firms up a bit you will be able to re-shape the tube into a perfect circular log and re-wrap until ready to use.

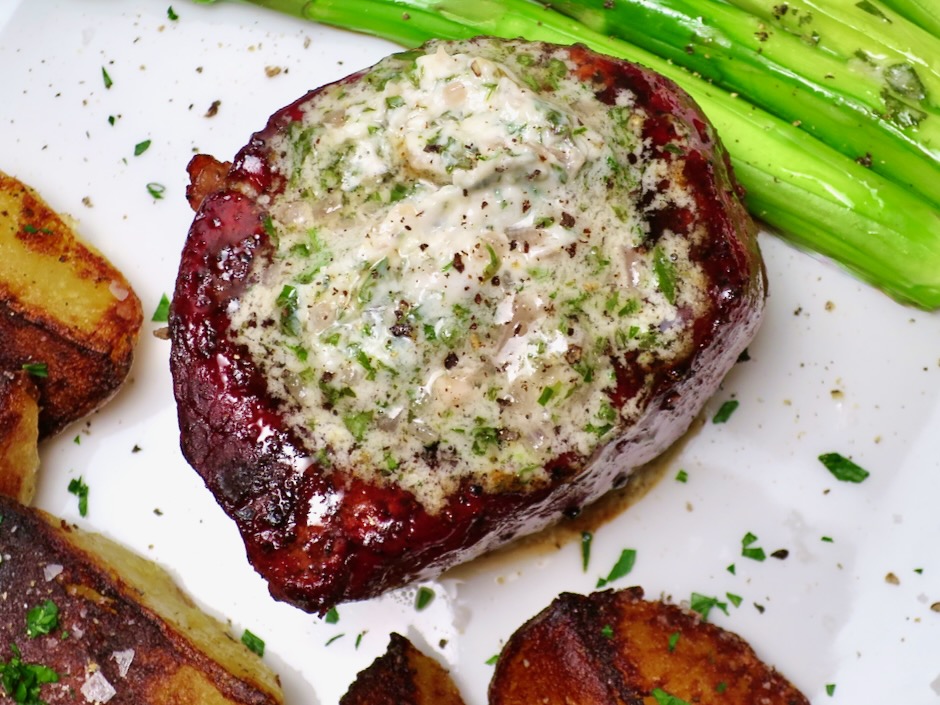
Lightly smoked then grilled filet mignon with béarnaise butter is surely one of the grandest meals imaginable.

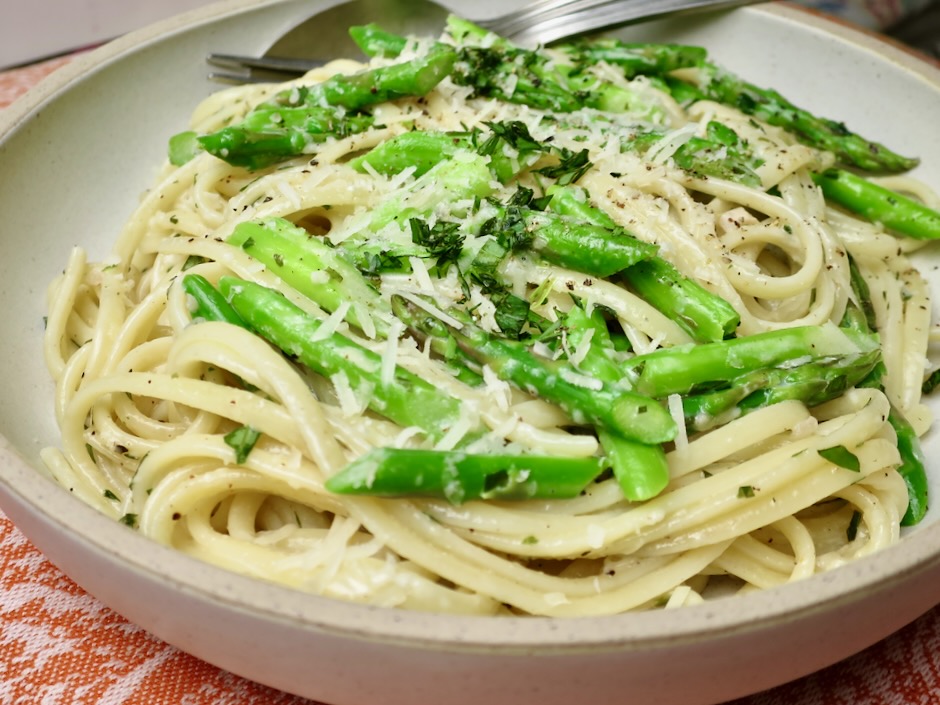
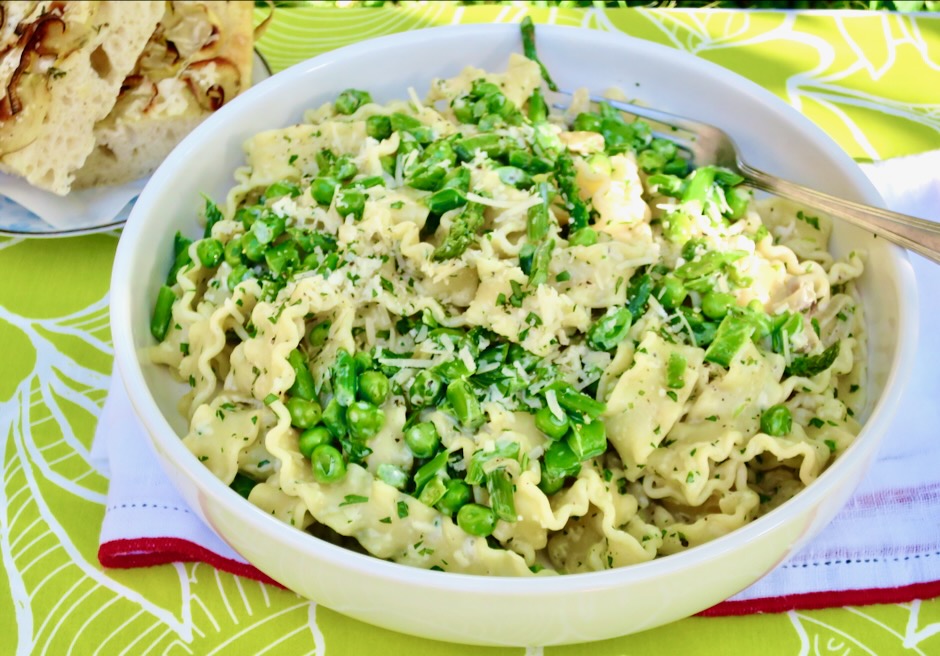
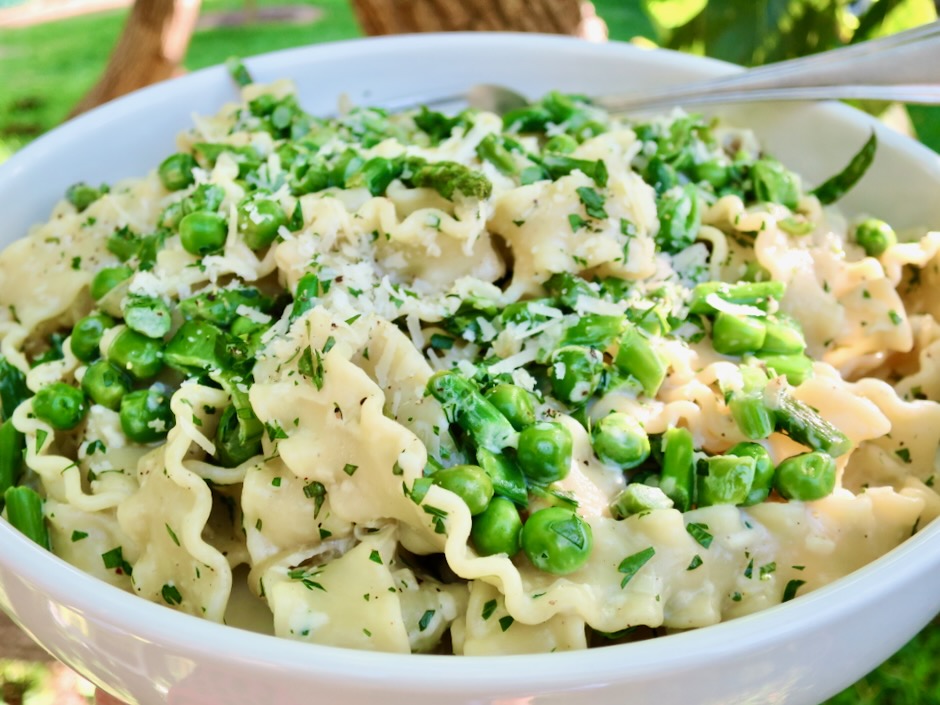
Leftover béarnaise butter is delicious tossed with long strands of linguine and asparagus. Use leftover béarnaise butter on sautéed vegetables, steamed green peas, on baked fish or chicken. Swirl some béarnaise butter in a pan before pouring in lightly beaten eggs then serve on toast.

Béarnaise Butter

Recipe by Kiyo
Servings

8-10

servings

Adapted from Food & Wine magazine

Ingredients

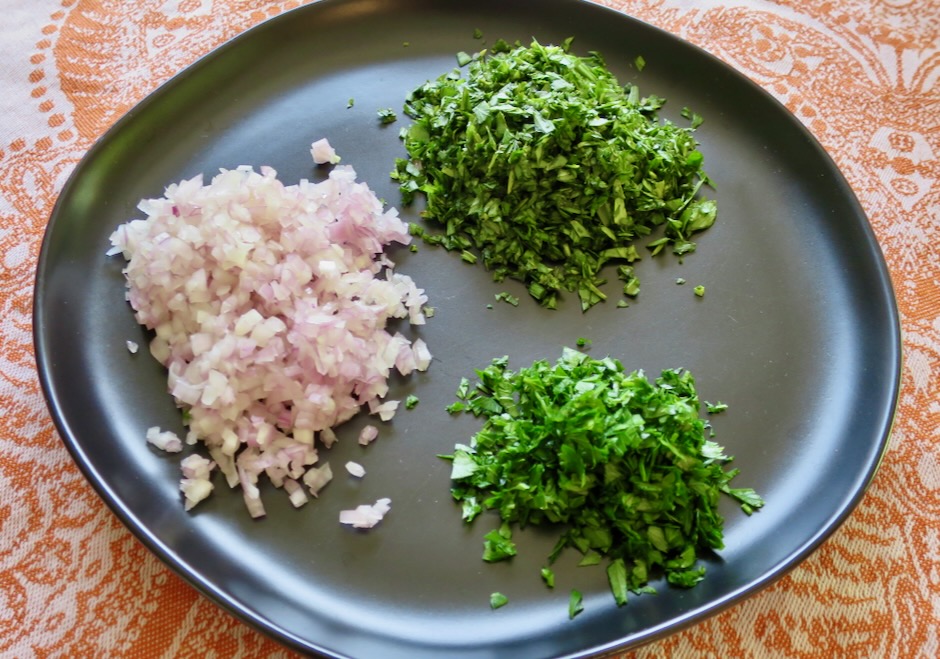
  • 1/4 cup finely minced shallots

  • 1/4 cup dry white wine

  • 1 1/2 tablespoons white wine vinegar

  • 6 ounces (170g) Miyoko’s hint of salt vegan butter or regular butter
    (1 1/2 sticks), at room temperature

  • 1/4 cup minced tarragon

  • 1 tablespoon minced flat leaf parsley

  • kosher salt and freshly ground black pepper

Directions

  • In a medium saucepan, combine shallots with wine and vinegar. Cook over moderate heat until all of the liquid has evaporated, about 5 minutes. Transfer shallots to a small bowl to cool to room temperature. You can speed up the cooling process by placing shallots in the refrigerator.
  • Scrape shallots into bowl with butter. Beat together with a handheld mixer until creamy. Fold in herbs and season to taste with salt and pepper. Transfer butter to a piece of plastic wrap and shape into a log. The butter will be soft at this point so don’t worry too much about getting the perfect shape. Transfer to the freezer for 10 minutes then re-shape as needed. Wrap a piece of foil around the plastic wrapped butter. Store in the refrigerator for up to 1 month or freezer for up to 3 months.

Notes

  • Remove butter from the refrigerator 30 minutes before serving. The butter will be easier to slice into neat rounds and will melt perfectly over the steak.
Bread, Breakfast, Lactose Free, Recipes, Summertime Meal

Fresh Corn Muffins

August 22, 2023

Corn is in peak season now and the markets are stocked with beautiful fresh ears of corn. I don’t always have a plan for what I’m going to do with the corn I buy but I make sure to use it within a day to ensure it is fresh and sweet. Here is a great recipe to make when you have fresh corn on hand and aren’t quite sure how you want to use it. I adapted this recipe from Cook’s Country magazine to make a lactose-free version. Feel free to use standard dairy ingredients when you make these.

You can whip up a cardamom-brown sugar butter that pairs well with the fresh corn flavor of these muffins. The sweet and salty butter with a hint of cardamom takes these muffins over the top.

Bob’s Red Mill is known for quality products and their cornmeal is no exception. The medium grain cornmeal is just the right texture for these muffins.

Beautiful cornmeal such as Bob’s Red Mill can be found at Safeway on Maui.

Hydrating a portion of the cornmeal with milk in the microwave before adding it to the rest of the ingredients produces a muffin with a tender crumb and a boost of fresh corn flavor.

You might think there is too much batter for 12 muffin cups. I read a few comments from others who made 16-24 muffins. If you have a muffin pan that has a smaller than usual cup capacity, you may need to bake more than 12 muffins. However, for this recipe I found the batter to be perfect for my 12-cup muffin pan. The batter should fill the entire cup and even be a bit higher than level.

Beautifully high domed muffins show off the fresh corn beneath. One of my favorite ways to eat these corn muffins is to split them, toast them until the edges are browned and crispy, then serve with a pat of butter and homemade jam.

Fresh Corn Muffins

Recipe by Kiyo
Servings

12

servings

If you don’t have a scale use the spoon and level method for measuring dry ingredients. Recipe adapted from Cook’s Country magazine.

Ingredients

  • 1 1/2 cups (190g, 6.8 oz.) all-purpose flour

  • 1 1/2 cups medium grain cornmeal, divided (1 cup=140g, 5 oz.,
    1/2 cup=70g, 2.5 oz.)

  • 3/4 cup (150g, 5.3 oz.) granulated sugar

  • 1 teaspoon fine sea salt (if using unsalted butter increase to 1 1/4 teaspoons)

  • 1 1/2 teaspoons baking powder

  • 1 teaspoon baking soda

  • 1 cup (227g, 8 oz.) lactose free whole milk or regular whole milk

  • 1/2 cup (113g, 4 oz.) lactose free or regular sour cream

  • 1/2 cup (1 stick, 113g, 4 oz.) Earth Balance Buttery Sticks or unsalted butter (see adjustment for salt if using unsalted butter)

  • 2 large eggs

  • 2 cups (304g, 10.7 oz.) fresh corn kernels, about 2 large ears of corn

  • Cardamom Butter
  • Mash together until well combined: 1 stick Earth Balance Buttery Sticks or unsalted butter (softened), 1/8 cup + 1 tablespoon packed light brown sugar, 1/2 teaspoon ground cardamom (add 1/4 teaspoon fine sea salt if using unsalted butter).

Directions

  • Adjust oven rack to middle position and heat oven to 400 degrees. Generously spray 12-cup muffin tin, including top, with vegetable oil spray.
  • Whisk flour, 1 cup cornmeal, sugar, salt, baking powder, and baking soda together in a large bowl; set aside.
  • Whisk milk and remaining 1/2 cup cornmeal together in a medium bowl. Microwave until mixture begins to thicken to a paste-like consistency, about 1 1/2 minutes, whisking every 30 seconds to combine. Whisk sour cream and melted butter into cornmeal paste. Whisk in eggs. Stir cornmeal mixture and corn kernels into flour mixture until just combined.
  • Divide batter equally among prepared muffin cups; evenly distribute any remaining batter among cups (cups will be full or slightly over the top level).
  • Bake until muffins are golden brown and a toothpick inserted in the center comes out with just a few crumbs attached, 20 – 24 minutes. Let muffins cool in pan on wire rack for 5 minutes. Gently remove muffins and let cool on wire rack for 15 minutes. Serve warm with cardamom butter or split muffins and toast in toaster oven until edges are browned and crispy.

Notes

  • Muffins can be frozen for 1 month.
Cakes, Dessert, Lactose Free, Recipes

Coconut and Cardamom Cake

August 14, 2023

The irresistible flavor of toasted coconut is not only delicious but makes a beautiful topping on this cardamom scented cake. A simple yellow cake that pairs well with the rich, buttery frosting (yes you should lick the bowl) checks all the dessert boxes. I can’t imagine a better cake.

It takes just 5-7 minutes to toast shredded coconut. This step is important as it intensifies the coconut flavor and adds a little crunch and color to the cake. Make a little extra to snack on while you are frosting the cake.

The frosting consists of powdered sugar, butter, a bit of half and half or cream, coconut extract, a dash of salt and toasted coconut.

Most of the cake ingredients will be in your pantry. I made a quick trip to the market to purchase coconut extract and cardamom.

Dollop spoonfuls of the frosting over the top of the cake then using an offset cake spatula smooth over the sides.

It can be a little tricky applying the coconut to the sides of the cake. Just do your best to gently pat small handfuls on the sides then tidy up later.

This is a gorgeous coconut cake that can be served alone or with a small scoop of vanilla ice cream. The flavor of the cake with that hint of cardamom and coconut is intoxicating.

Coconut and Cardamom Cake

Recipe by Kiyo
Servings

10

servings

Adapted from Bon Appetit magazine

Ingredients

  • Cake
  • 1/2 cup (1 stick, 113g) Earth Balance Buttery Sticks or unsalted butter, room temperature, plus more for the pan

  • 1 1/3 cups (167g) all-purpose flour

  • 1 1/4 teaspoons baking powder

  • 3/4 teaspoon Diamond Crystal or 1/4 + 1/8 teaspoon Morton kosher salt if using Earth Balance Buttery Sticks (increase to 1 teaspoon Diamond Crystal or 1/2 teaspoon Morton if using unsalted butter)

  • 1/2 teaspoon ground cardamom

  • 1 cup (200g) granulated sugar

  • 2 large eggs

  • 2 tablespoons vegetable or canola oil

  • 1 teaspoon vanilla extract

  • 1/2 teaspoon coconut extract

  • 1/2 cup lactose free or regular whole milk

  • Frosting
  • 1 cup (85g) sweetened shredded coconut

  • 1/2 cup (113g) Miyoko’s Hint of Salt vegan butter or unsalted butter, room temperature

  • 2 cups (220g) powdered sugar

  • 1/2 scant teaspoon Diamond Crystal or 1/4 + 1/8 teaspoon Morton kosher salt if using Miyoko’s vegan butter (increase to 3/4 teaspoon Diamond Crystal or 1/2 teaspoon Morton kosher salt if using unsalted butter)

  • 1/4 teaspoon coconut extract

  • 1/4 cup lactose free half and half or regular heavy cream or half and half

Directions

  • Cake
  • Place a rack in middle of oven and preheat to 325 degrees. Butter an 8″ round cake pan and line the bottom with a parchment paper round.
  • Whisk flour, baking powder, salt, and cardamom in a medium bowl to combine.
  • Beat granulated sugar and 1/2 cup Buttery Sticks or unsalted butter in a large bowl using a hand mixer on medium speed until light and fluffy, about 3 minutes. You may also use a stand mixer (medium speed) with a paddle attachment. Add eggs one at a time, beating until incorporated after each addition. Add oil, vanilla extract, and coconut extract beating until combined. Reduce speed to low and gradually pour in milk; beat until incorporated. Scrape down sides of bowl and mix to combine. Add dry ingredients and gently fold in with spatula just until no dry spots remain.
  • Scrape batter into prepared pan, smooth surface. Bake cake until a tester inserted in the center comes out clean, about 45 minutes. Transfer pan to a wire rack and let cake cool for 1 hour then invert onto a small cooling rack. Remove parchment paper then invert cake onto another cooling rack so it is right side up. Allow to cool completely before frosting (1 more hour or so).
  • Frosting and assembly
  • While the cake is cooling, heat a medium skillet (9-inch works well) over medium-low heat. Toast shredded coconut, stirring often, until mostly golden brown, 5-7 minutes. Immediately transfer to a shallow bowl and let cool (coconut will continue to darken slightly as it cools).
  • Using a hand mixer on medium speed, beat Miyoko’s vegan butter or unsalted butter in a medium bowl until light and fluffy, about 3 minutes. Add powdered sugar in 2 additions, beating until combined after each addition. Add salt and coconut extract and beat until incorporated. Reduce speed to medium-low and beat, scraping down sides of bowl as needed, until mixture is very light and fluffy, about 5 minutes. Add half and half or cream and beat until frosting is smooth. Frosting should be thick but spreadable; if it’s too thick beat in more cream 1 tablespoon at a time.
  • Transfer cake to a serving platter. Using an offset spatula, spread frosting evenly over top and sides of cake. Sprinkle shredded coconut over top and sides, pressing gently to adhere. You may chill the cake (covered) for 15 minutes before serving. This will allow the frosting to set up a bit (especially for those of us who live in a warmer climate).

Notes

  • The cake can be baked 1 day in advance of serving. Store in a plastic cake container or cover with plastic wrap once the frosting has set. Remove from the refrigerator 1 hour prior to serving. The cake can also be frozen for up to 1 month. Defrost overnight in the refrigerator before serving.
Message

Maui Wildfire Support Relief

August 11, 2023

As of this morning, Maui fire crews continue to battle three large wildfires. The largest wildfire has devastated Maui’s historic town of Lahaina leaving many of our residents without homes. Many people are still unaccounted for. If you would like to support Maui’s residents please consider donating to one of the charities listed in the Maui Now article below. Mahalo for any support you are able to extend to those affected by the wildfires.

From Maui Now: https://mauinow.com/2023/08/09/in-person-or-online-how-you-can-support-maui-wildfire-relief/

Dinner, Italian, Pasta, Recipes, Summertime Meal, Vegetarian, Veggies

Pasta Primavera with Asparagus & Peas

August 1, 2023

With its beautiful bright green colors and aromatic tarragon, this pasta primavera earned 5* ratings on NYT Cooking site. After making this dish I can see why everyone loves it. It’s loaded with fresh asparagus, snap peas and green peas. Fresh tarragon is what makes this dish special.

The pasta I used (Mafaldine) is wide and flat with ruffled edges. It has a striking appearance when cooked and works well with many pasta dishes. The original recipes calls for fettuccine or tagliatelle which are much easier to find. If you want to try malfadine, you can find it at Amazon. Fresh tarragon can be found at Whole Foods.

Pasta Primavera (Spring in Italian) is a dish that combines lightly cooked vegetables with fresh herbs. Now that spring has passed and summer is here, it’s still a perfect time to find fresh asparagus at the markets. Sugar snap peas seem to be available year round as well as peas (frozen). I bought a well known brand of frozen peas that were chalky and had no flavor. I searched online for reviews of peas and found multiple top ratings for Woodstock Organic Peas. They are sweet and have a nice texture. So these are the only peas I buy now. You can find Woodstock Organic Peas at Hawaiian Moons on Maui.

Serve your pasta primavera with focaccia or good sourdough bread and you have the perfect summer meal.

Pasta Primavera with Asparagus & Peas

Recipe by Kiyo
Servings

4

servings

Adapted from NYT Cooking

Ingredients

  • 1/4 pound sugar snap peas, stems trimmed

  • 1/2 pound asparagus, woody ends trimmed

  • 2 tablespoons Earth Balance Buttery Sticks or unsalted butter

  • 3/4 cup frozen peas, defrosted

  • 1/4 cup thinly sliced shallot

  • 2 garlic cloves, finely chopped

  • kosher salt

  • freshly ground black pepper

  • 10 ounces mafaldine, fettuccine, or tagliatelle

  • 2/3 cup finely grated Parmigiano Reggiano + more for serving

  • 1/2 cup warm half and half (I used Organic Valley Lactose Free)

  • 3 tablespoons finely chopped flat leaf parsley

  • 1 tablespoon finely chopped tarragon

Directions

  • Bring a large pot of salted water to a boil.
  • While the water is coming to a boil, slice snap peas and asparagus spears into 1/3-inch wide pieces; leave asparagus tips whole.
  • Melt Buttery Sticks or unsalted butter over medium-high heat. Add snap peas, asparagus, and shallots. Cook until vegetables are barely tender (not soft or mushy), about 3 minutes. Stir in peas and garlic and cook 1 minute more. Season with salt and pepper. Transfer to a large bowl and set aside.
  • Cook pasta until al dente. Drain pasta and transfer to the bowl with vegetables. Immediately toss pasta with vegetables, Parmigiano Reggiano, half and half, and herbs. Season generously with salt and pepper to taste. Grate extra cheese over the top before serving.
Dinner, Lactose Free, Recipes, Sandwiches, Tofu, Vegetarian

Balsamic-Soy Marinated Tofu

July 20, 2023

Tofu can be controversial in some American kitchens. Not in mine! I saw a photo of this glorious tofu in Bon Appétit magazine and couldn’t pass it up. Writer and editor Ali Francis had this tofu in a sandwich she bought at a bakery and was immediately smitten with it. She contacted the bakery and asked for the recipe. Though she didn’t receive an actual recipe with exact measurements, they supplied her with an ingredients list which was enough to devise a very close rendition of the tofu dish she had fallen in love with.

The plan is a simple one. Grab a few ingredients, place in a Ziploc freezer bag, marinate, bake, eat.

My reliable Tofuxpress has never let me down after using it for more than 13+ years. There are many other versions that do the same job of pressing out the water. If you love tofu as I do, it’s an essential gadget to have on hand.

I used cubed tofu but you could also slice the tofu into slabs for sandwiches. Fresh cilantro can be switched out with parsley or dried herbs.

The tofu has been marinating for 16 hours and is ready to be baked.

The leftover tofu marinade is reduced and brushed over the tofu as it bakes.

Now that is some good-looking tofu. If you chose to bake tofu slabs instead of cubes, you can use them in a sandwich. Slather sriracha mayonnaise on a soft baguette, top with balsamic tofu, crispy lettuce, sliced cucumbers and cilantro sprigs.

Balsamic-Soy Marinated Tofu

Recipe by Kiyo
Servings

2-3

servings

Recipe adapted from Bon Appétit magazine

Ingredients

  • 3/4 cup balsamic dressing or equal parts balsamic vinegar and olive oil

  • 3 tablespoons soy sauce

  • 2 large garlic cloves, minced

  • 1 tablespoon chopped herbs such as cilantro, flat leaf parsley, or a teaspoon of dried Italian herbs

  • 2 teaspoons maple syrup (optional but recommended)

  • 14 ounce extra firm tofu, water pressed out, cubed or cut into slabs for sandwiches

Directions

  • Whisk balsamic dressing, soy sauce, minced garlic, chopped herbs, and maple syrup in a 2 cup measuring cup. Pour marinade into a Ziploc freezer bag. Place tofu cubes or slabs in marinade and turn to coat. Place bag in the refrigerator for 12-24 hours, turning once or twice. I marinated the tofu from 7pm – 11am the following day (16 hours) so that it would be ready for lunch at noon.
  • Preheat toaster oven or standard oven to 375 degrees. Line a small baking sheet with foil and place a piece of parchment paper over the foil (for easy clean up). Transfer tofu cubes or slabs to baking sheet. Pour any leftover dressing from the marinated tofu into a small sauce pan (skim off some of the oil and discard). Gently simmer leftover marinade on very low heat until it reduces and thickens slightly, about 5-7 minutes. (It should not be bubbling vigorously or it will burn).
  • Bake tofu cubes or slabs for 45-50 minutes or until deeply golden brown, turning once, and basting occasionally with the reduced marinade. Serve with rice, steamed broccoli or your favorite salad or sandwiched between a soft baguette topped with crunchy iceberg lettuce and cucumbers.
Follow

Get every new post delivered to your Inbox

Join other followers: